


MidiMatt
-
Posts
8 -
Joined
-
Last visited
MidiMatt's Achievements
")


-
Thanks Brad good idea makes certainly sense. However I did it actually that way as I used the MIDI DIN out already for connect to PC. My aim was not having to change connectors when using PX-560 with PC or iPad. So it is now working, but sure audio filters are never nice to use when there is another way to workaround
-
One more addition for your pedal experimenting, there are three means I used while experimenting to check proper working, config and midi range values of the pedals: A MIDI-OX tool on Windows PC (while USB MIDI connecting) B Midi Wrench in iPad / IOS (while USB MIDI connecting) C There is also test menu in Service Menu mode (if you know how to access, can't share that here how to access for obvious reasons)
-
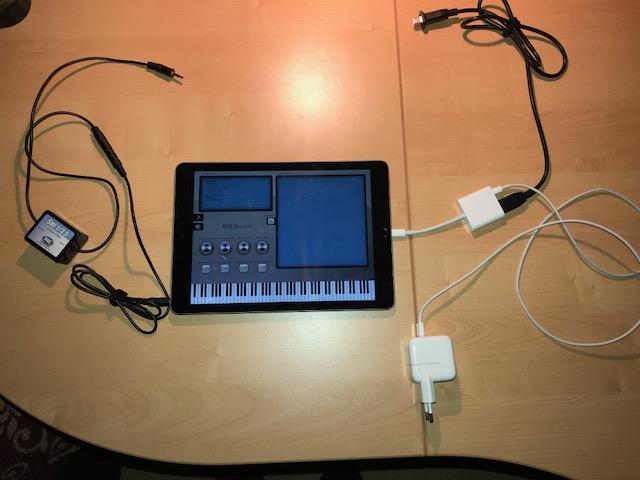
I'm using some Audio SW and Music learning apps on an iPad together with PX-560 and wanted to share my experience to get that working, I think might be interesting as not everything was working smoothly from the beginning. In general I wanted to allow MIDI out from PX-560 via USB Midi to iPad and wanted to connect outgoing audio to PX-560 "AUDIO IN" connector while using "AUDIO VOLUME" knob at the back to adjust level. Here a picture of the final setup: On the top left you see the audio connector for AUDIO IN of PX-560 and right top there is the USB for USB MIDI port of PX-560. I use iPad air 2 (with lightning connector) still with IOS 11 here, obviously in the middle :-). And on the left you see an audio filter, and on the right the apple adapter plus power supply. In the beginning I also read some other forums and basically it was suggest to use some apple photo adapter or camera kit in different versions. I could luckily borrow two versions of this older stuff to try it out, but it was in my setup not working or working instable. Furthermore a huge problem is that you cannot attach USB and power supply for recharging in parallel so you will run quickly out of power. Then I found a relativerly new adapter which is sometimes called Apple Lightning to USB3.0, the apple model number is A1619. This one was working fine and has the possibility to connect power supply and USB same time. Only the apple pricing is really nasty, it is around 40-50 USD/EUR. 😞 I was really happy when I had it working properly but then I connected audio and had really bad noise in the audio. After further investigation this is caused by some ground loop problem as the ipad is connected to PX-560 ground wise to USB AND AUDIO IN (or Line IN if you like to use that). One could turn up iPad volume to max and regulate with audio volume knob on PX-560 audio down, you can then work with it, but it was still a bit there. I tried then a audio ground loop isolator in the audio connection here a PAC SNI-1/3.5 for about 15 USD/EUR. Then it was luckily fine and the audio noise was gone. I think if it is just for hearing the sound and not any recording all kind of these filters are fine. But you have to be aware that there is always a small influence on audio spectrum. So the one I picked was tested by some people an Amazon which claimed it will harm the audio spectrum as less as possible. So I like it and I'm not able to hear a significant influence in the audio. As MIDI testing tool to get everything running in the beginning or later to also find out about Midi traffic going out of PX-560 you could use the "MIDI Wrench" app which I really like. If you connect to a PC for MIDI testing I can recommend MIDI-OX. I hope this is somehow helpful and will save others from a lot of experimenting and spending money on useless overpriced apple adapters. I would be keen to hear of your experience with that topic. Furthermore any opinions about the audio noise/ground loop are welcome, is it a Casio or apple issue or both ? Did anyone come across that ? Is it present with different tablets or adapters ?
-
Hi Jeff, I'm not fully sure if I understand what exactly your setup is. But I would assume you have connected PX-560 Midi USB via some adapter to iPad and then feeding back the audio out of the iPad into Line In of PX-560. You should have three volume regulation possibilities which you could assign to the three knobs of PX-560 via Menu->Controller-Knob1..3, maybe do all three then you can try it out while watching the three knob values in Main screen on the bottom: Knob 1 - CC7 - Volume, if your SW on ipad supports that kind of Midi control the audio generation in the SW should be controlled in volume by that Knob 2 - Keyboard Volume allows you to control the overall output of PX-560 sound generation (alternatively you could use Menu-Midi-Local Control off to completely mute) Knob 3 - Line In Volume will control (if you have your iPad fed back to PX-560) the volume of incoming iPad sound Hope that helps...
-
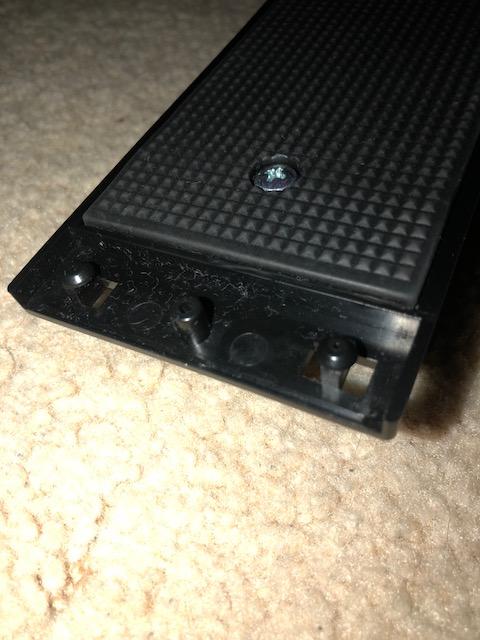
Thanks Brad, thats interesting... but I just bought the PX-560 😉 I have one more other question to all regarding the CASIO SP-20 pedal. Because there is one thing I really dont like about it. If you use on carpet or soft underground it will always sinks in a bit on front and move a bit due to an area which is not filled with the rubber part: It looks like you can attach something to (a leading cylinder in the middle and two mechanical plug in connectors ???). Is there something available , or something to put several SP-20 mechnically together. Anybody an idea why it is designed that way ?
-
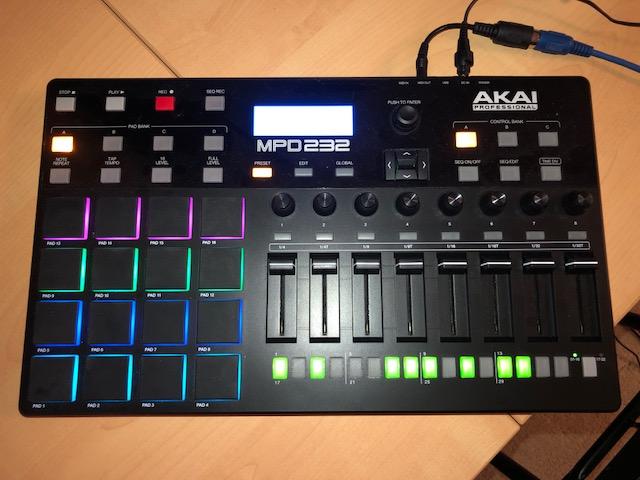
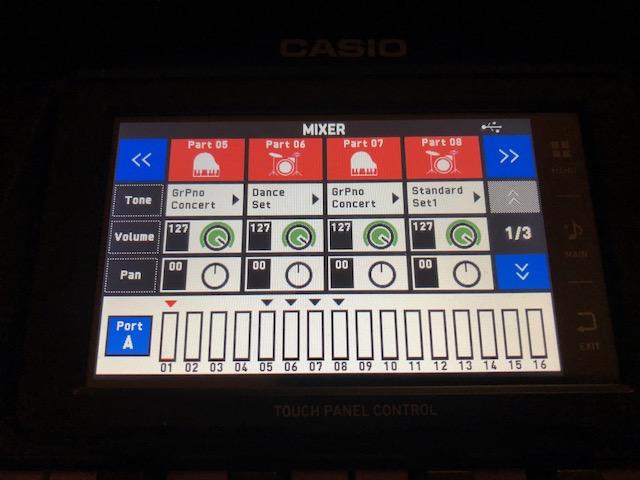
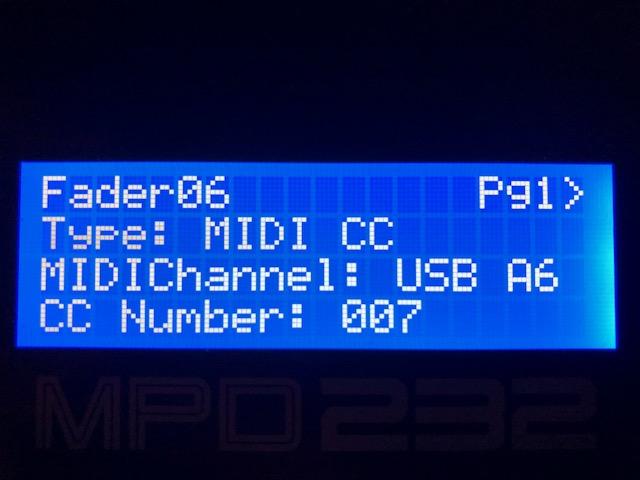
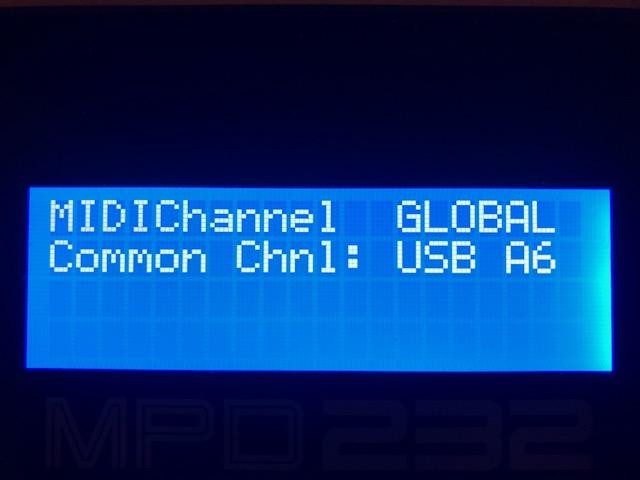
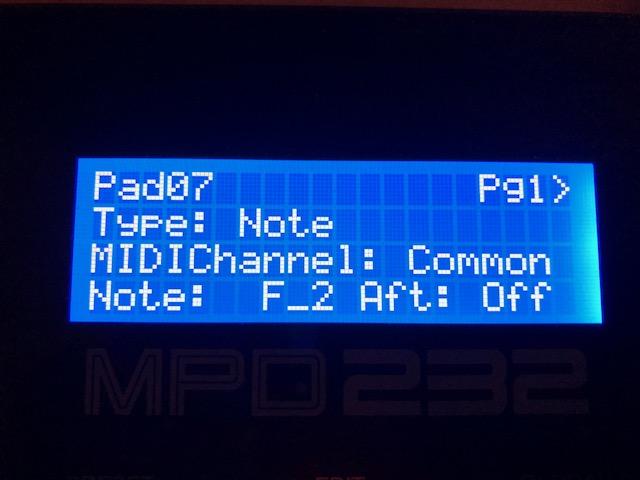
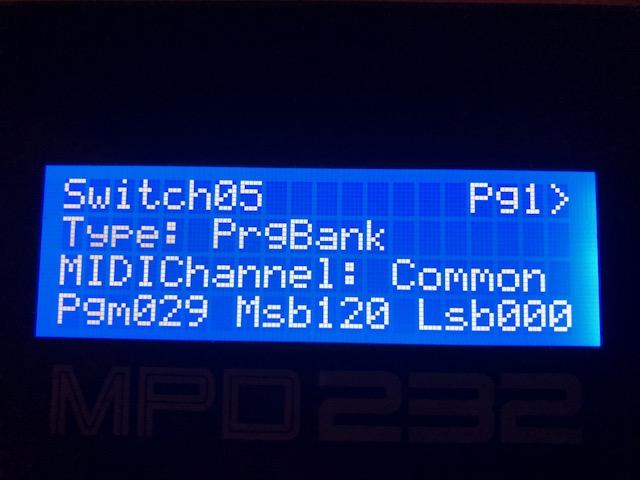
I had still an Akai MPD 232 at home from use directly with computer with some audio software and thought about using it with my brandnew PX-560. Here the outcome for your inspiration... The MPD232 is basically the following: - 16 drumpads (in 4 different banks switchable) - 8 switches (in 3 different banks swichtable) - 8 rotary controllers (in 3 different banks swichtable) - 8 faders (in 3 different banks swichtable) - basic sequencer - it is around 200 USD/EUR So what I did I connected the classic Midi out 5 pin of MPD232 to MIDI in of PX-560. Which worked directly fine. Then I thought about how to enable drum functionality. According to PX-560 manual "MIDI channel assignments and diagram". Port A channel 6 is unused. So I chose this channel, but you can certainly also us another one depending on what you want to achieve finally. In MPD232 you have to set the global channel like that for A 6: In the PX-560 mixer you can check whats going on: You see in above Mixer screenshot I have selected "Dance Set" Drum set on Port A / Part 06. I wanted to have the drum sets available in PX-560 directly selectable via the MPD232 switches. This was the hardest task to figure out but it is possible in MPD232 configurable like that: You see here on Switch 5 I put Program Bank Change were 29 / 120 means "Dance Set". You will find this numbers for the different sets in PX-560 Manual Appendix page 5 and 6. Now you have to assign notes to your MPD 232 drumpads as you like: This will put on Drumpad 7 the note F2. In PX-560 manual appendix page 7++ you will find the information which drum instrument is on which note. And finally you could control volume of all PX-560 mixer channels (or other functions you are interestes as long as they are a MIDI CC) configure to faders or rotary controllers: Above MPD232 menu shows that Fader 6 will control the volume of Midi channel A6 on PX-560 (via Midi CC 7). If you have all set up correctly you have a real cool drum machine including simple sequencer while using the samples and instruments of PX-560. And you have a lot more controllers for all CC based functions like volume. The only thing I couldn't figure out was to record the incoming midi with PX-560 MIDI recorder. To my current understaning that is not possible due to the current design of Midi signal flow inside PX-560. (Would be a cool function for new firmware if possible at all). I hope this is useful and an inspiration, for me it is a great and relatively cheap extension of the PX-560. Anyone tried that out before. Other midi input devices you like for connect to PX-560 ?
-
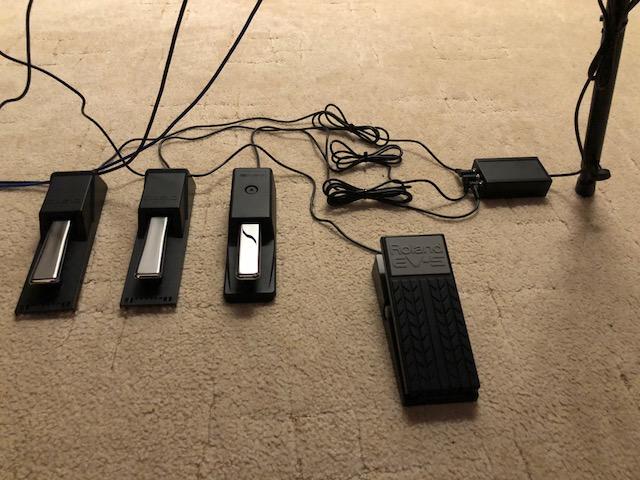
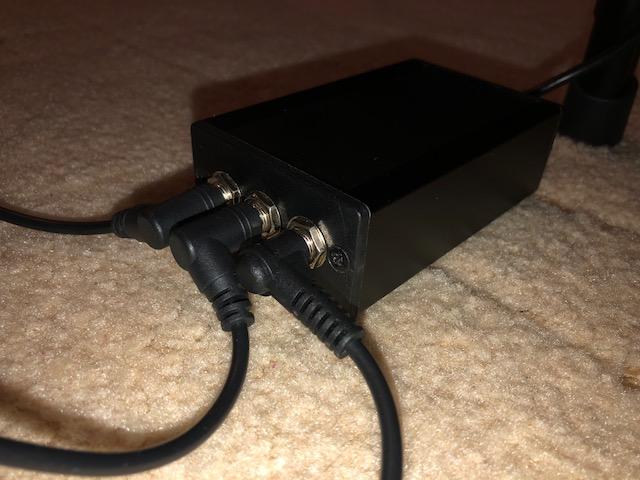
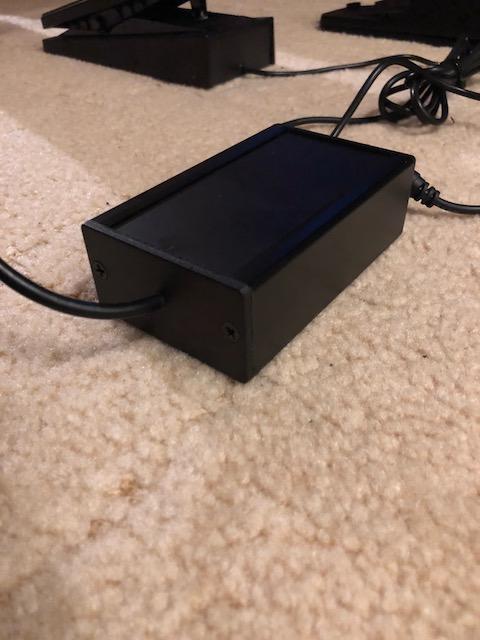
I spent some evenings to figure out perfect pedal config for my PX-560 and wanted to share and certainly like to hear your opinions what you use, like or not like. Maybe I went to far 🙂, but I'm fully happy now... So here how it looks like at the end : From left to right: 1. Casio SP-20 switch for "Soft" via SP-33 bottom port 2. Casio SP-20 Switch for "Sostenuto" via SP-33 bottom port 3. Roland DP-10 in continous mode for continous "Damper" via SP-33 bottom port 4. Roland EV-5 continous for selectable expression functions via Assignable Pedal port at the back So I bought first the EV-5 which was straight forward as also suggest in the Casio manual to be used with assignable pedal port. Furthermore I bought a Casio SP-33 (3 pedal control) relatively cheap while knowing that you actually need the wooden rack for that to install, but I don't like this rack and don't own it. So my plan was first to take the SP-33 and put the inner workings in a self-made box. But I was not really comfortable with look and and the relatively short pedals. So I decided to do a bit of reverse engineering how the SP-33 works actually and figured out the pin layout of the bottom pedal connector: I will not share details directly (only of admin allows). But generally you have common ground, soft and sostenuto switch pin. And two pins similar to assignable pedal for damper voltage divider. My plan was first to use 3x Roland DP-10 which has a switch were you can select switch or continuous (10k potentiometer). So for continous damper that works fine despite the SP-33 resistance is lower and doesnt use the full potentiometer range. But it seems luckily that the PX-560 has routine which is adjusting the range to get midi values from 0x00 to 0x7F also at the SP-33 port. For the soft and sostenuto I was not so lucky, as Roland uses switches in alternated polarity (pressed is open). The pedal back ports of PX-560 can handle that to adjust automatically but the SP-33 bottom port unfortunately can't. So I opened the DP-10 with the hope the switch is in a way that function can be altered, but unfortunately it is a switch with only 2 connectors which is on default closed. So I finally gave up, returned two DP-10 and got two Casio SP-20 which are okay. To connect finally the 3 pedals to the SP-33 bottom port I used a small aluminium box and built 3 female 6,3 mm connectors in, de-soldered the SP-33 cable from the SP-33 main unit. That's how it looks like: So the box has nothing init, "just" the connect from the SP-33 cable to the female 6,3 mm connectors. You could basically also solder just a cable without box, but I found it more professional looking that way. I hope I could inspire a bit for the folks out there which dare to solder a cable or build a box. Be aware if you go down that road always keep in mind that you do it on own risk. And certainly would be cool if Casio could pick up the idea to have a solution for users which don't want the wooden rack but still want to have all three pedals in a nice format with continous damper function.
-
Here also my two cents for the topic: I bought my PX-560M Nov 2018. I hadn't extreme problems that Menu/Main/Exit did not work at all - like others reported here or on YouTube, but I often had strange effects that I accidently selected wrong buttons or functions. In the beginning I thought I pressed unprecisely or the touch screen itself is not that precise like on an iPad. As this happened more often I also used some conductive tip and I realized that in my case the touch coordinates were around 20 pixels shifted horizontal. I read then this thread here and tried to contact my regional support for instructions, but got no answer at all. Afterwards I tried US support, they reacted promptly and were nice but didn't have instructions to give out and heard of that issue only 2 times before and basically said I need to contact my regional support :-). (@Tworld: Would be interesting if you could share which country's support gave out an instruction). To make story short I wanted that to have that fixed asap without returning the device so I tried an hour myself to figure out key combo to enter service menu. And well I could get in did the touch screen calibration and all was fine and I'm also much happier now 🙂. So my take away from this is: Most cases seem to be a wrong calibration in production. It seems not to be an HW issue. I would recommend everybody like me having the feeling that the touch screen is working unreliable to try with conductive tip / stylus etc. From Casio support side would be really good to hand out instruction where it could help or for next firmware/model add directly a calibration menu in the settings menu.

