Mclandy
-
Posts
215 -
Joined
-
Last visited
3 Followers


Mclandy's Achievements
")


-
In case there are people following this sub-forum who do not necessarily follow the General CT-X Discussion sub-forum, I wanted to make sure you are aware of the AC7Editor program, for which I just released a new version. See more information here:
-
In case there are people following this sub-forum who do not necessarily follow the General CT-X Discussion sub-forum, I wanted to make sure you are aware of the AC7Editor program, for which I just released a new version. See more information here:
-
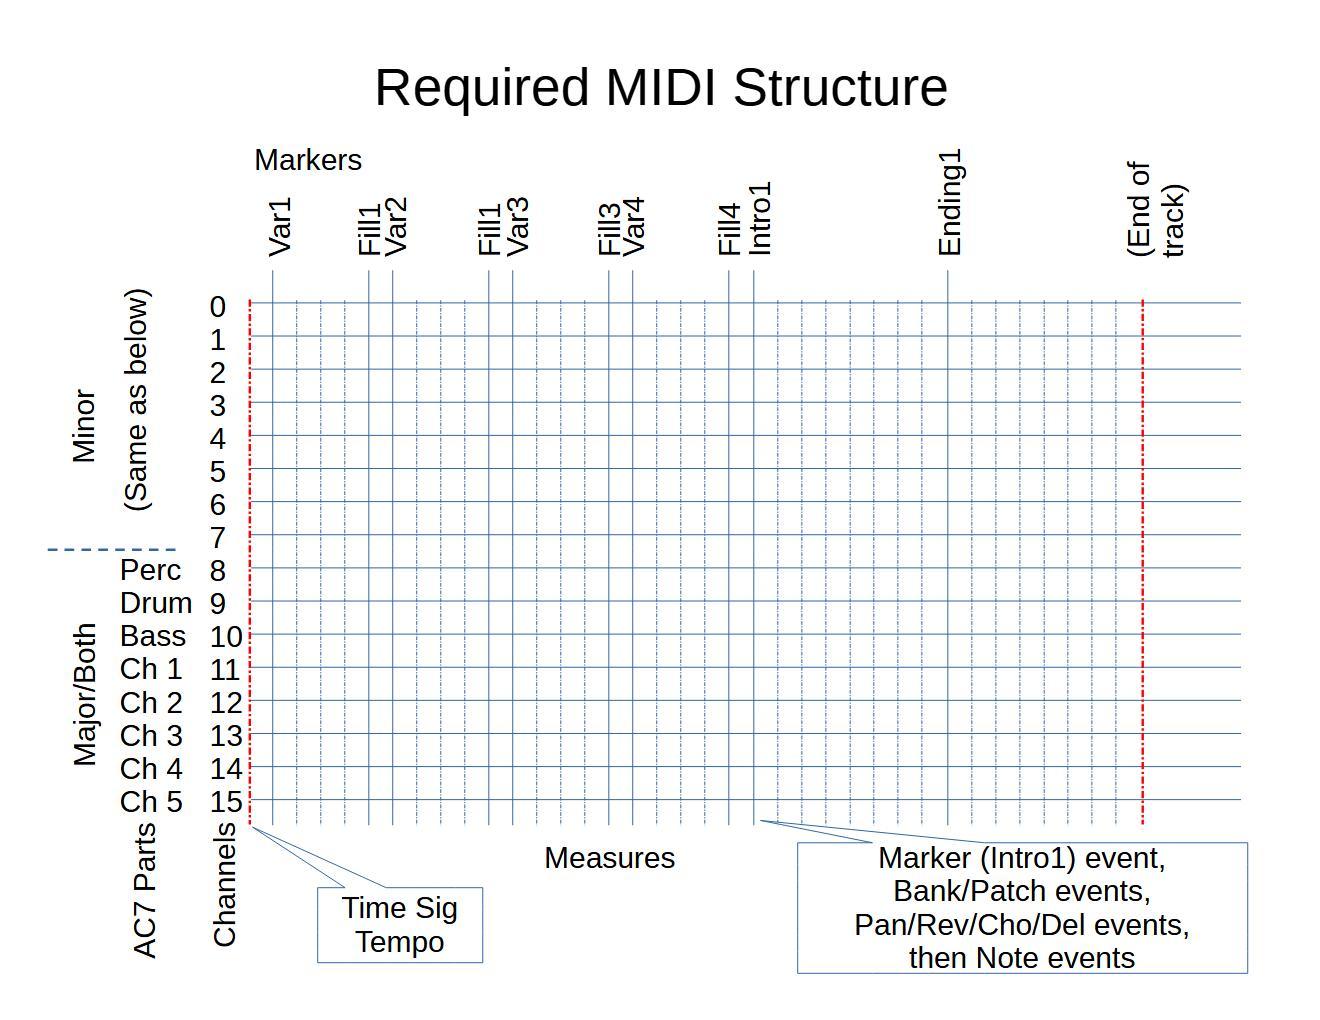
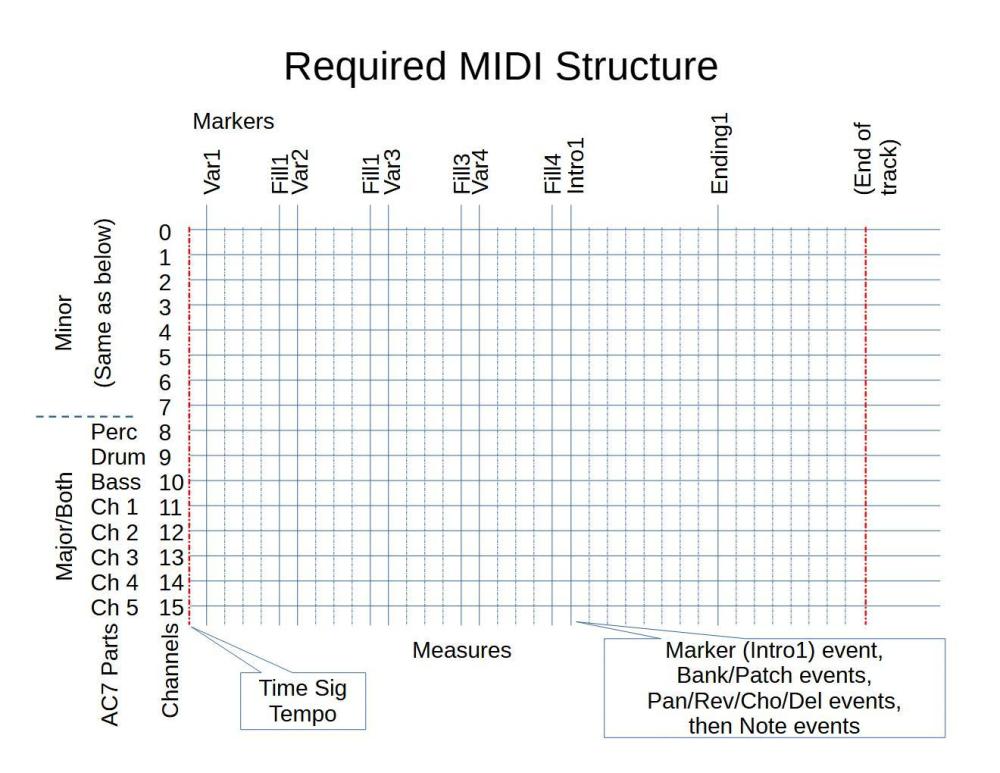
An updated version of the AC7Editor program (1.02) has been released and is available on the SourceForge site. For those familiar with it, here again is the project page link: https://sourceforge.net/projects/ac7editor/ For basic information about the program, where to find it, and how to install it, please see the earlier post for the initial release at: This new version has a few minor bug fixes, along with these new functions: A check and warning if the size of the AC7 exceeds 64k in size, since this will cause it to fail to load on the keyboard. The file is still saved, but a warning is shown. The new Remix/Merge tool provides the ability to remix the variations in an AC7 (for example, swap Var1 and Var2), or optionally to select another AC7 file and “merge in” variations from that file into the AC7 in the editor. This only operates on the current AC7 image in the editor, so the AC7 file must be saved for the changes to become permanent. The ability to import a properly structured MIDI file, much like the current program ability to import Style files. Just to be clear, this requires a MIDI file specifically built to meet certain requirements in order for the import to work, but it is something you should be able to do in almost any MIDI editor. I will point out that putting one together takes some time, which limits the amount of testing I’ve been able to do, but I’m pretty confident that it generally works. Be sure to report any problems here. For those looking for more information on the MIDI import function, read on. (Update: I've added a diagram to this post, attached below, to hopefully make the following text clearer) The import of MIDI files will ONLY work when the MIDI is properly structured according to the following rules. Trying to import a general MIDI music file will not produce any usable results. However, it should be possible to create an importable file using almost any MIDI editor, and of course content can be copied from other MIDI files to help create the tracks. Obviously, some knowledge of MIDI terminology, content, and editing will make this task considerably easier. The MIDI file must be a standard MIDI file, saved in Format 0 (one single track containing all channels, just like the MIDI content in Style files). You may need to force your MIDI editor to save it in this format. For the purpose of the following description, however, the note sequence in each channel is considered to be its own “track”. Track segments, and how they map to Variations: The MIDI must contain text markers that divide the tracks into multiple segments by time, where each sub-segment maps to a specific variation in the AC7. Text markers are MIDI Meta-events, and either the 06 (Marker Event, preferred) or 01 (Text Event) type are supported. These events must be inserted exactly on measure boundaries, so the duration of time between markers (the segment lengths) are precisely a whole integer number of measures. They should also be the first event to appear at that precise time (before other Control events and notes in the track). A marker event ends the previous segment and begins a new one, and the name defines which variation the new segment maps to, so each marker name should only be used once. The last segment is ended by the end of the track, so there is no need for a final marker. The program recognizes marker names based on either Style naming standards (for example, "Main A", “Fill In BB”, “Intro A”, "Ending B", etc.), or on terminology used in the AC7Editor program (Var1, Fill2, Intro1, Ending2, etc.). If using Style marker names, only Intro/Ending A and B are supported. The order in which markers/variations appear in the MIDI timeline is not critical, but precise placement and naming of the markers is. A given Part (within a variation) may consist of a single track which plays when any chord is played on the keyboard, or it is possible to create separate Major and Minor parts, which only play for major and minor chords, respectively. Major/Minor parts are mostly used in Intros and Endings, when a different melody and/or chord sequence is desired, depending on whether the song is to be played in a major or minor key. MIDI channels, and how they map to Parts: Parts/tracks in the AC7 file are imported based on a fixed mapping of channels 0-15 in the MIDI (this is the channel numbering per the MIDI spec, although many MIDI editors label these 1-16). Channels 8-15 import respectively to AC7 Parts 1-8 (Percussion, Drum, Bass, Chord 1-5), and generally provide the single (“both”) track for that Part. Channels 0-7 are only ever used to create minor tracks for Parts 1-8, and then only if the minor channel contains at least one "Note On" event within a given segment. If a Minor track segment exists in Channels 0-7, then the matching track segment in 8-15 is considered to be the Major track. So, for example, a MIDI may have some events in channel 6, but if no actual note events appear in the segment following marker “Var1”, then the Chord 4 part in Var1 will have no minor track. In that case, Channel 14 provides the one and only track for Chord 4 in Var1 (unless it doesn’t contain any note events either, in which case Chord 4 would just be empty in Var1). All note sequences in the channels must be defined in the key of C, just like when creating Rhythms on the keyboard. Intros and Endings can of course contain chord sequences, but still must all be defined relative to C. If the MIDI channels contain Program Change and MSB Bank Select Control events, these will be picked up to set the Mixer Tone values in the AC7 file. These events should be inserted among the first events in each section, before any note events, but after the marker. If a given section doesn't contain these events, the program looks back in the track for the next previous set of Bank Select/PC events in that channel. So, for example, if a given channel/part always uses the same instrument, just setting the bank/patch once at the beginning of the track will set the same instrument for that Part across all variations. If no bank/patch events are found, default tones (GM Piano, Std Kit 1) are used, but it is generally recommended to set them rather than depend on the defaults. Keep in mind that the editor program will treat all segments that use the same tone for a given part as a single Part/Tone group, so if you want the ability to edit some variations independently, they must have different tones assigned in the MIDI. You can usually use a patch file with your MIDI editor so it inserts actual Casio bank/patch values, or you can just use general MIDI bank/patch values and change them later in the editor. For major/minor channel pairs, only the bank/patch information for the major channel is used. This is because in AC7 files, both major and minor tracks are connected to the same mixer values, including bank/patch. So bank/patch settings in channels 0-7 (minor tracks) are certainly allowed, and can be useful when playing the sequence in the MIDI editor, but they will have no effect when imported. The MIDI must contain a valid time signature “58” Meta Event (4/4, 3/4, etc.). The MIDI editor should insert this by default at the beginning of the sequence. If volume/pan/reverb/chorus/delay Control Events are present (optional), they will get picked up to set the mixer values. Like with bank/patch, the program will search backward in the track, if necessary, to find these settings, and will use defaults if none are found. If a tempo “51” Meta Event is present (optional), that will set the default tempo for the AC7 (but the Editor also lets you change this). Many editors insert this by default at the beginning. Chord Conversion Table values for tracks are defaulted: introNoChange for most intro/ending parts, Bass Basic or Bass 7th for bass, Ch Basic or Ch 7th for other parts (depending on whether the track segment contains 7th/Bb notes or not). These can be changed on the keyboard, except when the Part contains a major/minor pair group. The Breakpoint values for tracks are defaulted to C, but the Editor lets you change this. No High/Low note limits are set for tracks, but the Editor lets you change these. High/Low limits force notes played as part of an accompaniment to stay within the range specified. Inversion is defaulted to Off. The Editor does not currently provide a means to change this, although it can be changed on the keyboard, except in Parts with major/minor pairs (which are usually used in intro/endings, and generally are not inverted anyway).
-
Availability of a new AC7 Editor program
Mclandy replied to Mclandy's topic in General CT-X Discussion
@TedS, Unfortunately, what you are requesting is not possible. Preset parameters are not part of, or included with, Rhythm file data. The "One-Touch Presets" are a built-in (preprogrammed) feature of the CT-X keyboards, but unlike Tones, Rhythms, Phrases, Registrations, and Songs, they are not editable and there are no "user" slots for them. So they can not be saved to, or loaded from, a USB drive or computer, and no new presets can be added. These built-in presets simply "reference" existing rhythms and tones, so I believe they are actually much closer to a fixed Registration file with an attached chord sequence. So unfortunately, for presets, what you get is what comes with the keyboard. Of course, you can record song tracks that do pretty much the same thing, although the number of available slots is somewhat limited. I am working on some enhancements to the program, but it's slow going because my time is pretty limited right now. -
Availability of a new AC7 Editor program
Mclandy replied to Mclandy's topic in General CT-X Discussion
Actually, CT-X does support parameters in the AC7 file to tune drum notes, both EQ and some effects. I haven't had time to implement and test the configuration controls for it yet. It gets a little complicated being on an individual note basis. Do you use that a lot on your MZ-X? I could try to add it when I get some time to work on it. I agree, DSP as part of the Rhythm file, without having to create a custom tone, is a nice feature. -
Availability of a new AC7 Editor program
Mclandy replied to Mclandy's topic in General CT-X Discussion
@Silvano Silva, Yes, this program allows you to substitute specific drum notes for a drum sound in another kit, by using a feature in the CT-X keyboards. I am pretty sure this feature is exclusive to CT-X keyboards, so it will not work on your MZ-X (although on MZ-X, you can create "User" drum kits which include whatever sounds you want, isn't that correct?). But as you say, you can for example assign a note in Standard Kit 1 to play another drum sound from Dance Set 1, and that allows you to create and play improved rhythms on CT-X. It's actually kind of nice that this is a feature of the Rhythm file, because then there is no need to create a special User drum tone file to go with it. Please note my earlier posts about support for non-CTX keyboards. The program only has built-in Tone and Drum lists for the CT-X models, so AC7 files from an MZ-X keyboard may contain quite a few "unknown" MZ-X Tone names, or some may be labeled slightly differently, and of course the Drum kits are somewhat different, too. But if someone wants to create an alternate Patch file for MZ-X, then the program will support it. -
The only settings relating to MIDI are Keyboard Channel (which MIDI channel to use when sending keyboard events to a computer), Local Control (which just prevents the keyboard from sounding notes itself if you are "playing" sounds on the computer end instead, and yes, you might want to turn that off if you are going back to "normal" keyboard play), and Accomp Out (which just determines whether Accompaniment note events are included in what is sent to the computer/MIDI controller). Those settings persist until you change them, although I believe they do go back to defaults if you turn the keyboard off and back on again, and don't have Auto Resume turned on.
-
I'm not exactly sure what you mean by "come out of the midi format", but if that means playing MIDI data from a computer or flash drive via USB, then no, there should be nothing to reset. It could theoretically depend on the content of the MIDI -- like I suppose if it contained certain Sysex commands, it's possible it could change something. Most MIDI software I've seen, when it detects a MIDI file contains Sysex commands, asks whether to send them (generally you should not unless you know they are appropriate for the keyboard). But in most cases, I would think the most it would require is selecting a registration to set things back to a "known" configuration state.
-
As Brad points out, amp type selection is only one parameter of the Amp Cabinet effect, which is only one possible module in a DSP chain containing up to 4 effects. But to create a tone in which you can select a particular amp, you first have to select (as part of the tone editing process) a DSP (which is not necessarily the same as Tone) that actually includes Amp Cabinet as one of its effects modules. In the Appendix document, the DSP section lists DSPs 801 through 900, and the effects modules contained in each. So you could easily find a DSP in that list which contains Amp Cabinet, and apply it to your edited Tone. Unfortunately, the appendix does not list the additional set of DSPs that are associated with built-in tones. However, a while back I created a complete list of all available DSPs (those included in built-in Tones, in addition to those in the 801-900 range). The document shows each DSP, and which specific effects modules it contains, and in which order in the effect chain. I'll include the link to the forum thread below. Not to add to the confusion, but there is also the Distortion effect module, which does contain a parameter to select between a much smaller set of amp types. But the core purpose of that effect is to add the guitar distortion sound, with the amp type being just a parameter to tweak that effect. But if what you are really looking for a Distortion guitar, you might want to choose a DSP with that effect instead of the Amp Cabinet. I don't believe there are any DSPs available which contain both Distortion and Amp Cabinet effects modules, so that's an either/or decision. So again, to experiment with Amp Cabinet sounds, you need to start with the desired Tone (most likely some Clean Guitar tone, but you can actually do this with any tone, and it doesn't really matter whether it already has a built-in DSP or not), then use the Edit button to start editing the Tone, and scroll right/left to find the DSP settings. Choose a DSP/Tone (1-900) that contains the Amp Cabinet effect, then find that specific module in the chain, and go in and change the Type (cabinet type) parameter to the desired cabinet. If you can't tell what cabinet it is from the abbreviations in the manual, refer to the document link I posted earlier which expands on all the cabinet names. As you change the cabinet Type parameter, you can play the sound on the keyboard to hear what each one sounds like. Just remember, any defined DSP can be applied to any Tone, although the chain of 1 to 4 special effects modules in each DSP definition is fixed. However, as part of Tone editing, you can select the DSP you want to apply, and change any of the parameters within those effects modules (like Amp Cabinet Type). Yes, it's a bit involved, but once you figure out how to change/edit DSPs, it becomes much easier. Here's the link to the forum thread containing the full list of DSPs available, along with their effects chains:
-
It sounds like you might be looking for this list that a few of us put together a while ago, associating amp names with the abbreviations in the manual. Still, keep in mind that the differences may be subtle, and these are just synthesized models. I believe I saw somewhere that they are based on Kemper amp profiler software. Also, I just realized that you may be looking at the built-in tones (like "128 Clean Guitar 2") and seeing that they have a DSP defined, with a particular amp type as a parameter in the DSP. The keyboard obviously does not provide a complete pre-defined list of built-in guitar tones for every possible type of Amp model available. So if you want to try out a particular amp type, you need to start with one of the built in tones and create your own User Tone from it, and then add (or modify) DSP settings in that User Tone to choose the amp type you want.
-
Typically you would start with one of the "Clean Guitar" sounds (aka, "Telecaster-like"), and then add DSP amp modeling to that. But other than that, I don't believe there is any "goes with" relationship. It just depends on the sound you're looking for.
-
Availability of a new AC7 Editor program
Mclandy replied to Mclandy's topic in General CT-X Discussion
Thanks, and let me know how you make out. If you try out the function for importing Styles, you will probably find it has a CT-X "bias" to it as well, as the mappings I've built up over time take advantage of the full range of CT-X tones and drum kits. So after doing an Import, you may find some "Undefined (bank/PC)" tones listed, as well as possibly some unassigned drum sounds. The good news is that the editor makes these fairly easy to change, plus you also have the option of adding superseding mapping definitions to the "remap.txt" file to change how the tones are converted. Aside from that, I think all the other functions (other than the disabled CTX-only ones) should work for the PX560, but let me know how it goes. -
Availability of a new AC7 Editor program
Mclandy replied to Mclandy's topic in General CT-X Discussion
Release of new version 1.1 with enabling for non-CTX keyboard support I have just released an updated version of the program that now includes limited support capability for non-CTX keyboards which use the AC7 format. As I suggested in my last post, I have updated the Preferences dialog to allow for a 3rd mode for "Non-CTX" keyboards. When that mode is enabled, another dialog option is enabled to specify an external "alternate patch" file for other keyboards. At program startup, that file will be loaded in place of the internal CT-X Tone and Drum lists, so the program will show the Tone and Drum descriptions that are valid for the specified keyboard. This mode will also disable a couple of features that are only available on CTX keyboards (the Tone EQ settings, and Drum kit substitutions). Note that support for other keyboards than CT-X depends on the creation of these alternate "Patch" files. These are simple text files, although as you might expect, they contain a lot of information. I am not volunteering to build these for all the different Casio keyboards, but as an example and model I have created one for the PX-560 and included it in the download package. The first few lines of the file describe the content and syntax, for reference. Creating one of these might look a little intimidating at first, but they can be done with relatively little typing if you know how to copy and paste into a spreadsheet, move columns around, and export content in CSV format. Perhaps this represents a good opportunity for some community collaboration. One other change in this version is that I have decided not to list User Tones by default in the tone list in the "Tone and Mixer Settings" properties page. In general, it's not a great idea anyway to use User Tones in Rhythms (anyone who has tried this probably knows why), plus with this program's ability to access the Rhythm file's built-in settings for DSP definitions, Tone EQ controls, and Drum Substitutions, there is even less reason to consider using User Tones. So basically, including User Tones by default mostly just "clutters up" the Tone list unnecessarily. However, User Tones can still be accessed and used simply by typing "user" in the Tone list filter and clicking "Apply", which will cause them all to be listed and available for selection. Beyond these changes, this version just includes a few enhancements in operation verification (things to prevent/protect users from unintentionally doing wrong things). Link: https://sourceforge.net/projects/ac7editor/files/ Let me know if there are any questions. By the way, does anybody know if Chandler Holloway is still around, or if not, is there anyone who now fulfills a similar role? Also, I see there have been a few downloads - any feedback? -
Availability of a new AC7 Editor program
Mclandy replied to Mclandy's topic in General CT-X Discussion
@mrmr9494, @Jokeyman123 After looking in a little more depth at the PX560 Tones and Drum kits, I see enough differences that it would probably be confusing trying to edit using the CT-X data. Sometimes the same patch numbers have slightly different names, or are even swapped from what they are on CT-X. Also, Privia has a ton more Piano tones (makes sense), which would not be accessible. There are some drum kit differences, too. I do, however, think I could find a workaround for the repetitive numbering in the Tone descriptions. I wanted to make the program as simple and self-contained as possible for CT-X users (which was the primary focus), which is why I embedded the tone and drum descriptions in the program for those keyboards. However, I used to have that data in separate files. I'm thinking about the possibility of adding a Preferences option to specify an alternative, external file for the Tone and Drum data records, which would get loaded at startup in place of the embedded ones. Perhaps that setting could also "switch off" any CT-X-only features. That's something I'll muse over while waiting for some feedback from the early users. -
Availability of a new AC7 Editor program
Mclandy replied to Mclandy's topic in General CT-X Discussion
I just wanted to mention, as @Jokeyman123 commented, you may notice that there is a newer version (5.0) of ooREXX out there, and there is in fact a way to install that with the 4.2 ooDialog manager and get my program working with it, but that gets a bit complicated and is not worth it unless you are doing your own ooRexx development. It's much simpler to stick with the 4.2 version of ooRexx and ooDialog, especially if you are installing them just to support this program. But if anyone wants further details, let me know.