


Rusty Krash Baxter
-
Posts
82 -
Joined
-
Last visited
Content Type
Profiles
Forums
Downloads
Posts posted by Rusty Krash Baxter
-
-
Perhaps a new product announcement coming at NAMM?
-
I was looking to buy a 2nd XW-G1 and no one has them available. Has the XW-G1 been discontinued or is there a delay in production or what's going on? A new product announcement at NAMM?
-
Great job and Thanks for the gift!
-
Thanks busharoo! Thanks Jokeyman123!
-
I already own a XW-G1 and just bought a used XW-P1 and 3 of the slider knob caps for the step sequencer are missing. Anyone know where I can purchase 3 of the original slider knob caps as spare parts?
Thanks
-
I had an issue using the XW-G1 factory settings for the StepSequencer as a groovebox. The issue is I want to use the sliders to turn the parts on & off with all drum parts and the bass guitar part on the same group of sliders. The factory setting has the kick drum on slider 8 in the first set of sliders (1-8 sliders) and the other drum parts on 9-12 sliders and the bass guitar on part 13, the second set of sliders.
So I created a new user step sequence configuration with things moved around a little. I moved the kick drum from slider 8 to slider 13, the bass guitar from slider 13 to slider 14, and solo 1 from slider 14 to slider 8. I could not change the part names. The part 8 is still named "Drm1" even though it is now "Sol1", part 13 is still "Bass" even though it is now "Drm1", and part 14 is still named "Sol1" even though it is now "Bass".
Download StepSequence:
http://www.casiomusicforums.com/index.php?/files/file/900-groovebox-1zss/
Demo video:
-
File Name: GrooveBox 1.ZSS
File Submitter: Rusty Krash Baxter
File Submitted: 29 Aug 2015
File Category: XW-G1
NOTE: The website would not let me upload the step sequence with the correct extention of .ZSS, I had to change it to .ZSQ to upload it. So if you download it you will have to change the file extention from .ZSQ back to .ZSS the correct file name extention.
Description:
This is the StepSequence with a new user configuration called GrooveBox 1.
I had an issue using the XW-G1 factory settings for the StepSequencer as a groovebox. The issue is I want to use the sliders to turn the parts on & off with all drum parts and the bass guitar part on the same group of sliders. The factory setting has the kick drum on slider 8 in the first set of sliders (1-8 sliders) and the other drum parts on 9-12 sliders and the bass guitar on part 13.
So I created a new user step sequence configuration with the parts moved around a little. I moved the kick drum from slider 8 (part 8) to slider 13 (part 13), the bass guitar from slider 13 (part 13) to slider 14 (part 14), and solo 1 from slider 14 (part 14) to slider 8 (part 8). I could not change the part names. The part 8 is still named "Drm1" even though it is now "Sol1", part 13 is still "Bass" even though it is now "Drm1", and part 14 is still named "Sol1" even though it is now "Bass".
Instructions for use:
1. Press the "STEP SEQUENCER" button
2. Press the "SELECT" button to select sliders 9-16
3. Create a sequence by turning the buttons off & on for the parts 9-16 as usual
4. While playing the sequence, Press the "MIXER" button to bring up the mixer menu and make sure "Part" is selected so the sliders turn on & off the parts. Slider up turns on the part & slider down turns off the part
-
 1
1
-
-
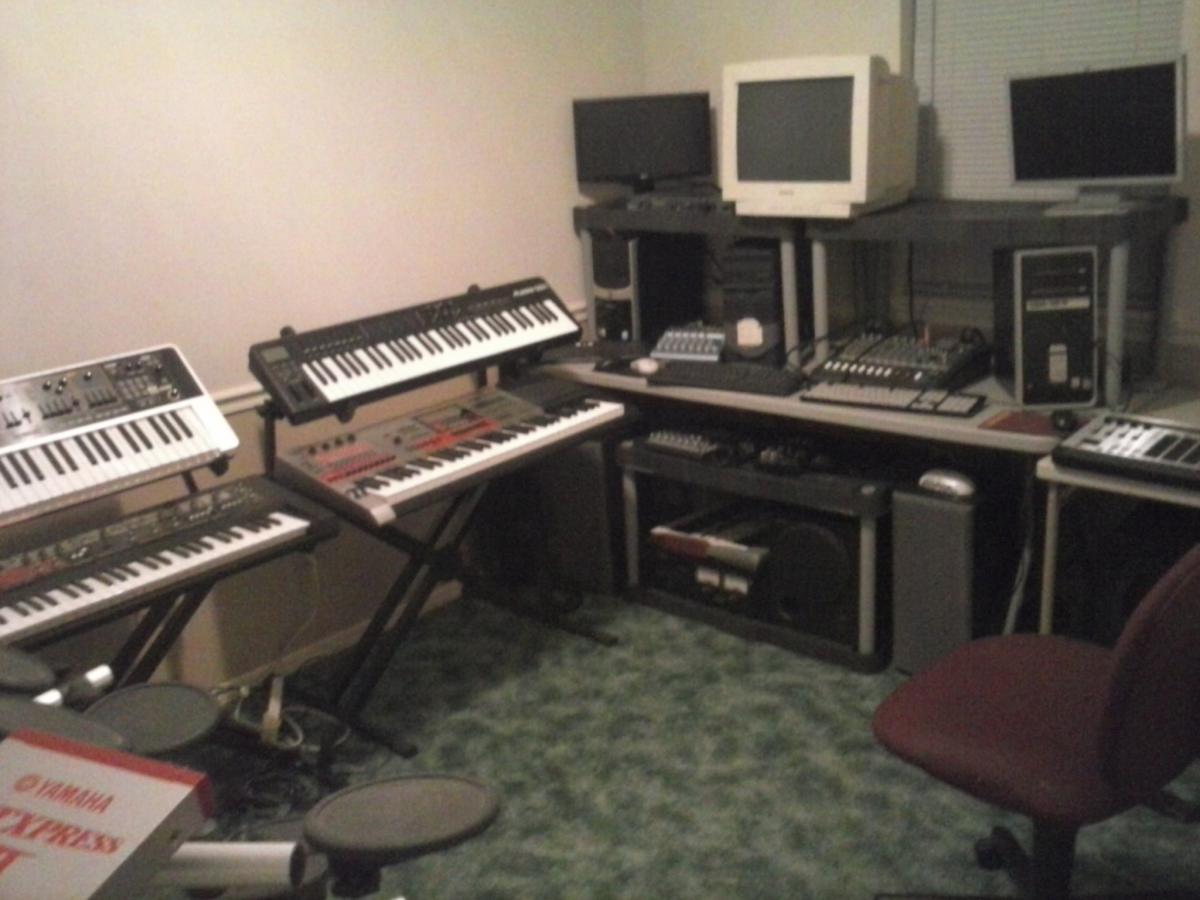
Rebuilt my home music production recording studio after move to a new city.
-
 3
3
-
-
Hey Rusty, are you going to bield this keybord and then incorperate your program (the one you made of the G1) so that your keybord will have a DAW/Controler?
The 'BaxKrashtor'\
Larry
That's part of the idea. I'm also going to add an arpeggiator to my G1 step sequencer program. That way some of my synths that don't have arps or step sequencers can be played by the program. I'm looking into VST development now as it currently is a stand alone program.
-
One way I do it is using multi-key to what I call,
sample bank performances where I've set assigned an
Looper bank to each performance to switch to. It means
multiple performance of the same kind with each a different
bank assignment for the Looper. I'm trying to figure out if
NRPN can be used instead, At the moment I'm focusing
on creating my song performances.
The sampling functionality isn't coupled much to performance or
Sseq mode. Its a good thing multi-key can apply the needed switching.
If an sample is not working out as expected "I know right ;("
doing an overdub on the temp bank is the only way to go,
but in a live play you have to sync Sseq sequence and stop
the sample Looper to flush the temp by selecting the proper
recording type and start over.
Its an pretty smooth process only when you record a beat
or phrase not while you play the key's in the process.
But it nails the Groove kinda thing pretty right.
Thanks XW-Addict! As always you are full of great information! I didn't know it was possible to do anything with the sampler/looper with multi-keys, I will study that area of functionality again. Also great idea of switching performances to switch looper banks. I'll study the performance mode again too.
-
Check into Arduino parts which many hackers are using to fabricate control interfaces. PAIA used to make all kinds of interesting modular analog control parts to assemble DIY synth modules. Craig Anderton also published a very good electronics book I used to have and I assembled some of his circuit designs for a ring modulator, phase shifter, fuzz box etc. Was good in that it taught me how to make voiltage-controlled circuits, power supplies necessary to power the +/- voltages for some of the old circuitry and early IC chips used (CEM chips were popular for creating sawtooth, sine and PM waves back then.)
Look for old electronics books from the TAB electronics book club-I may have one or two of mine left-there were construction designs specifically for making synth circuits and interfaces for keyboards or even simple contact switch synths. Delton Horn (yeah I know strange name for a scientist creating synth circuits!) was one of their best authors for this. Here is a link in Amazon showing at least 2 of his books. The Thomas Henry book was also quite good, I studied all these years back. I think I might have even learned something!
 Most of the parts in these circuits are now easier to get than back then.
Cool, Thanks! I'm still a beginner just playing around with 555 timers and op amps. It sounds good as a single oscillator in test, I want to see what it sounds like when I mix two of these oscillators together by actually building it. And playing it with a keyboard rather than a couple of buttons.
-
To answer you're question how I do it its not necessarily how you should do it ,Its all a matter of you're own workflow.
Question 1:
My Tip 1:
I clear the Looper when I switch between the Looper and Sseq mode.
In a live recording situation while the G1 plays the Sseq pressing the "Record" button brings up Looper mode.
Pressing the "Yes" button steps the Looper one bank forward out off the ''Temp" bank
doing this clears the temporary memory where the G1 records them to first.
After that I press "No" button to come back at the Looper bank of choice I do select a bank for hand, If a sample is to my liking I can save it directly to the required bank, The write option menu let you also choose to which bank you want to save.
In live recording sometimes a good piece comes out when I do several takes playing a Sseq and clearing the looper in the background.
My Tip 2:
Since there is one temp bank to work with you have to make sure to save you're work because switching Performances clears the temp bank. This is also useful to clear the Looper. In performance mode you can select a Looper bank to play or record from, If you do a live recording this is helpful because the Sseq can switch seamlessly on one another this give you freedom to record at each performances as you like.
Its all a matter of you're workflow to make it work.
Good info XW-Addict...I have a question about the temp area & the other banks:
How do you alternate with other banks dynamically in live performances?
My sampling experience is using the Kaos Pad & Koassilator Pro 4 sampling banks. With the XW-G1, I haven't figured out how to use the other sampling banks other than the temp bank for live sampling which means, I make a mistake recording a new layer into the temp bank, I have to start the sampling over from the begining or just let the mistake keep playing and add the next layer into the temp bank. I need to use another bank to record the new layer in so if I make a mistake I can just resample the new layer bank and not the whole thing. Thanks
-
Thanks for the encouragement. I'm looking at workflow now, how to organise work so onto performance mode, phrases, chains and then later on, linking with iPad- so expect there'll be another post before too long.. I think XW-G1 as a budget instrument has great sounds and is a good sketch area for getting ideas down. All da best
While I am not a newbie to synths, I too was a newbie (and still learning about it) to the XW-G1 back in February 2014. The manual is not very good but this forum is great with many knowledgeable people. So you have found the right place to ask questions for help. The XW-G1 is a very powerful awesome synth packed full of features.
Perhaps the path of education/learning about it for me will help you, what I finally figured out was:
1. Step sequencer - learned all about the step sequencer, creating step sequences, mixer, sliders, etc. Watched Mike's step sequencer videos many times.
2. Performances - setup for preset tones & zones, setup for sequencer, setup for preset arpeggios
3. Arpeggios - went through all the presets, then began setting up my own
4. Sampling
5. Tones - began creating my own Tones
-
1
-
-
Here ya go Rusty... Build one of these

Seriously though I wish Casio could build a cheap knockoff of one of these that wouldn't cost a kidney and bone marrow

Gary

That's cool! Thanks! Last year in 2013, I have already breadboarded & tested in separate pieces my oscillators, lfos, filters, & amp. Just need to put it all together at one time on one board and put in something with a keyboard I can play it with. During my spare time of course.
-
How about getting an older keyboard controller with midi din and minimal controls and paste your DIY module into it? There are some sound modules that are very small (like the Yamaha QY series or Roland PMAs) which would literally fit inside some of the keyboard controllers I've seen. Design a way to get the small control panel designed into the controller's structure and bingo, instant custom keyboard. if I blew up my XW-P1, I'd salvage the control panels (which are modular by the way, I know I've dissected mine twice) and re-assemble into a custom panel box with a torqued-out controller keyboard-say an old ensoniq digital piano or a Studiologic or Fatar. Crazy, but could happen! I'm keeping the XW in one piece, for now.
I had considered this but I want to play it, twisting knobs and sliders. Wasn't sure if there was going to be room for my circuit board(s). But you're I can find or make some room. Great idea! Thanks!
-
I own an SA-76. I haven't tried taking mine apart yet but it would make a good platform to experiment with I suppose.
What I'd really suggest though, is to visit a few garage sales or look at moving sales on craigslist and pick up something that someone is practically giving away. Even non functional they might actually be literally giving it away.
As for building your own synths. Here's a page full of juicy links on DIY synth construction.
http://jfosco.hubpages.com/hub/buildASynth
Gary
Thanks Gary good info!
-
I was building my own synth when I discovered the existence of the Casio XW-G1 and bought it.
I love it. However I am still thinking of building my own synth. I want to use an inexpensive synth that already has a keyboard/keys and a MIDI interface to start with. My idea is to remove the sound engine and replace it my own homemade one.I understand the Casio electronic insides are well labeled and easy/easier to hack into. I am thinking of using a Casio SA series model. What is the best inexpensive experimental platform for me to try this? You think the SA series or another?
A quick Google of the internet gives this...
http://www.codetinkerhack.com/2012/11/how-to-turn-piano-toy-into-midi.html
-
1
-
-
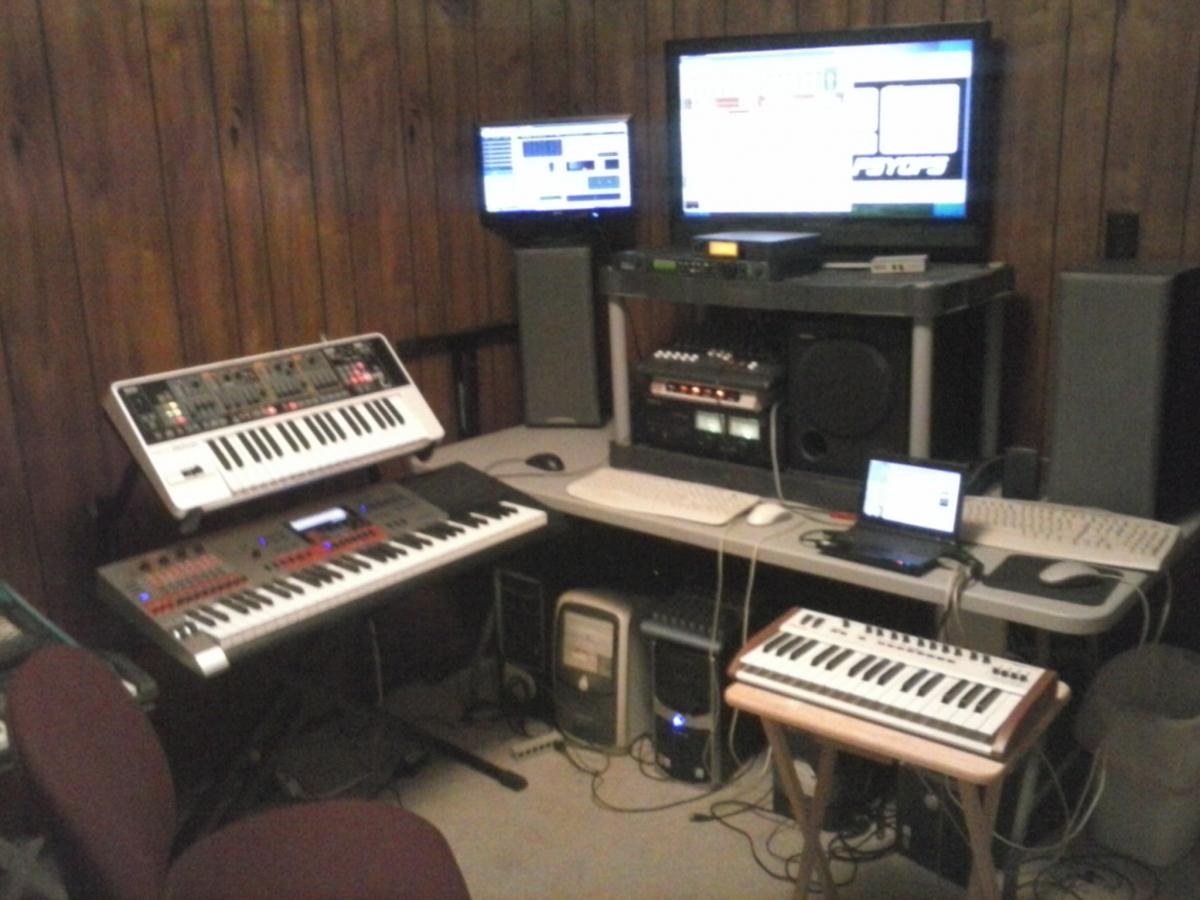
Reorganized my home studio
-
5
-
-
Nice Work Rusty.
Larry
Thanks, Larry
-
Awesome! Hey I never saw "I wished I had worked more and played less" written on a tombstone.
Thanks! Maybe some day music can be my career so I can work/play all the time

-
This is real? How the heck did you do this? I am amazed. I guess you are a programmer to create this from scratch? I have been trying to figure out how to design an editor for the PX-350 and haven't gotten too far. The closest I've come is using the www.ctrlr.org templates to try to write some controls-but not too good with writing sysex code and deciphering the PX cc messages. etc. This is an amazing piece of software. Great work Rusty.
Thanks. Yes, I was a software engineer for more than 20+ years. A couple years ago I returned to college to change my career.
I coded this app in Visual C#. I tried to keep it as close to the actual operation as possible such as clicking on the power button to turn it on & off, etc.
I have less income now but more time not at work. So now I have more free time to be a musician, composer, and songwriter.
And occasionally spending an hour here and there programming a virtual music instrument or music tool I need. -
This is very interesting! Can you go into a little more detail about the various functions and how it all works?
I also have an old Roland SoundCanvas SC55 sound module sitting in the closet I may dust off and put to use with this step sequencer app.
Overview:
It is a MIDI step sequencer based on the XW-G1 step sequencer. It generates no sound(s) but sends MIDI information out to play a MIDI sound module, keyboard, or synthesizer. It has only one mode (the step sequencer mode) which includes most of the step sequencer mode functionality plus mixer, plus some of the performance mode functionality.
Basic step sequencer mode functionality (based on the XW-G1):
* 16 step sequencer note on/off buttons
* 16 parts selected and changed by the Part +/- buttons:
XW Parts (Drm1, Drm2, Drm3, Drm4, Drm5, Bass1, Sol1, Sol2, Chrd) MIDI Channels 8-16 (Chrd part is 3 note chords same as XW-G1)
Enhancement of 7 more Parts (Ch1, Ch2, Ch3, Ch4, Ch5, Ch6, Ch7) MIDI Channels 1-7
* Mixer function of setting the Tone/Patch by MIDI program change for each of the 16 parts
* Tied note function
* 8 Sliders functionality (for individual 16 step sequencer note buttons):
Select buttons: 1-8/9-16 (bank select), A/B (note change, volume change)
* Master Slider (whole part change all 16 step sequencer notes)
Select button: A/B (octive change, volume change)
* 8 patterns & 8 pattern buttons
* Chain function for automatic loop or song playback of patterns
* Set the note type for each pattern: 16th notes, 8th notes, or quarter notes
Edit Functions (same as XW-G1):
* Copy Pattern
* Clear Pattern
* Clear Step Sequencer
* Part Program/Patch Edit (MIDI program change info: MSB, LSB, & patch #)
* Slider Edit (volume, notes, chords for Chrd part)
* Chain Edit (steps for each pattern to play and LOOP or END)
File Functions: All the above information gets stored in a single step sequencer file
* Save Step Sequencer File
* Load Step Sequencer File
-
LOL
Since I can not afford a second Casio XW (G1 or P1), I created this app to play a $100 keyboard (I have owned for several years) with a step sequencer tempo synced with my Casio XW-G1 step sequencer. It also has enhancements such as programming step sequences for all 16 MIDI channels.
-
2014/10/01 Demo Virtual Step Sequencer XW version Alpha.0.5 functionality modeled from the Casio XW-G1 (created during spare time over the last 3 months for my personal use only).
-
3
-
Has the XW-G1 been discontinued?
in XW-G1 Specific
Posted
Thanks everyone for all the responses!