craZivn
-
Posts
47 -
Joined
-
Last visited
Content Type
Profiles
Forums
Downloads
Everything posted by craZivn
-
What is your ideal Next Generation of PX-5S for 2020?
craZivn replied to Reg MidiStage's topic in Privia Pro PX-5S
Oh, and the option to make zones or tones monophonic would be very useful! Ivan -
What is your ideal Next Generation of PX-5S for 2020?
craZivn replied to Reg MidiStage's topic in Privia Pro PX-5S
I basically voted yes on the "to keep" options, plus the expression pedal and the touch strip as well as the organ modeler because eh, why not. Overall I''ve been quite pleased with my PX just the way it is and I've used it hard over the years. One thing that I think is vitally important is that if and when Casio produces a gen2 PX, it must be able to load Stage Settings from the current PX5S. Having to re-program all the Stage Settings that I've spent hours on perfecting would be a deal-breaker for me. Ivan -
My condolences! You are the next victim of the Bb velocity anomaly. Fortunately, you've got experience disassembling your board already so that's going to come in handy. Here's a thread which covers the repair pretty well. Ivan
-
I've had an issue with my slider #4 being over-sensitive for years. It's almost as if it's in between two detection contacts (or however that works) and can't decide exactly what position it's in. That screen appears when you move a slider and disappears moments after the slider stops so it looks like you might be having the same issue I have. I wish I could offer more help, I haven't yet tried cleaning the pot on my slider to see if it helps. Need to get to that one of these days. Ivan
-
Yep, what Brad said! I'd just like to add that after you set your selected slider or knob to control "CC07 Volume", you'll have to navigate to Edit>Stage Setting>Zone Edit>Controller Edit and then turn the selected knob or slider OFF for all zones except the one that you want it to control. Ivan
-
Version 1.0.0
72 downloads
This is a simplified stage setting for "Africa" by Toto. There are three segments: The main synth-horn bit (A1-A4), the wood-block sounds (A0-F#1) and the solo sound (B4-C8). My bandmates insisted on doing a simpled-down version of the song so I didn't go to the trouble of programming other sounds like the flute. Here's a quick demo of the sounds: -
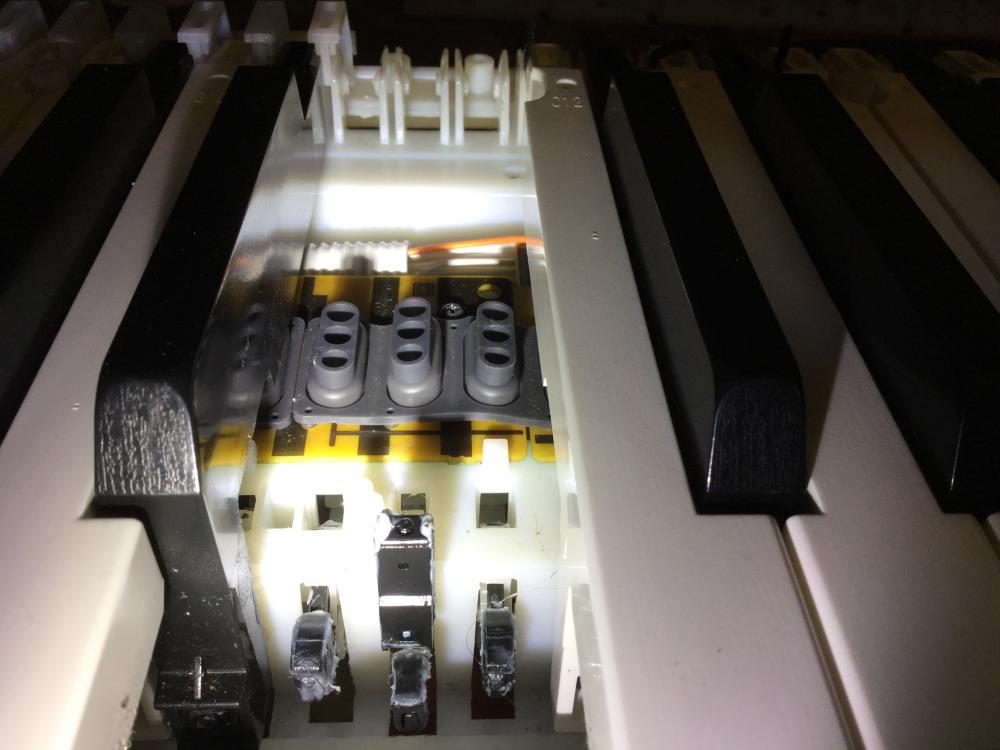
You're welcome Dave! Quick update: The Ab5 key started doing the same thing so I disassembled the keybed and moved the circuit board, and gave it the cotton-ball implant like I did with the other circuit board months ago. I also took the opportunity to remove all the keys and rubber dome strips and give the contacts a thorough cleaning. The Ab2 key, which was the one giving me issues before, has been problem-free since the last operation with the circuit board and the cotton ball, although I did notice (and clean off) a little more of the grease residue beginning to creep along under the rubber dome on a couple keys. I think the only permanent solution would be to clean out all the factory grease from the pivot and slide points, and replace it with some type that is more resistant to breakdown. Perhaps you fellows over at Casio should consider switching to a different grease in the keyboard's assembly? I'm not knowledgeable about greases but it seems there must be something available that won't separate over time. Aside from this issue I've had almost no problems with this keyboard, it's a workhorse in the studio and an absolute weapon on stage to a cover-band player like myself. It's just an inconvenience to have to disassemble and clean it because of an issue that really shouldn't be there. Ivan
-
UPDATE: The moisture issue is back! Here's what I tried this time, will update again if the issue returns. (copied and pasted from my blog at www.crazivn.com.) Update 2019-01-04: The Bb issue is back! This time I am of the opinion that it's not condensation collecting as I suspected before, but that the factory-applied grease may be breaking down and the oily residue making it's way underneath the silicone dome strip via capillary action. I replaced my chopped dome strip with a new one, and this time, to eliminate the "wave" in the strip, I decided to move the outer PCB a little bit to the left to widen the gap between it and the center PCB, thus taking up the slack in the dome strip and forcing it to lie flat. First I disassembled the PX5S and removed all the keys over the left-side outer PCB. Then I removed the seven screws which secured the outer PCB. The outer PCB is aligned in position by a small tab on the plastic chassis, which nests into a notch on the PCB to register it. In order to shift the PCB outward, I cut this tab off with nail clippers and smoothed the remains by shaving it with an X-Acto knife. Here is the tab before I cut it off. When I lifted the PCB off of the plastic chassis, I noticed an oily trail that had collected underneath the PCB. I suspect that this is a separation from the factory grease that was used to lube the key pivot points. Just for fun, I installed a cotton ball in the space between the PCB and the plastic chassis, underneath the gap. The theory is that any further seepage will be collected by the cotton rather than allowed to creep up over the PCB and under the dome strip. Whether or not this will have any effect remains to be seen. In order to shift the outer PCB to the desired location, I had to remove a bit of material from the inside of the screw holes. Here you can see the original location of the registration tab that I cut off to shift the PCB. (Outlined in blue.) With the PCB shifted over, the dome strip can now lie flat with minimal ripple. Hopefully this will prevent the oily residue from contaminating the contacts.
-
Anyone using the Casio Px-5s on rechargeable batteries?
craZivn replied to lesleo's topic in Privia Pro PX-5S
As one who has thoroughly voided the warranty on his PX-5S with the installation of LEDS (and whose warranty is also well expired to boot) I can say with impunity that I have used Panasonic Eneloop NIMH batteries in my PX with great success and zero problems. Actually I have used those batteries in everything with great success and no problems, YMMV. -
Thank you all for the kind words! I have a quick update: I have found it to be easier to disassemble the keyboard while it's on it's stand. That way I can access the top and bottom without having to roll the keyboard over. I've also modded the rubber dome strip as detailed below. Although I can't recommend it yet since I want to give it more time, this is what I did (copied from my blog at crazivn.com): " Addressing the Bb Velocity Issue: If you're here, you're probably already familiar with this issue so I won't go into detail describing it. Cleaning the contacts works well, but the problem will undoubtedly pop up again and most of us don't have the time to pull the board apart every few months to re-clean them. I have a theory that the reason the issue affects this particular key (although it can pop up with adjacent keys also) is that the rubber dome strip doesn't fit flat to the PCB at this point. The rubber dome strip bridges a gap in the PCBs, and the spacing isn't quite perfect so the strip has a slight "wave" to it. This allows moisture to get underneath and contaminate the contact points. My potential solution was to cut the rubber dome strip, and remove a little bit of material from one of the cut faces to allow the strip to rest flat. However, it should be noted that this will allow the cut ends to "flop" due to the spacing of the mounting dowels on the rubber strip. To secure the cut ends, I used a drop of hot glue on the front and back. Make sure the hot glue goes around the top of the rubber, and underneath the bottom of the PCBs to form a sort of "I" shape. This will harden into a sort of clip to hold the rubber to the PCBs. This technique is necessary because hot glue won't adhere to the rubber. Time will tell if this solves the moisture issue. " I can't recommend that anyone cut their rubber dome strips (I'm still giving the mod time to see if there are negative consequences) but that's the story so far. Also, I have a complete spare keybed on hand so I do have a safety net in case I destroy components. Ivan
-
Version 1.0.0
51 downloads
A song-ready SS for "Bring Me To Life" by Evanescence. A0 is the low bass rumble that you hear in the beginning of the song (hit it with your pinky while you're playing the piano part). C8 is the resonant staccato white-noise that you hear after Verse 2 in the song. B0 to E2 is the piano. F2 is the white noise for the intro. The rest of the keys are strings. Use Pedal 1 to sustain the strings while you use your right hand to hit the white noise for the intro. Pedal 2, all sliders and pitch/mod wheels are not used. Here's a short video demonstration of the stage setting, complete with mistakes but you get the idea: Enjoy! Ivan -
Evanescence View File A song-ready SS for "Bring Me To Life" by Evanescence. A0 is the low bass rumble that you hear in the beginning of the song (hit it with your pinky while you're playing the piano part). C8 is the resonant staccato white-noise that you hear after Verse 2 in the song. B0 to E2 is the piano. F2 is the white noise for the intro. The rest of the keys are strings. Use Pedal 1 to sustain the strings while you use your right hand to hit the white noise for the intro. Pedal 2, all sliders and pitch/mod wheels are not used. Here's a short video demonstration of the stage setting, complete with mistakes but you get the idea: Enjoy! Ivan Submitter craZivn Submitted 05/31/2018 Category Song Ready Stage Settings
-
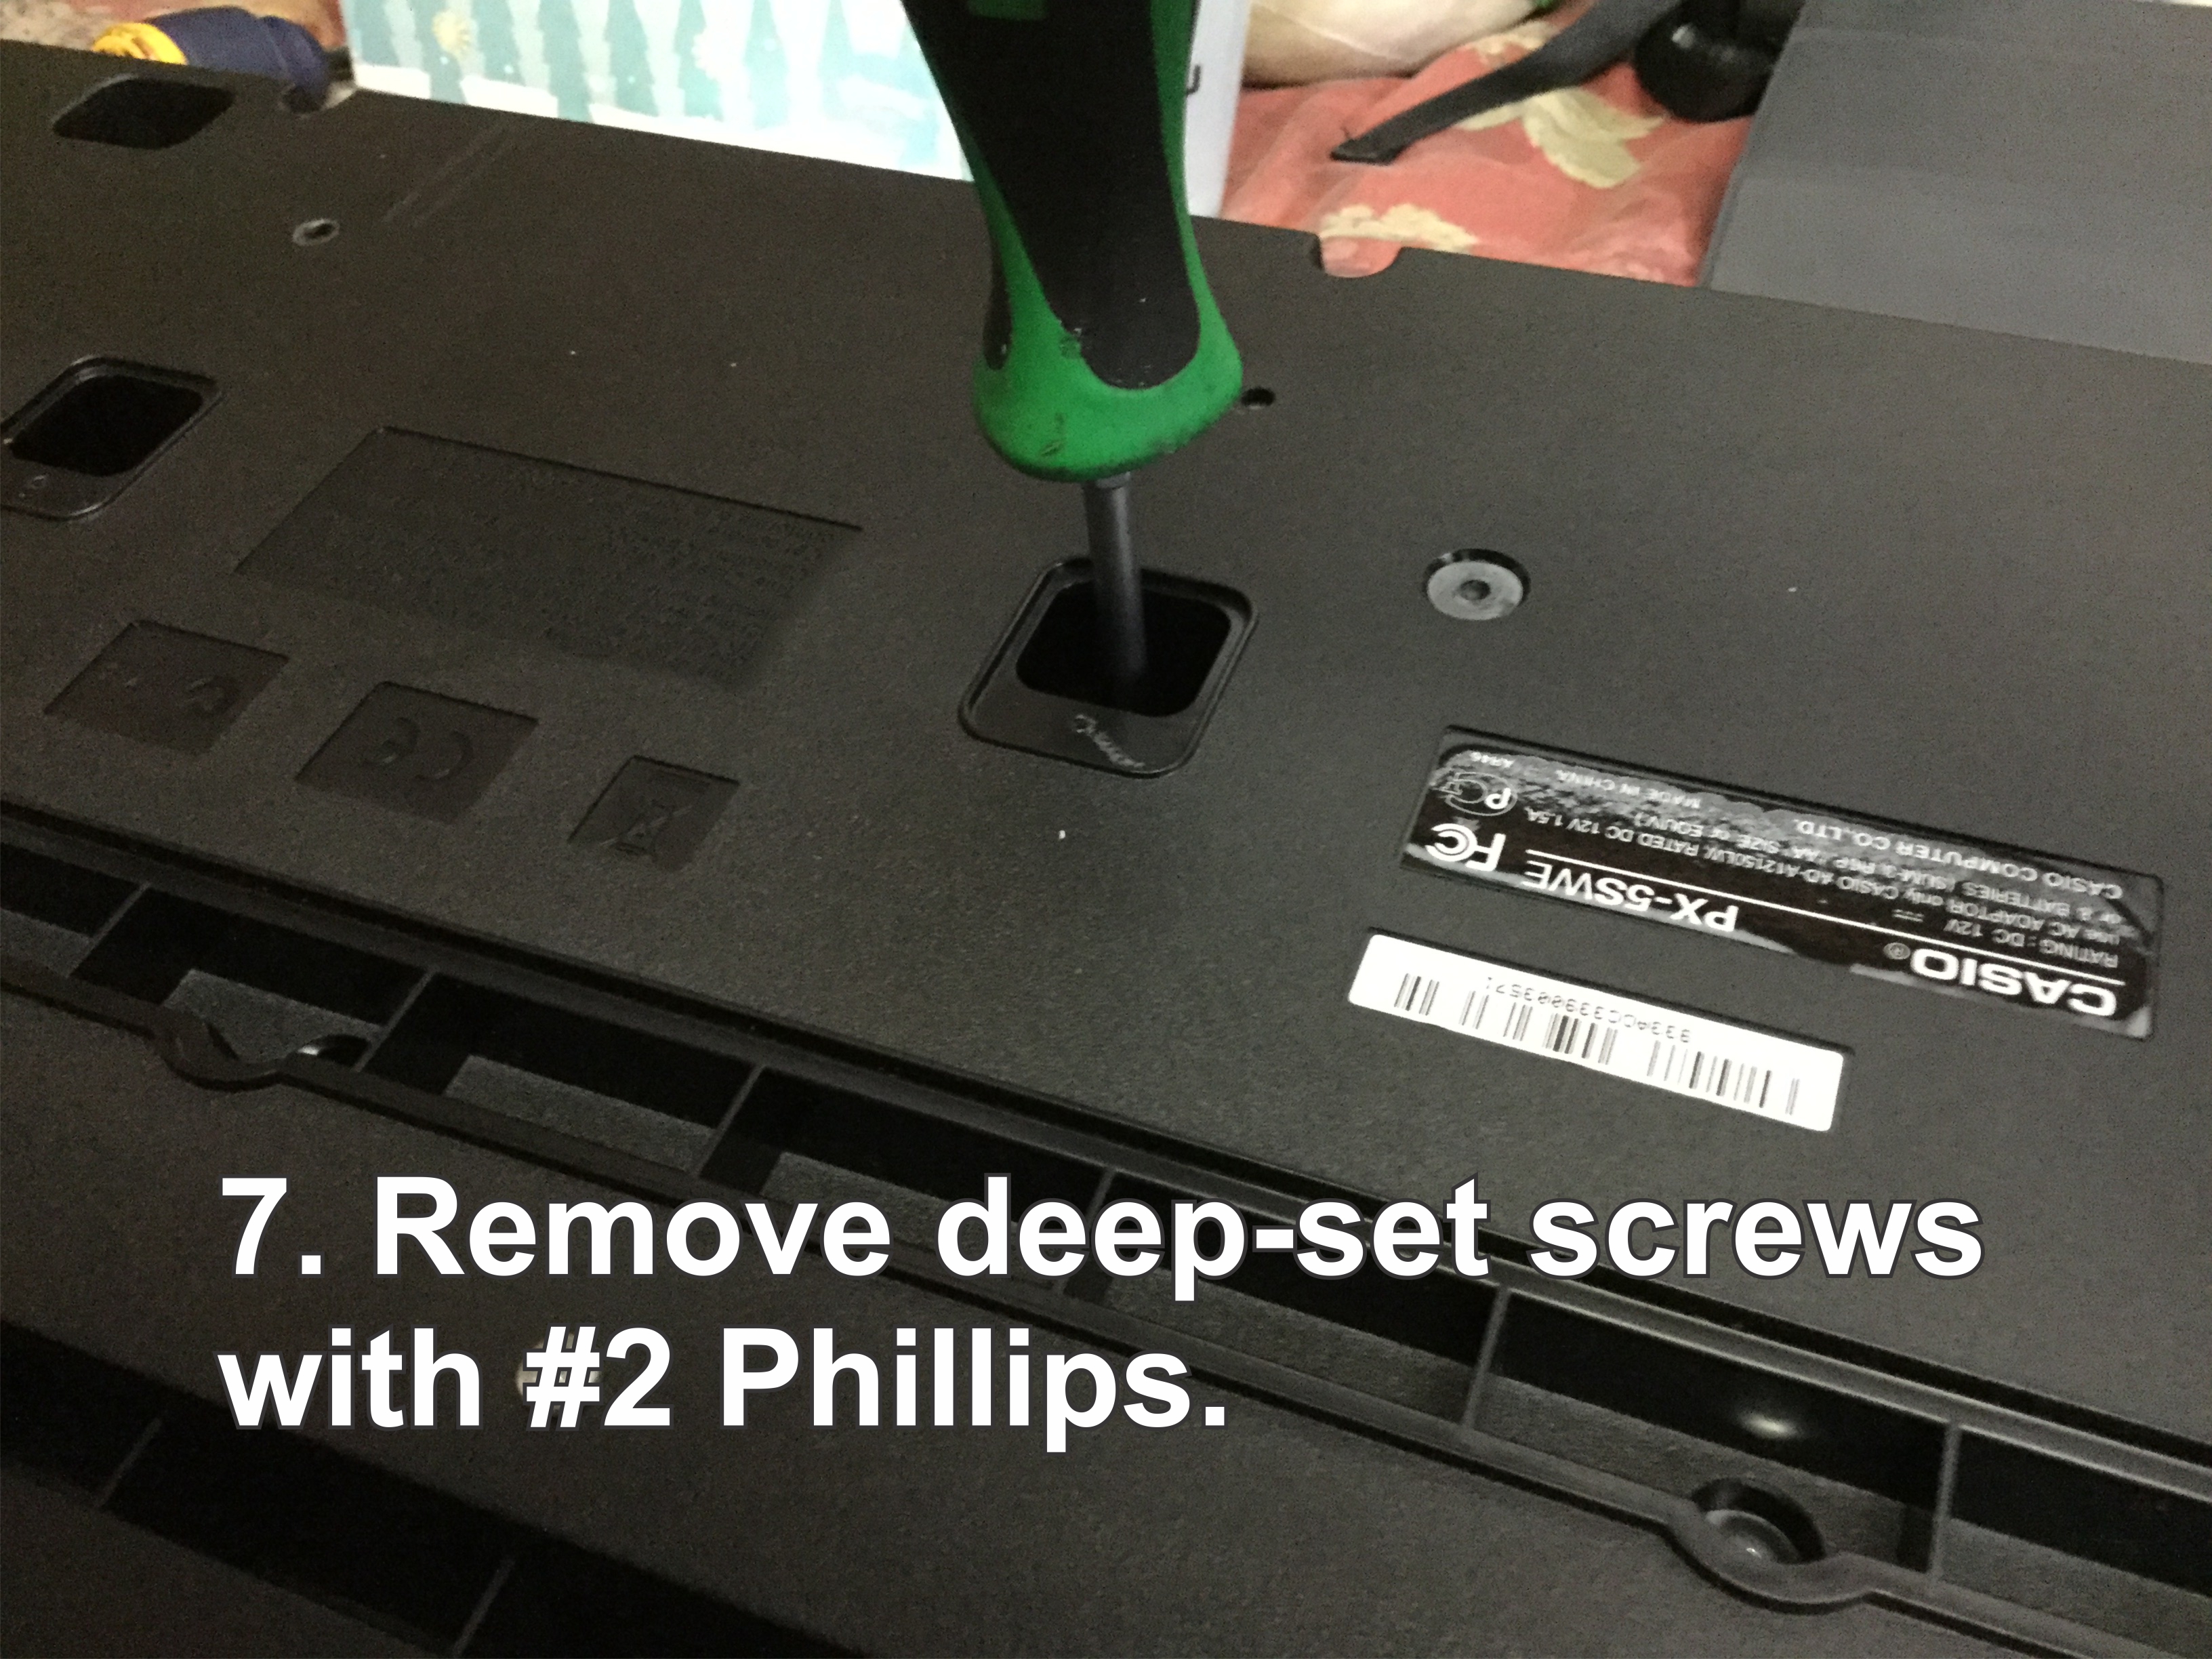
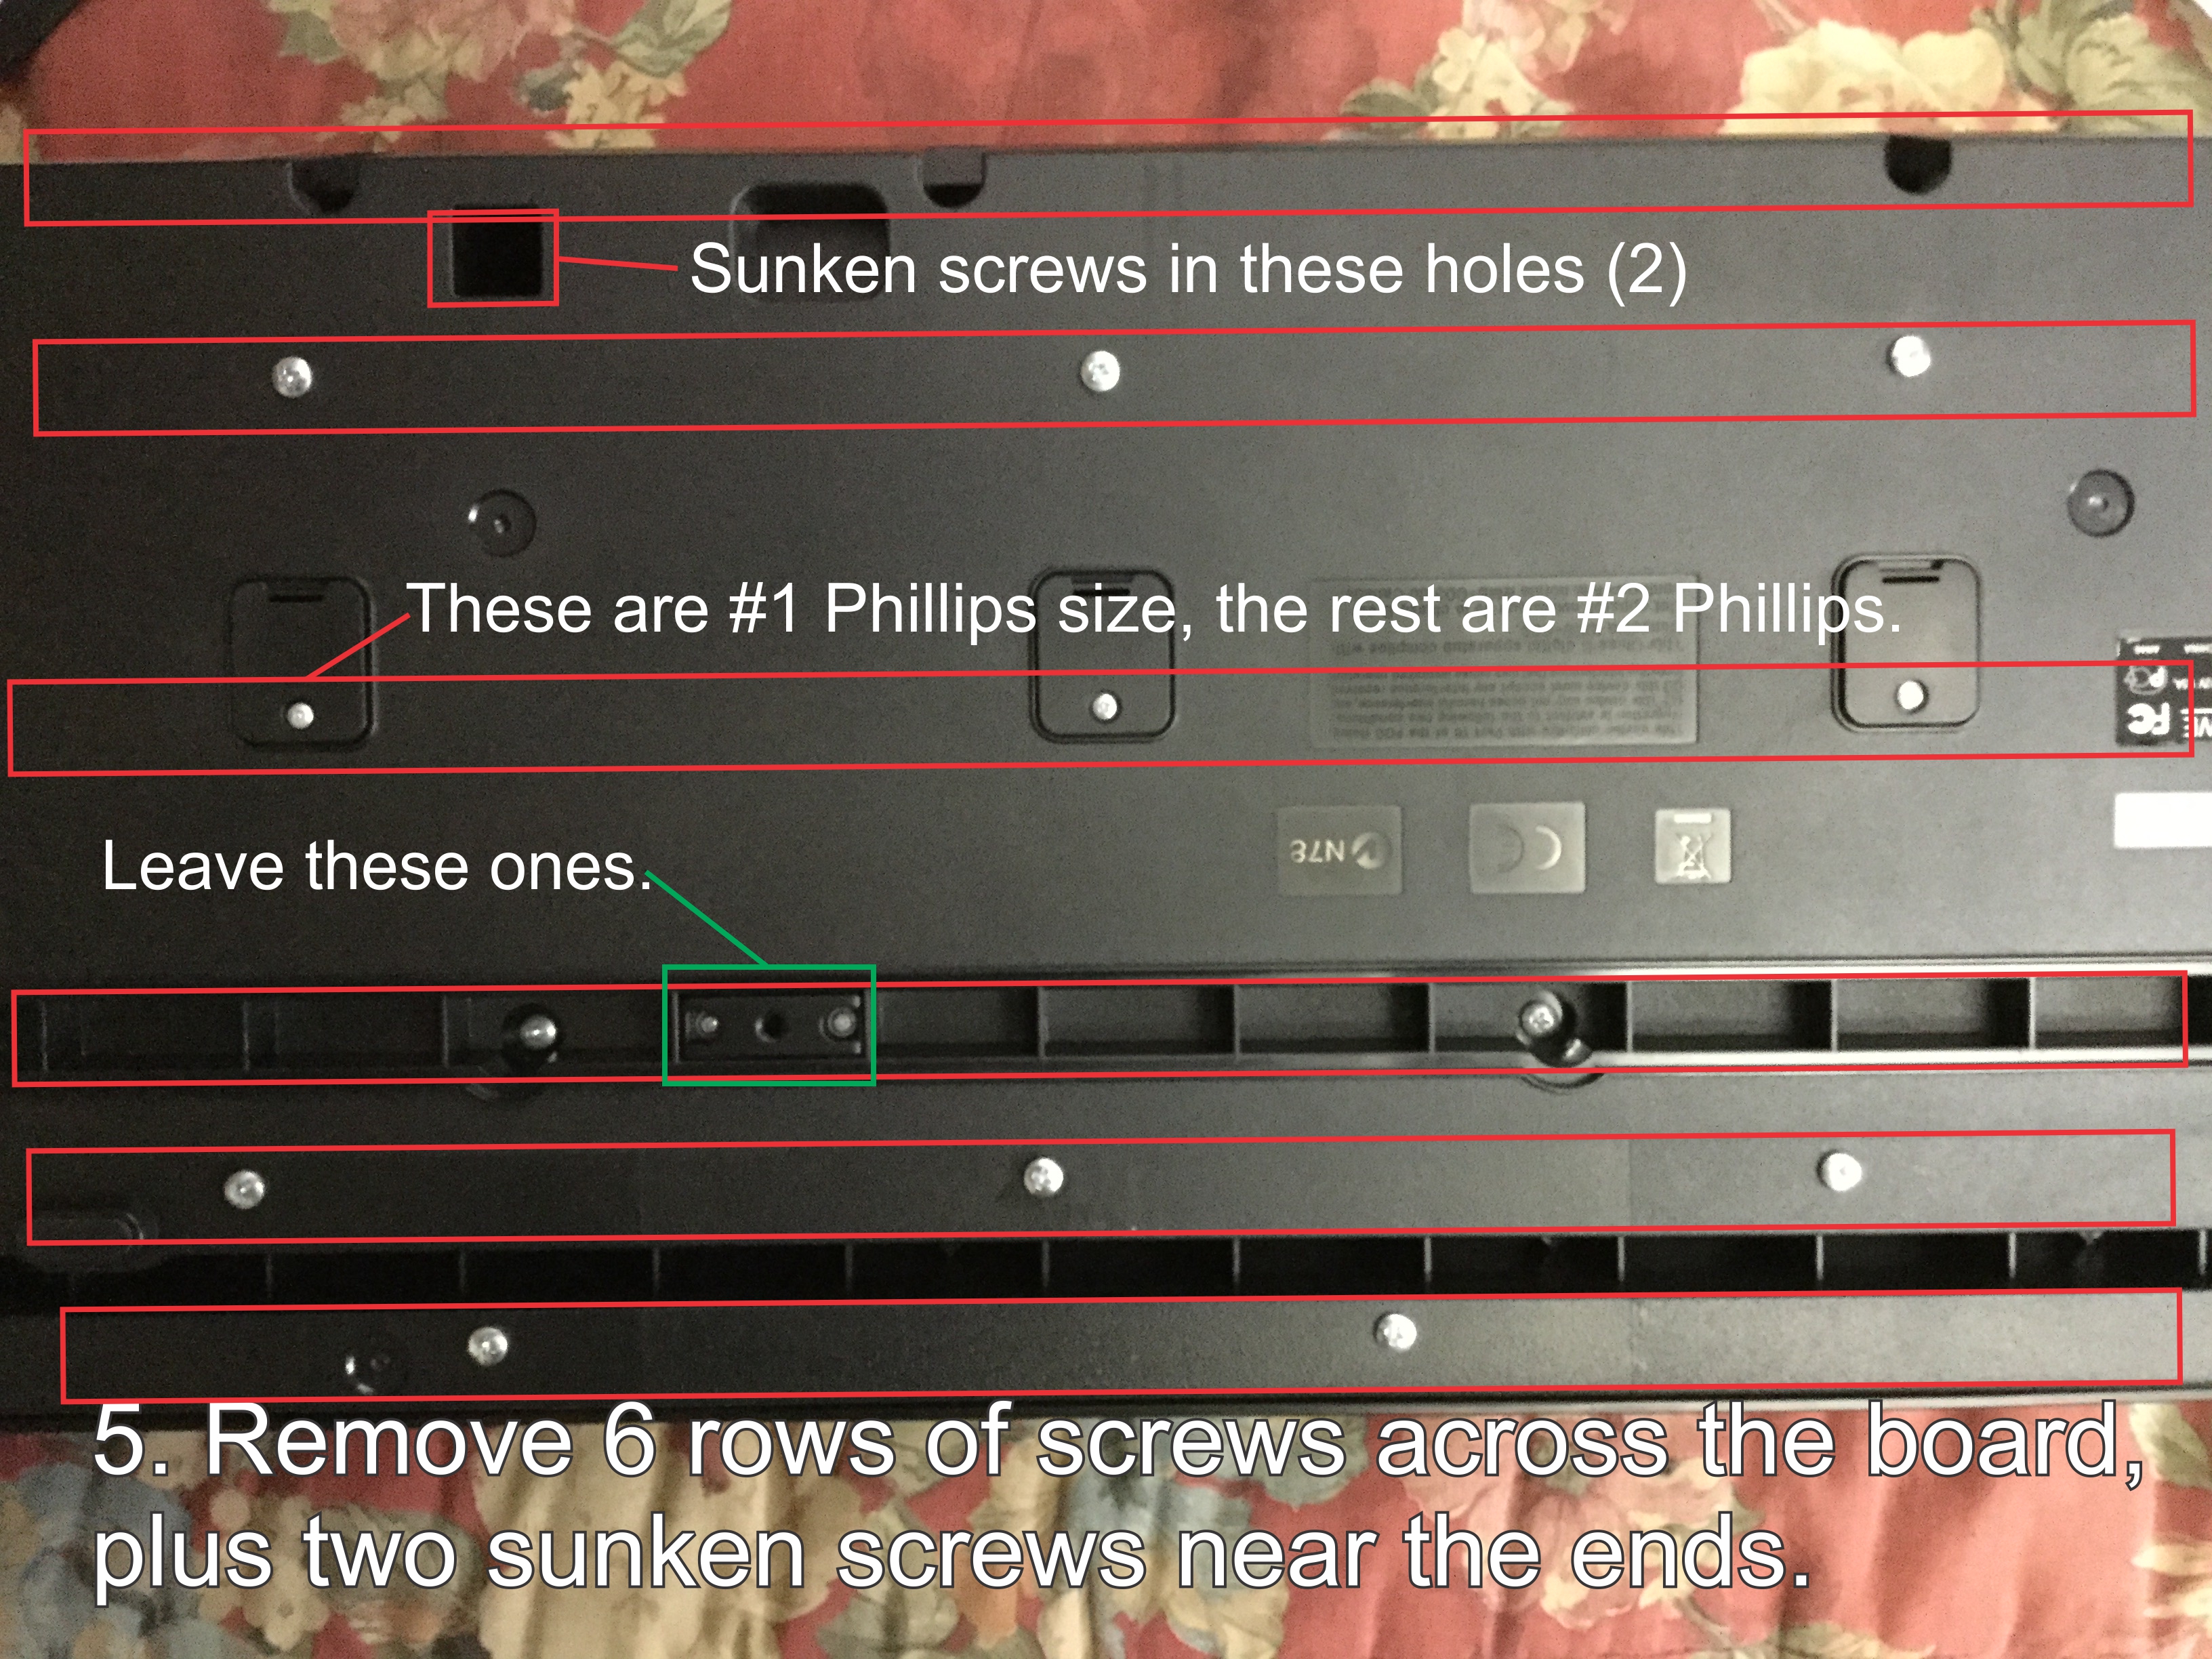
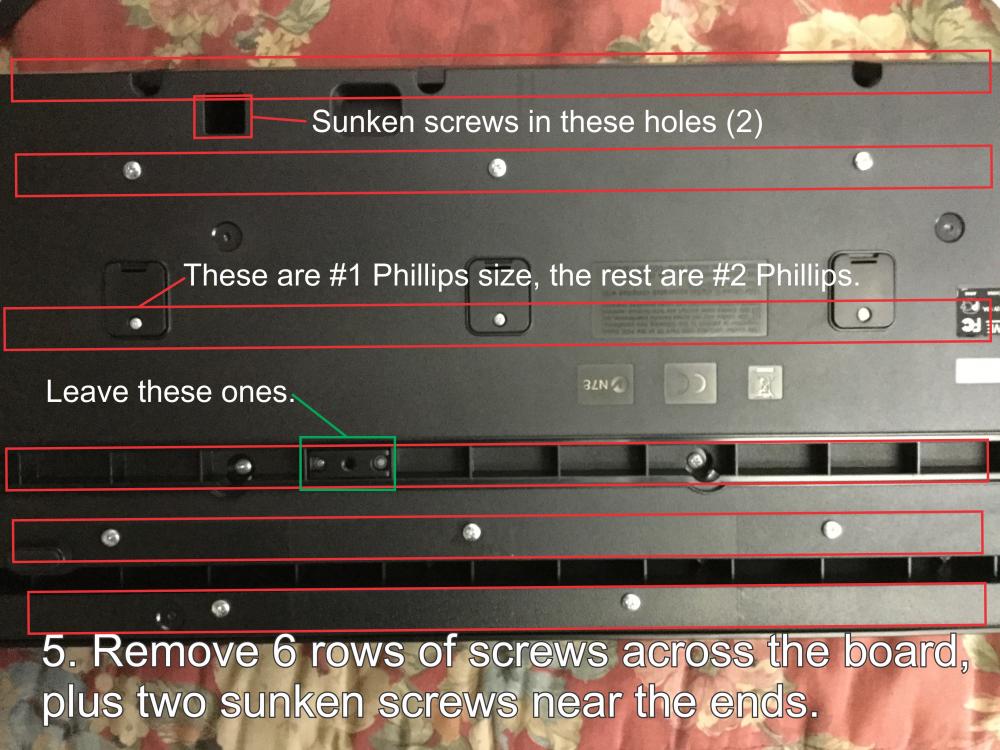
UPDATE: I realized that Step #5 failed to mention the two oddball sunken screws near the ends, updated the #5 picture to correct that mistake.
-
Thank you! If it hadn’t been for your original thread, I almost certainly would have broken something taking mine apart. Your pics and descriptions are what gave me the knowledge (and the courage!) to attempt this operation, now I wouldn’t hesitate to do it again! Hopefully the next guy or girl who does this will have some more pointers to add, and the repair/mod knowledgebase can keep expanding. Regards, Ivan
-
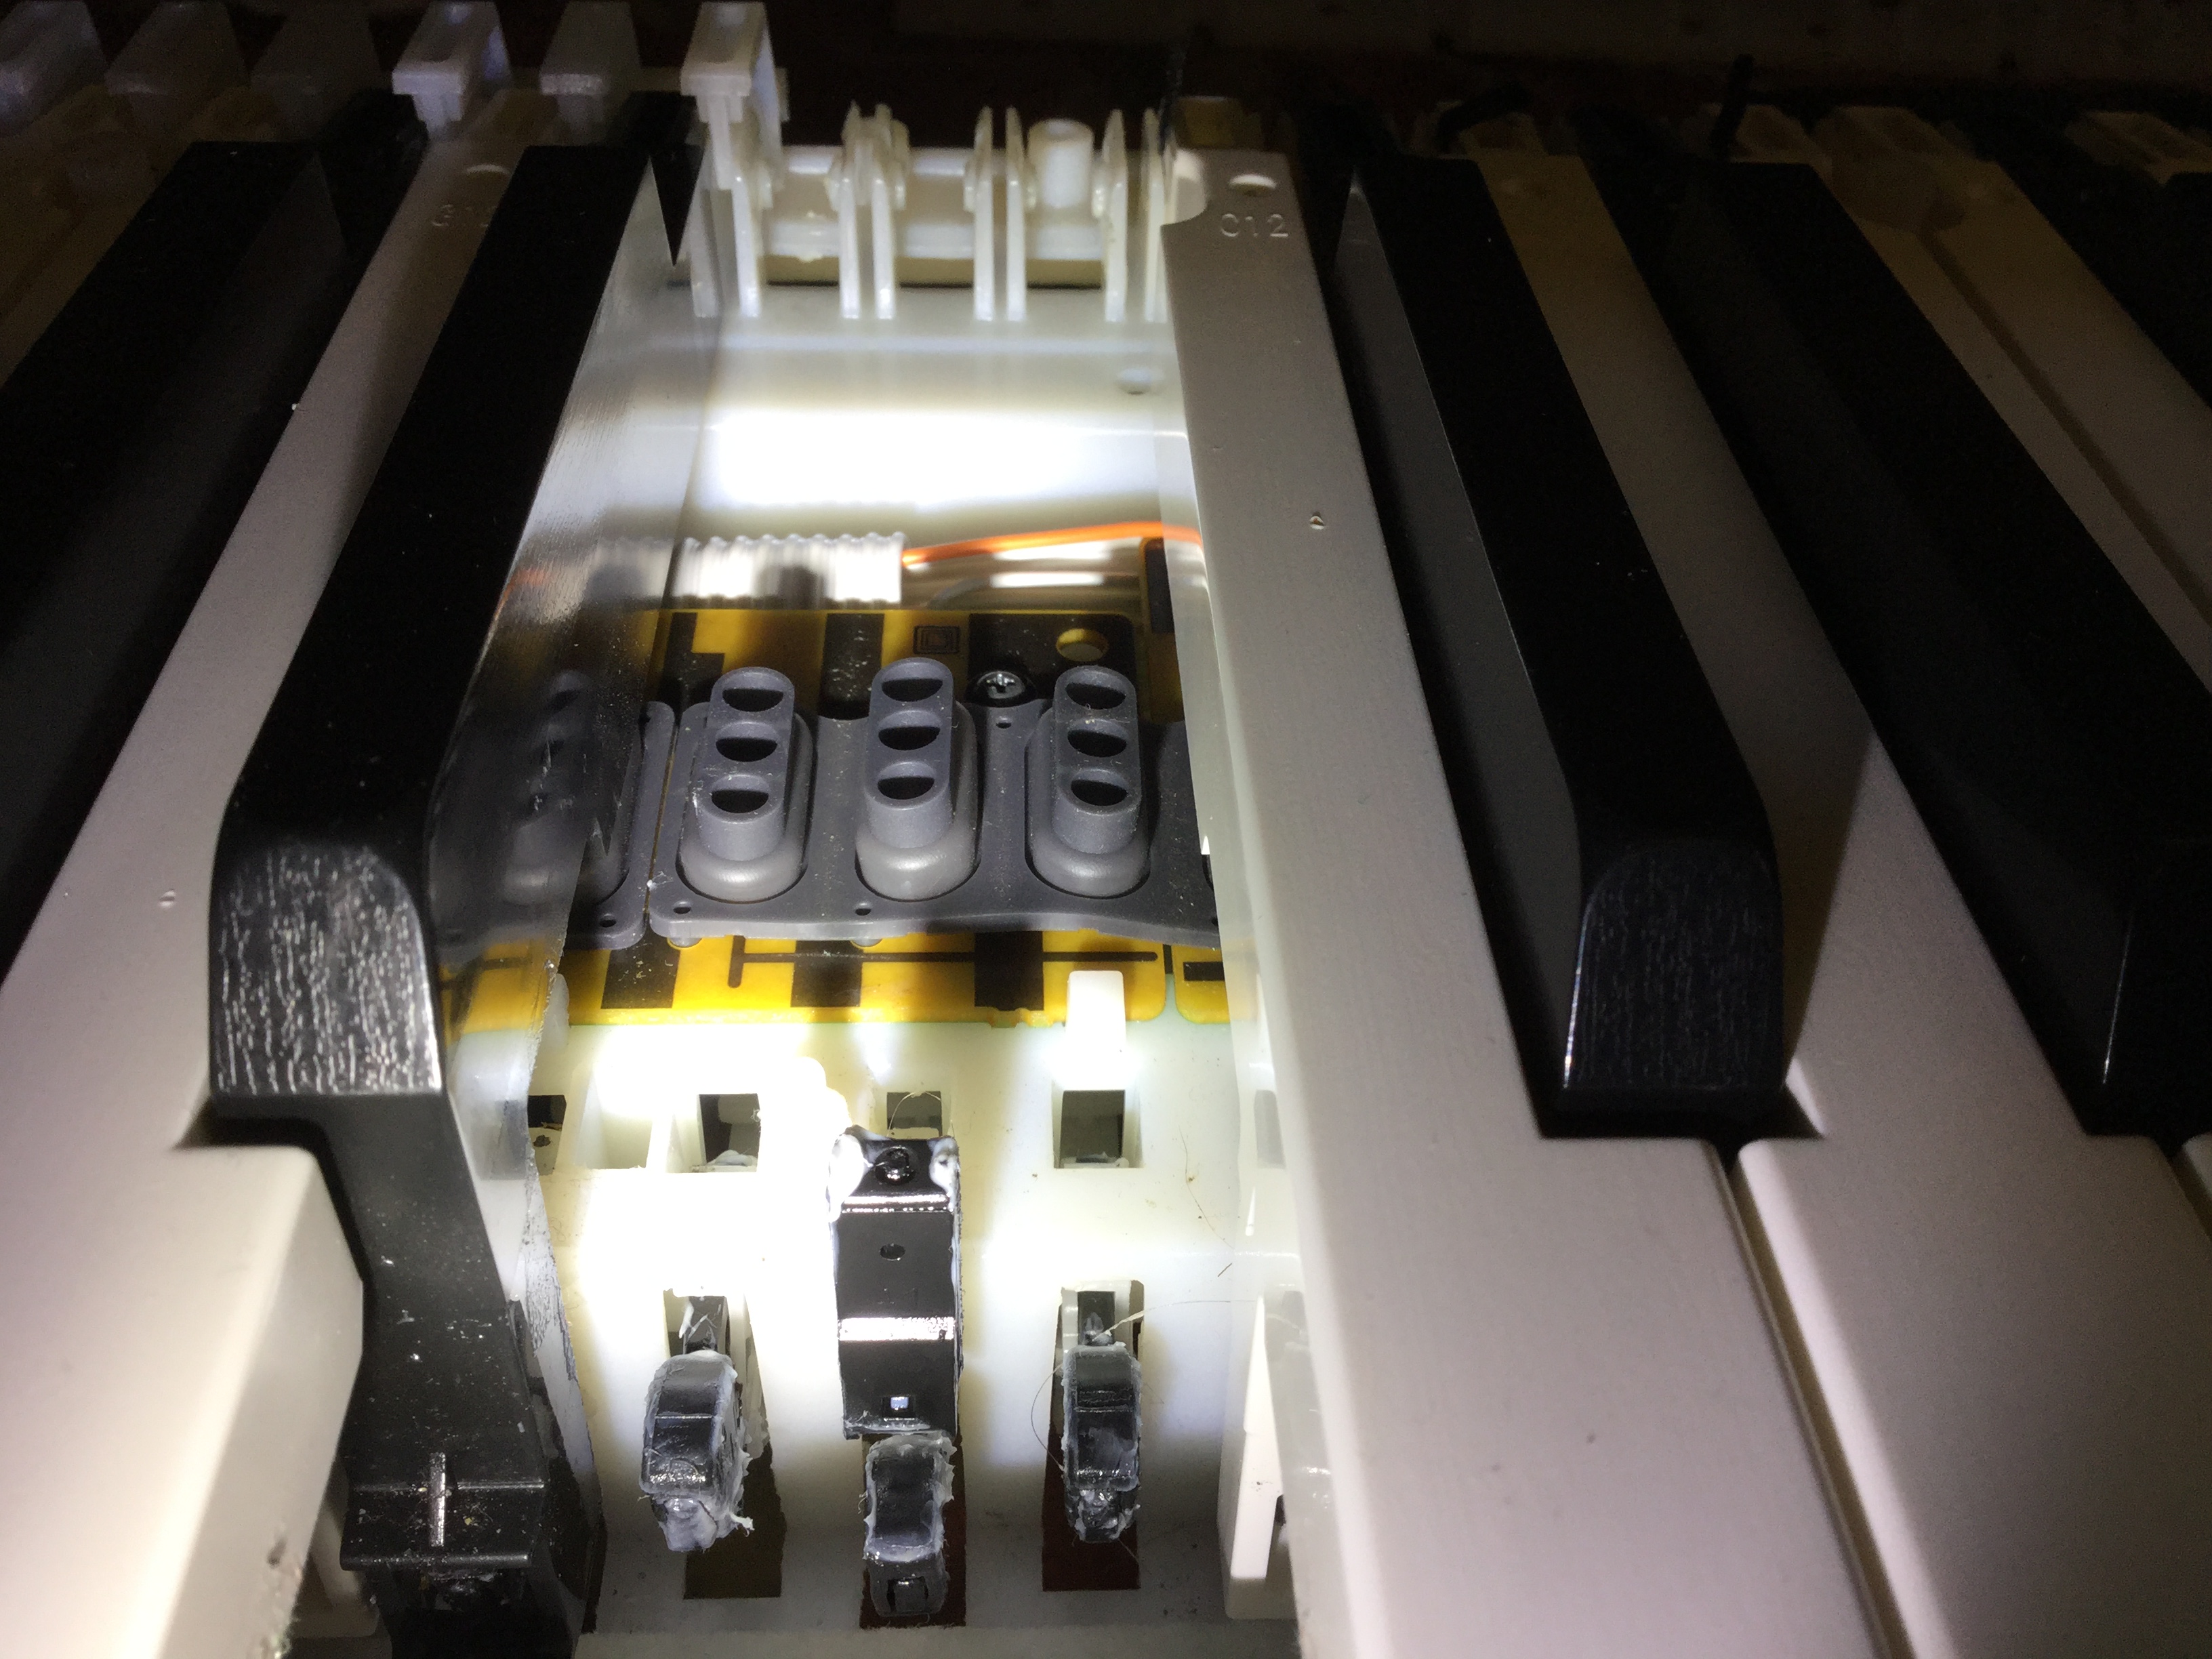
Just tore down my PX today, and just made a thread on it further up the forum, but I have a theory that the reason it's usually the A# key is because it's close to a junction where two boards meet, and the rubber sort of ripples up in that location allowing contaminants to get under it near the A# and B key contacts. Ivan
-
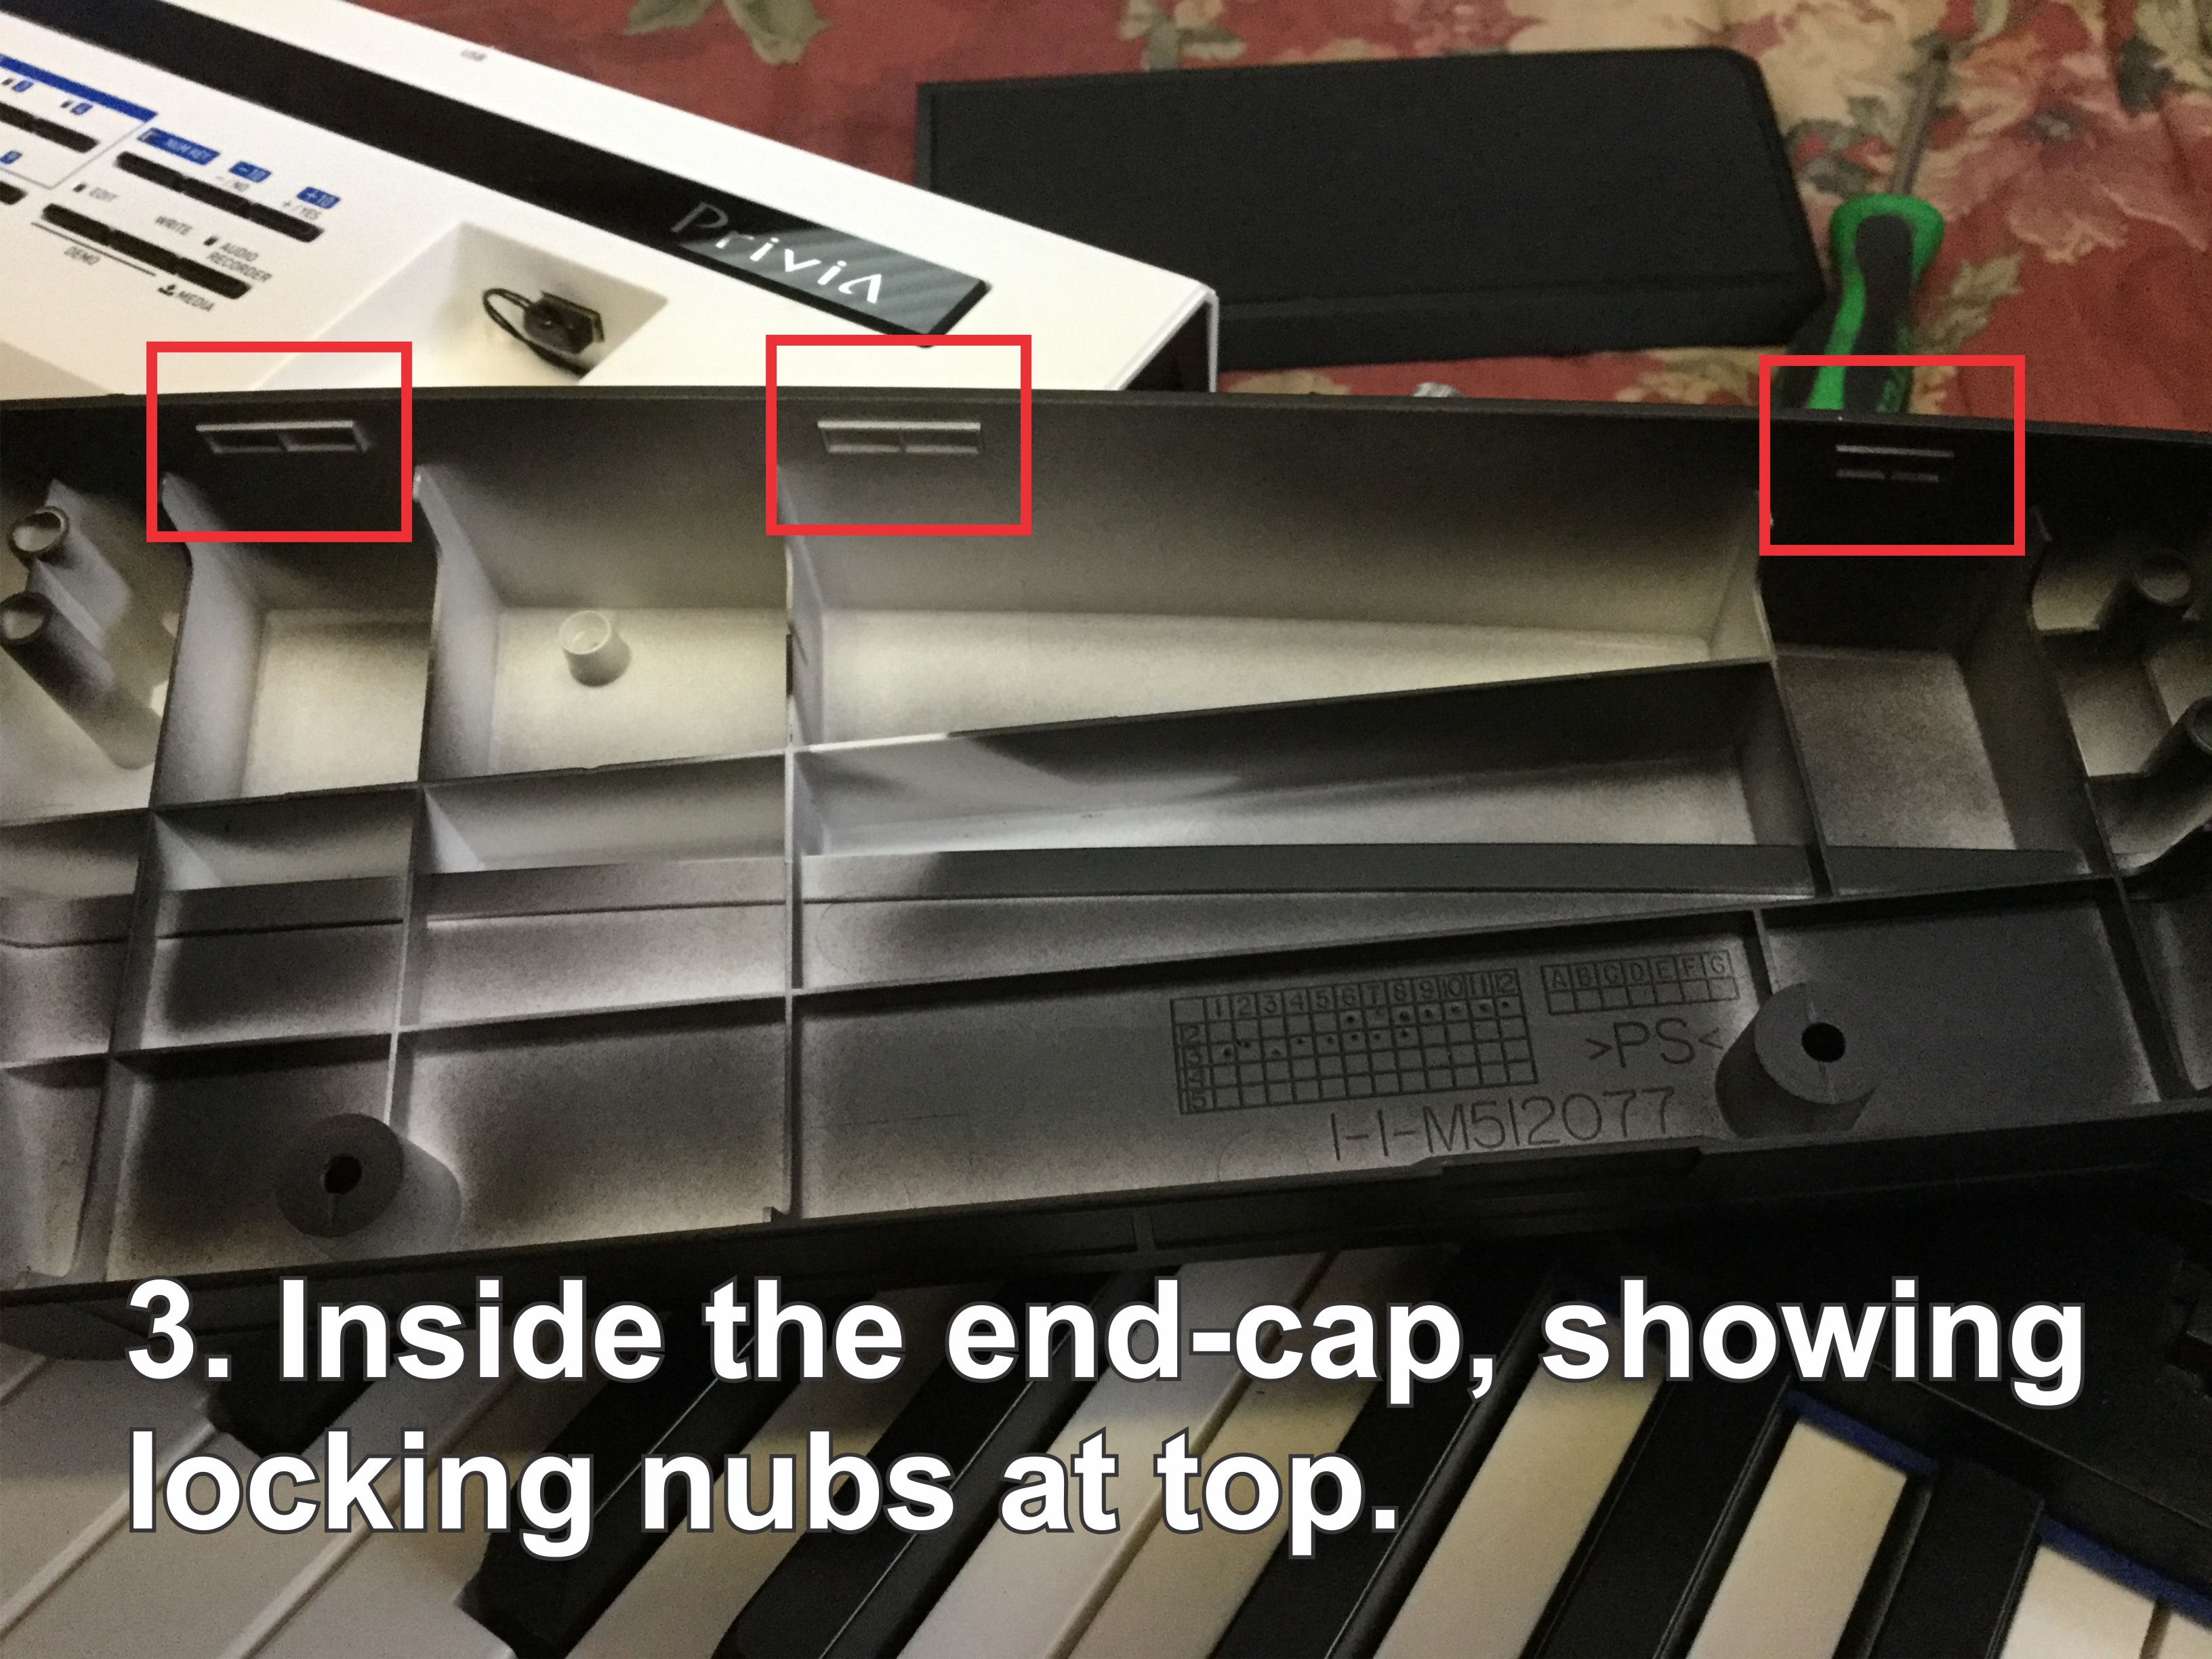
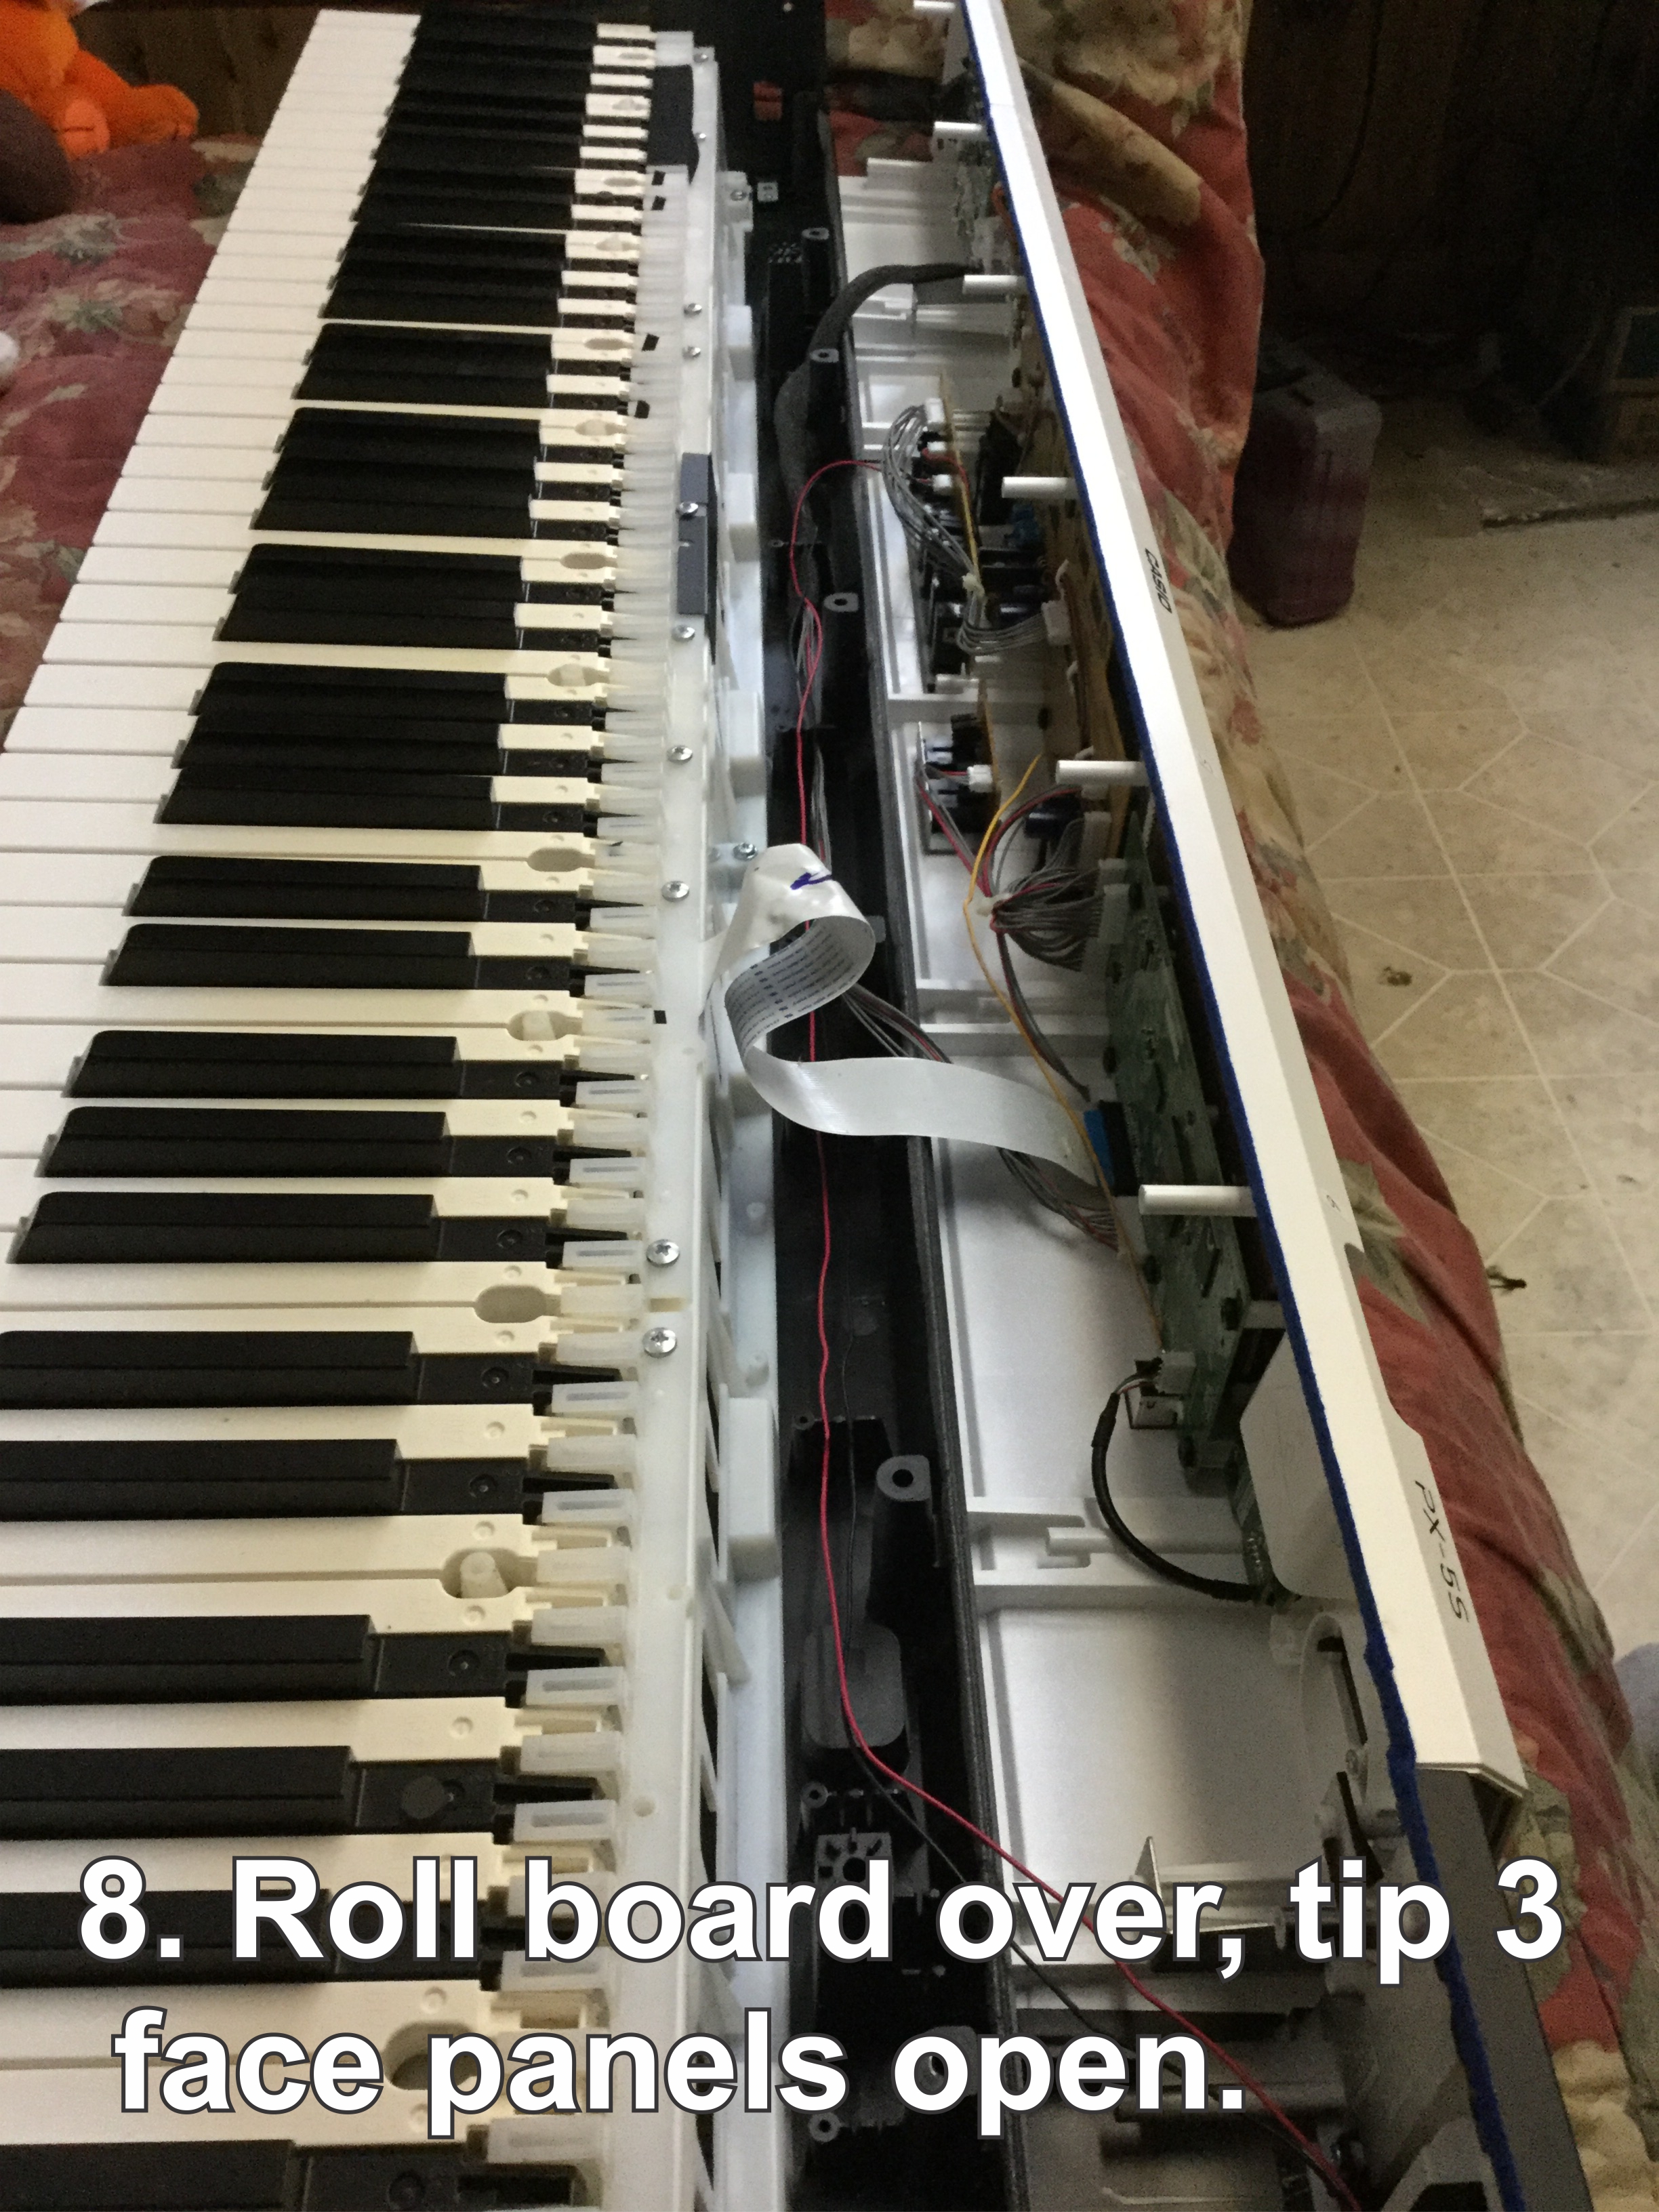
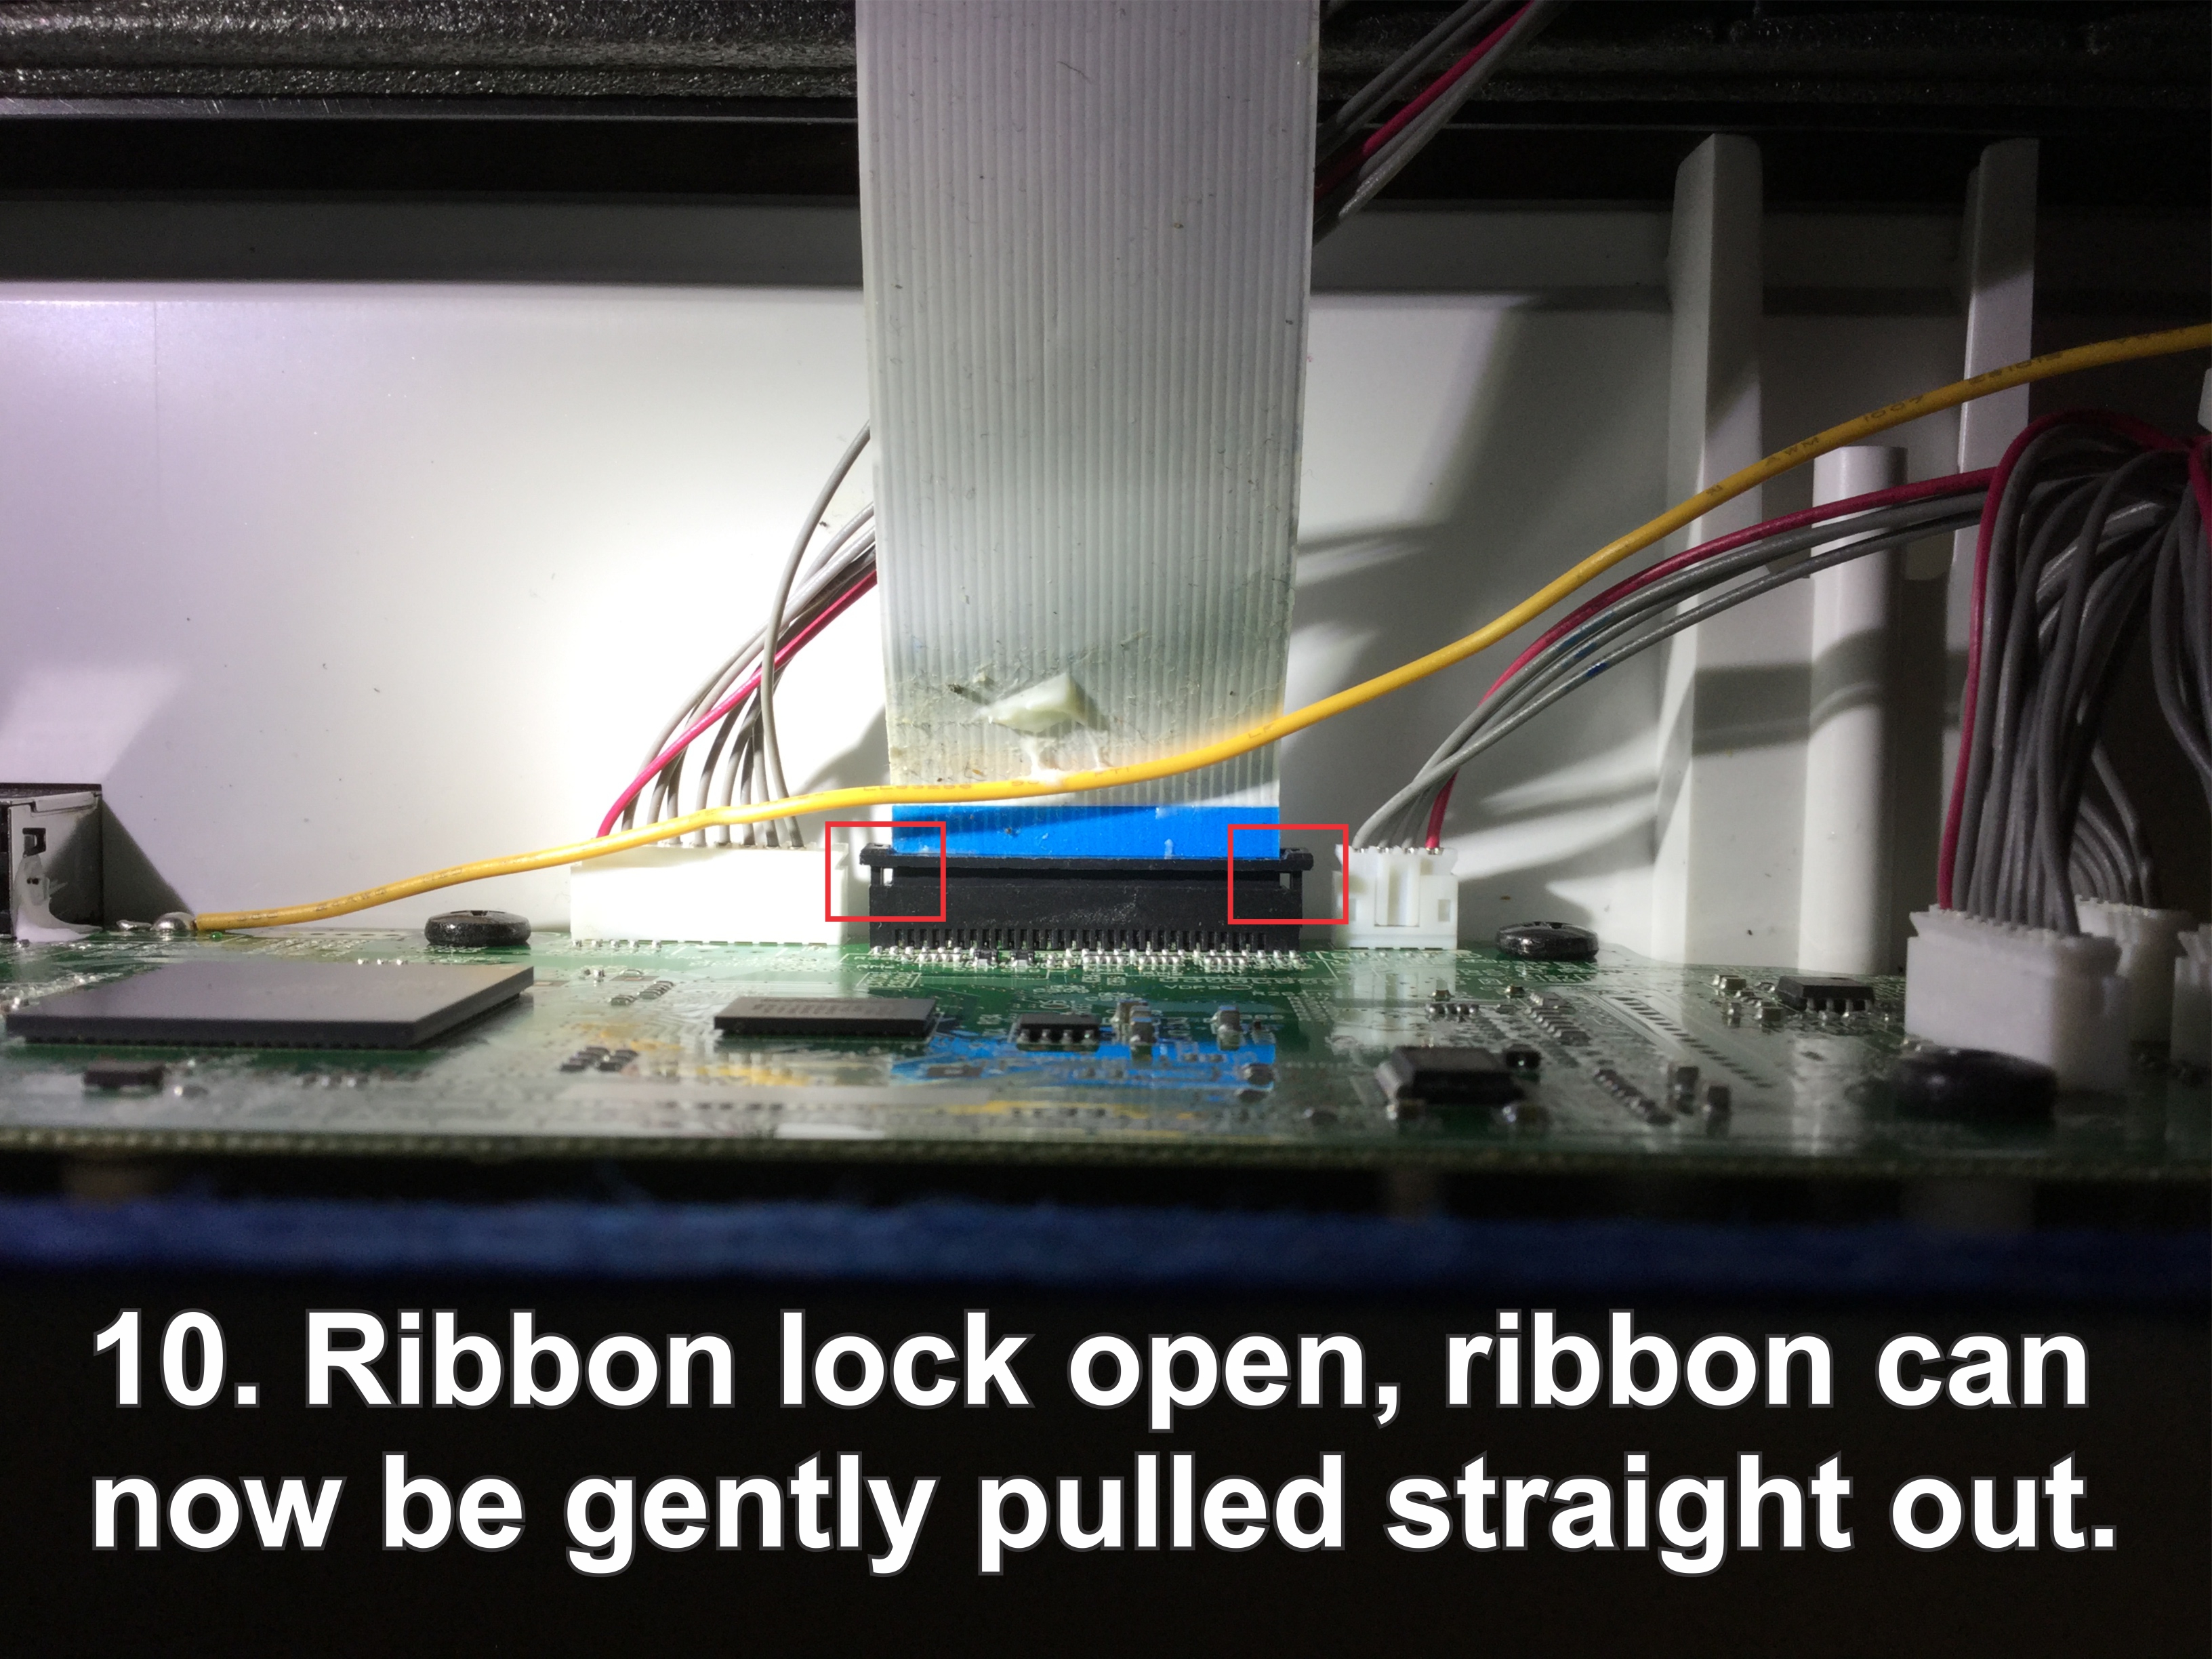
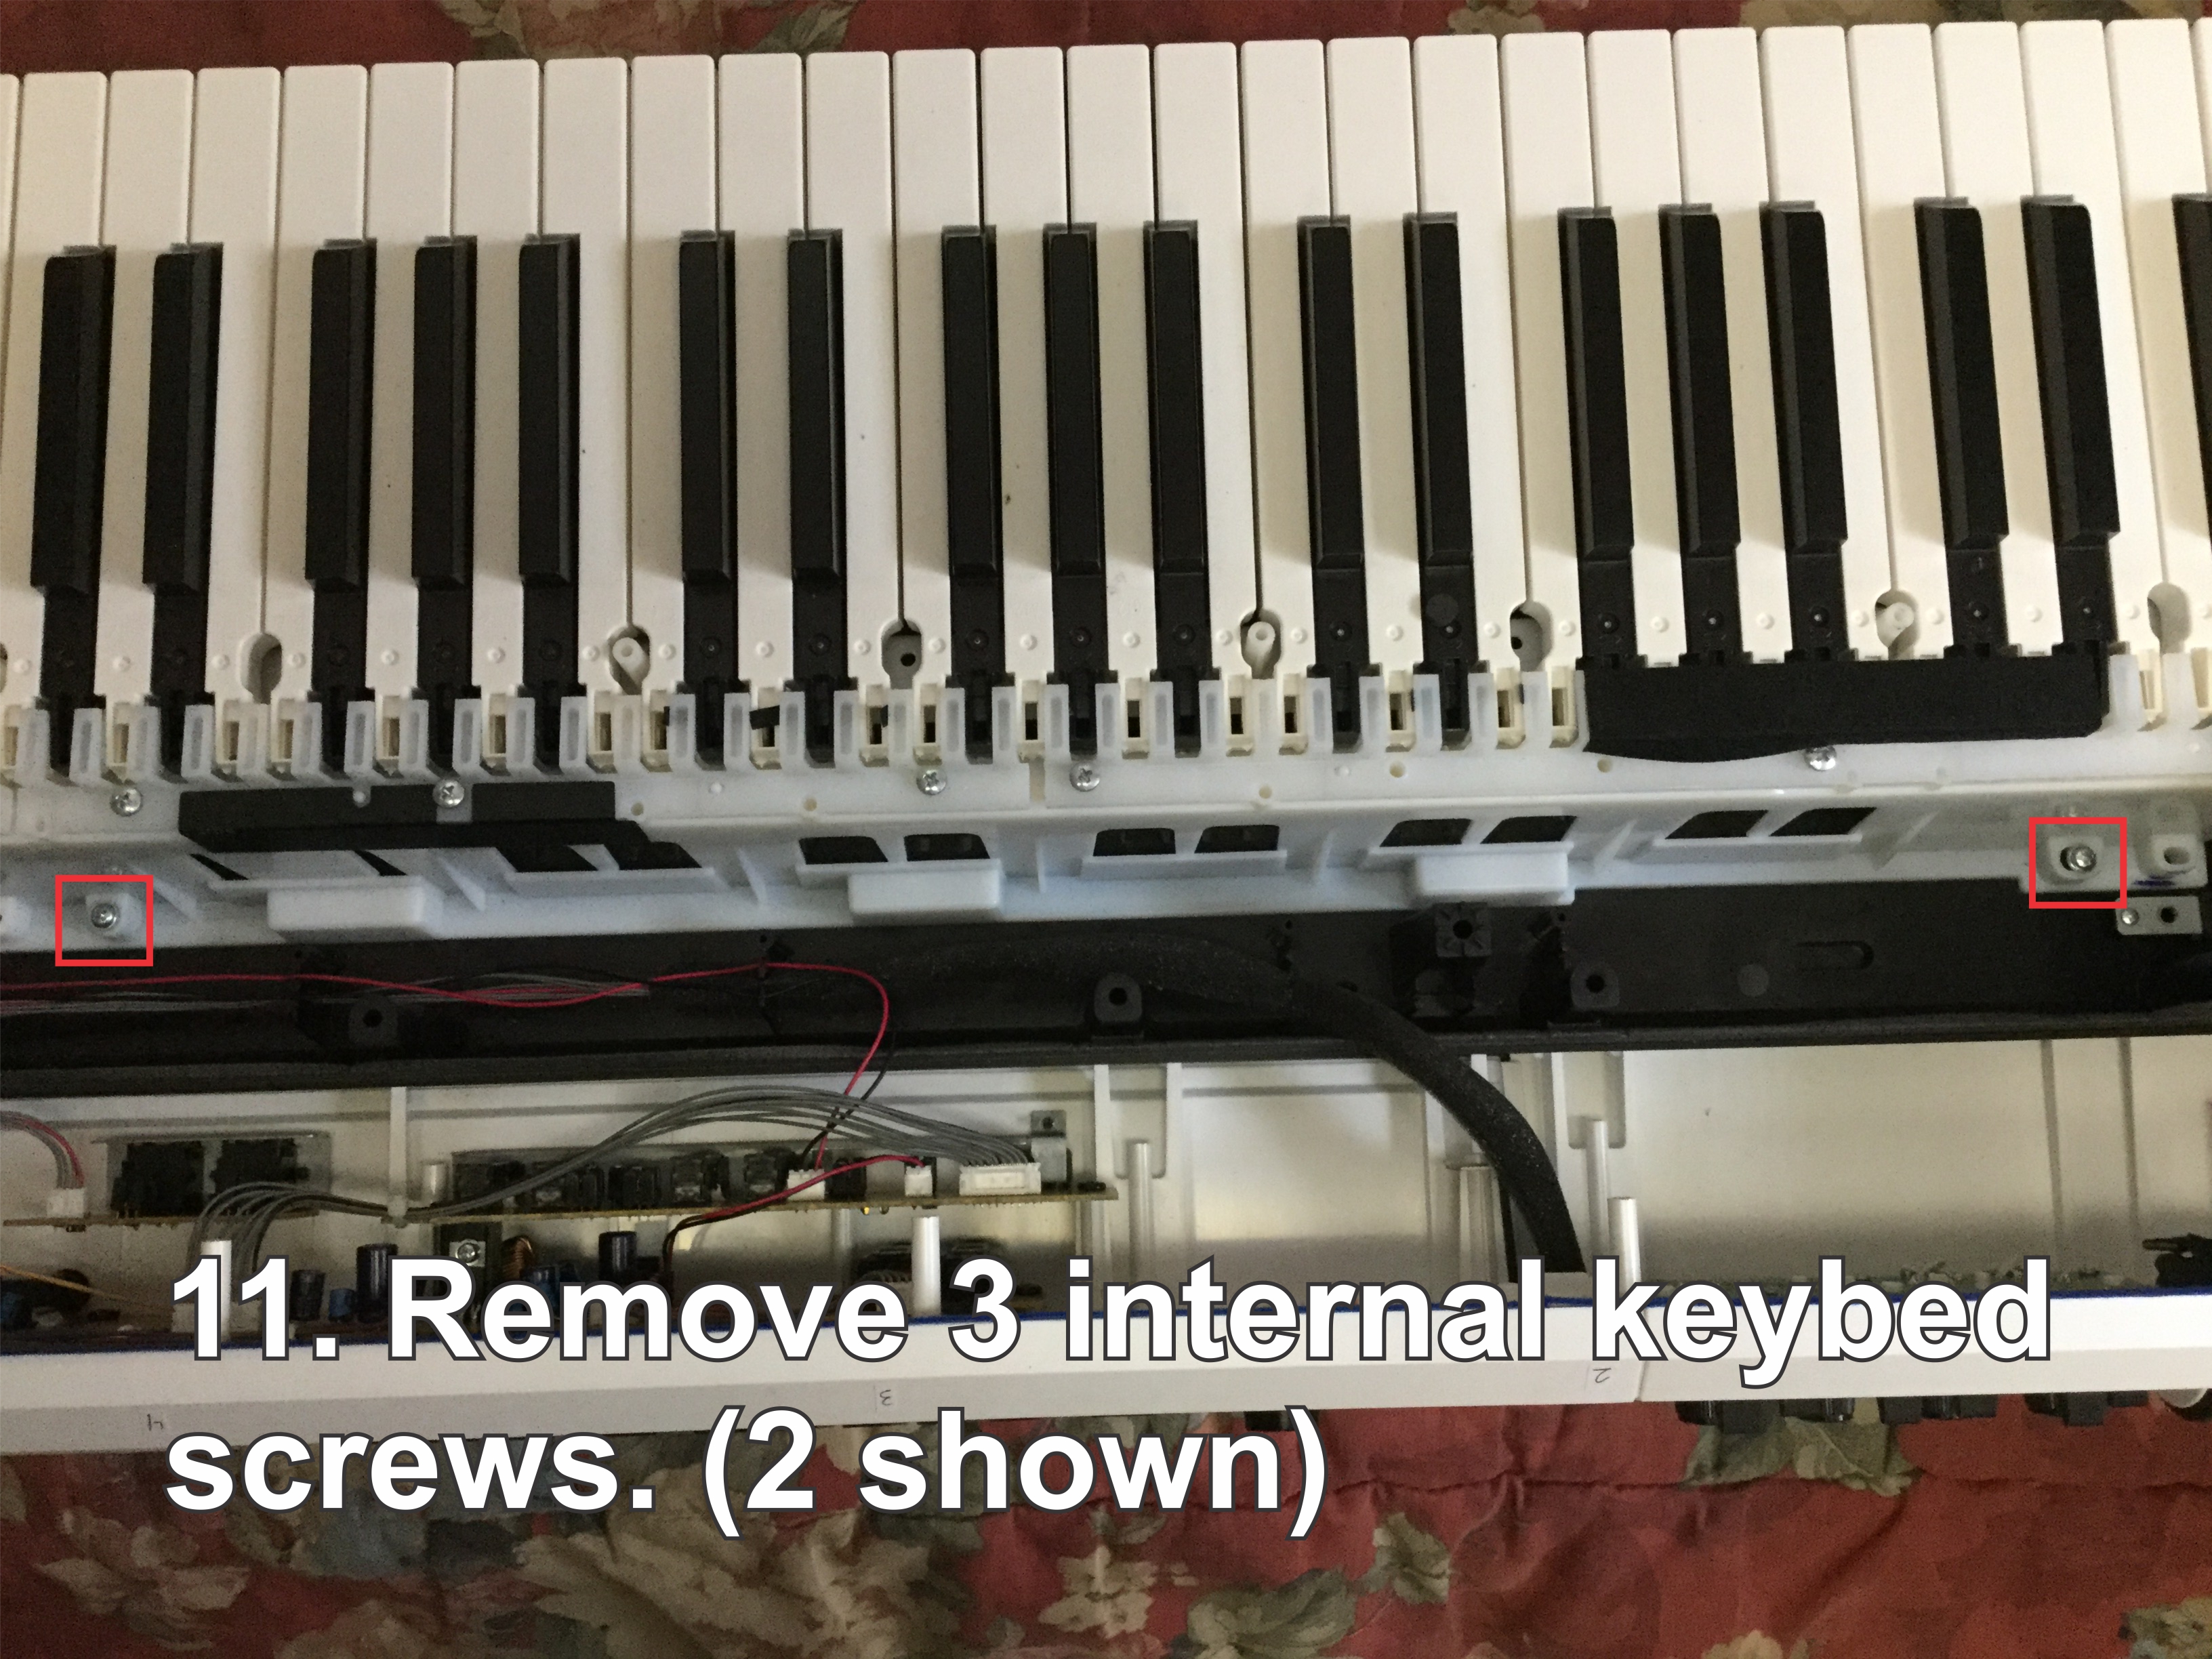
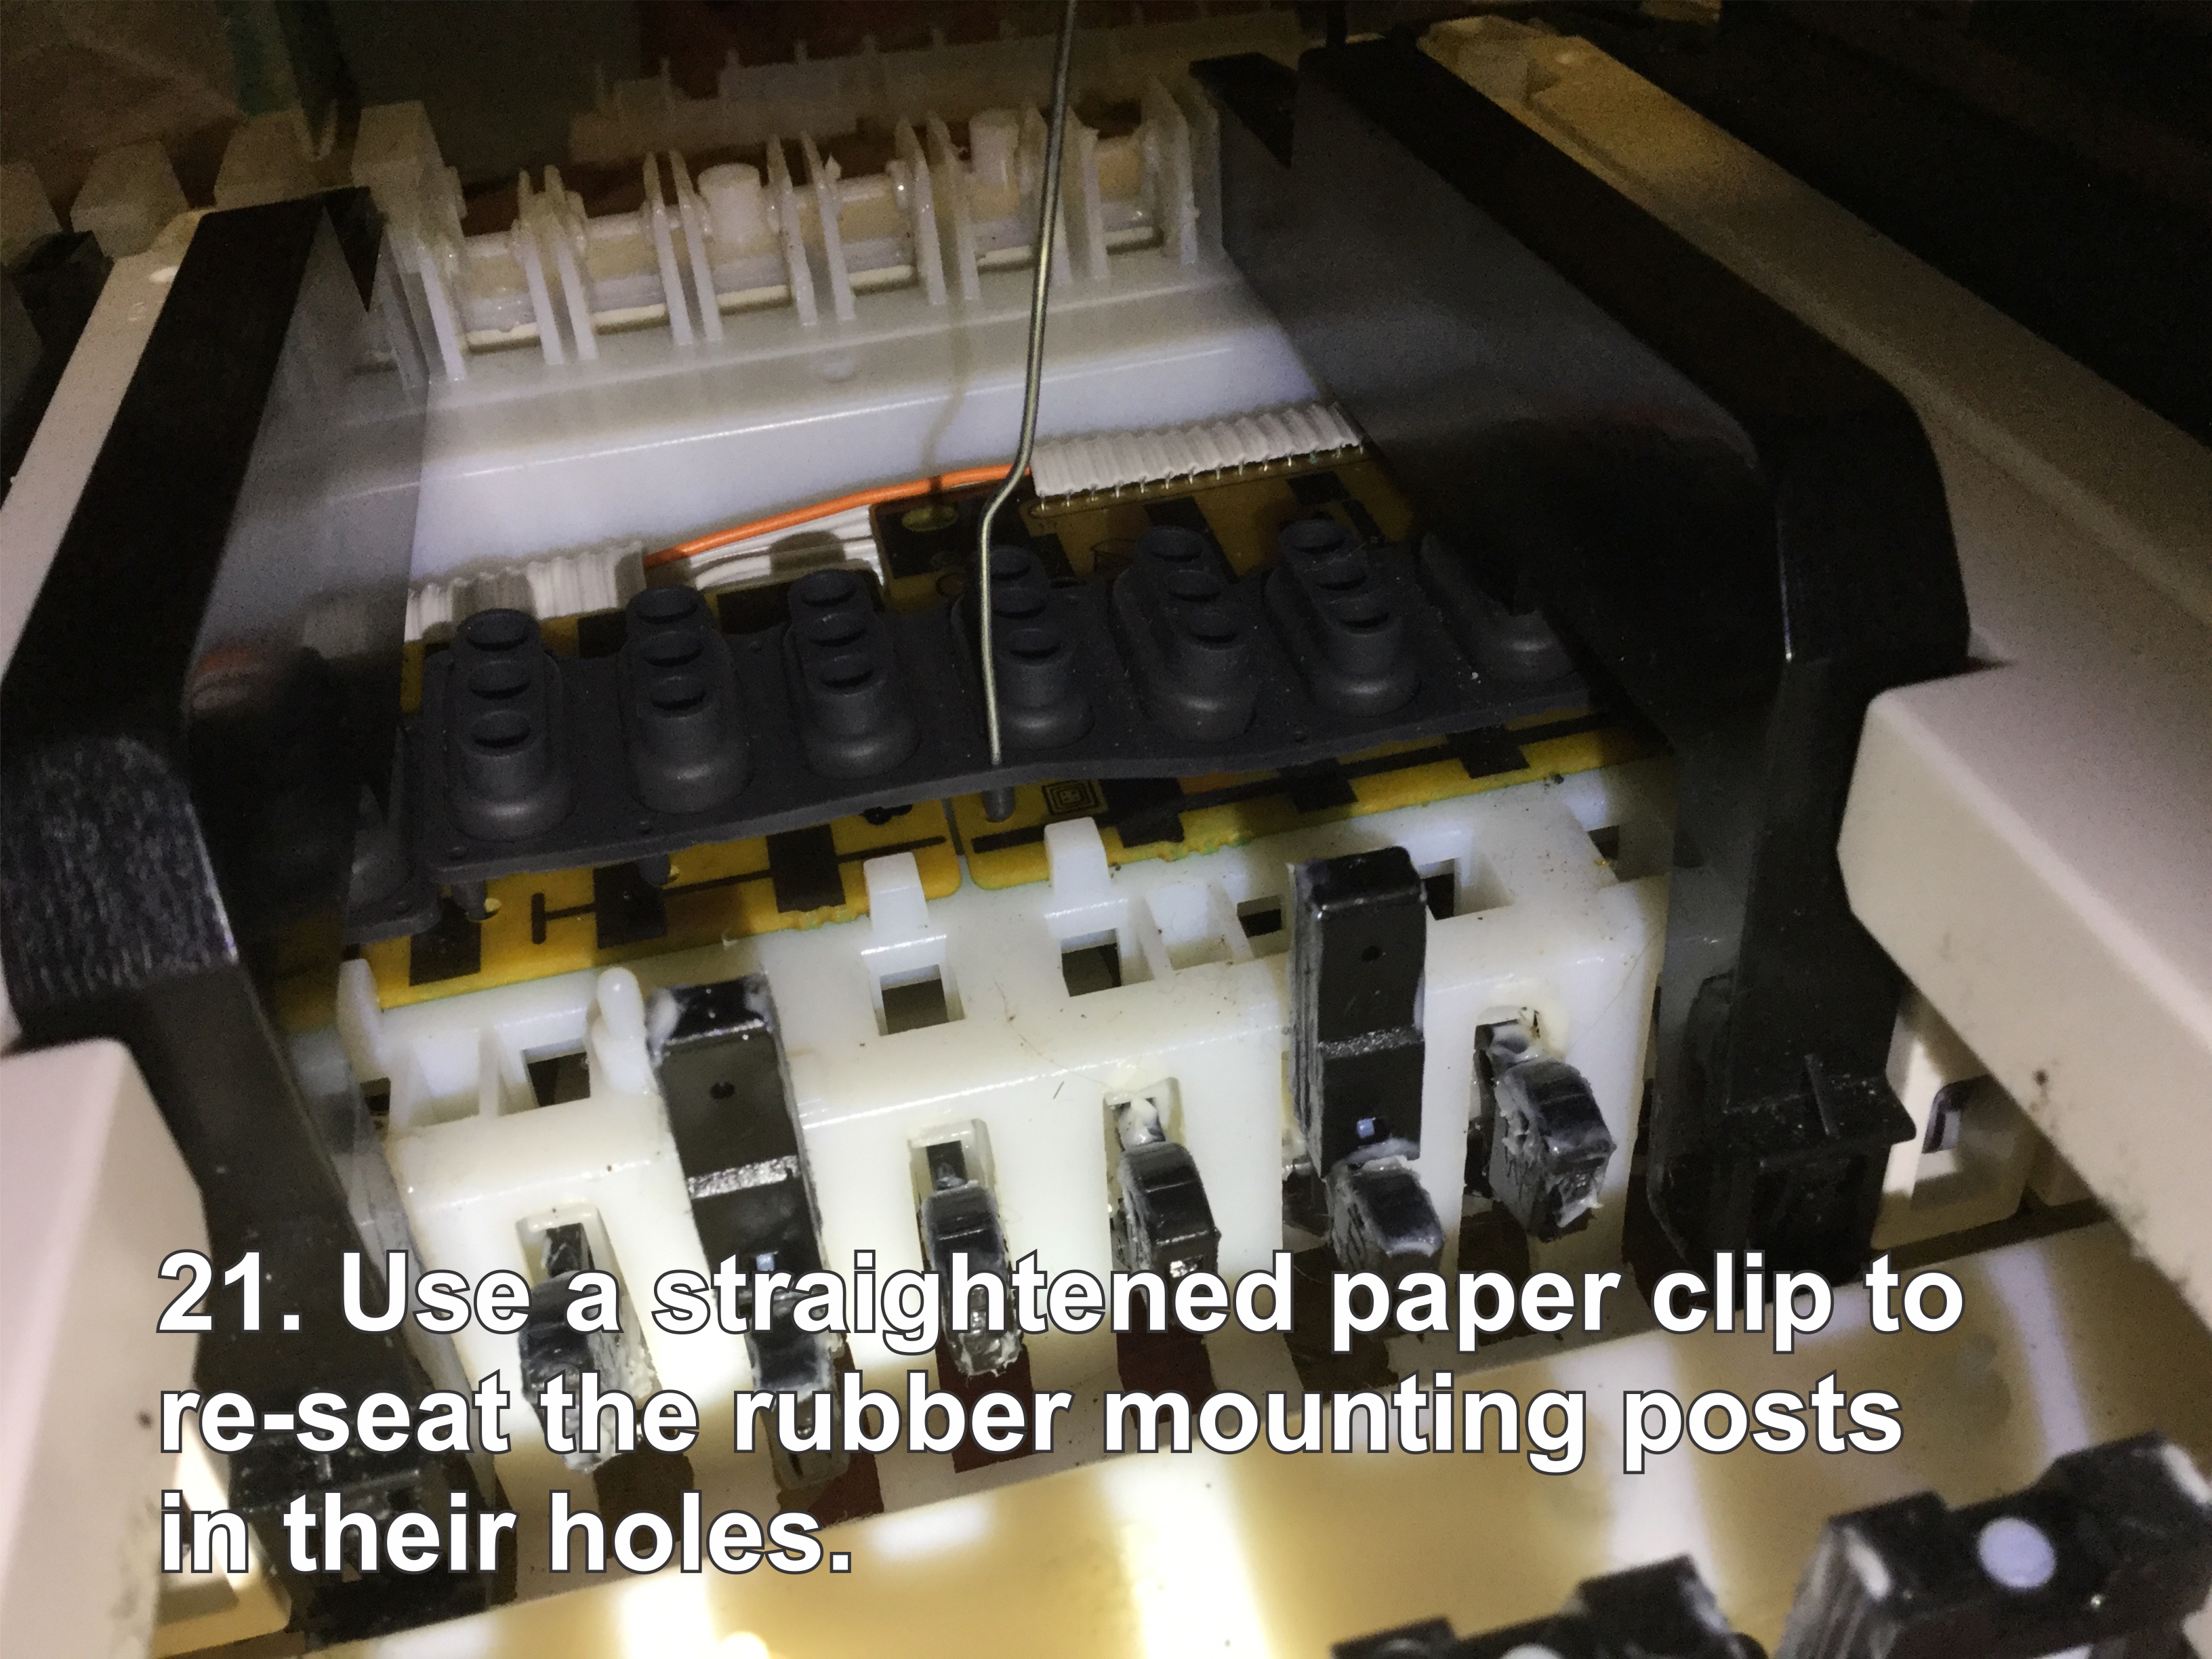
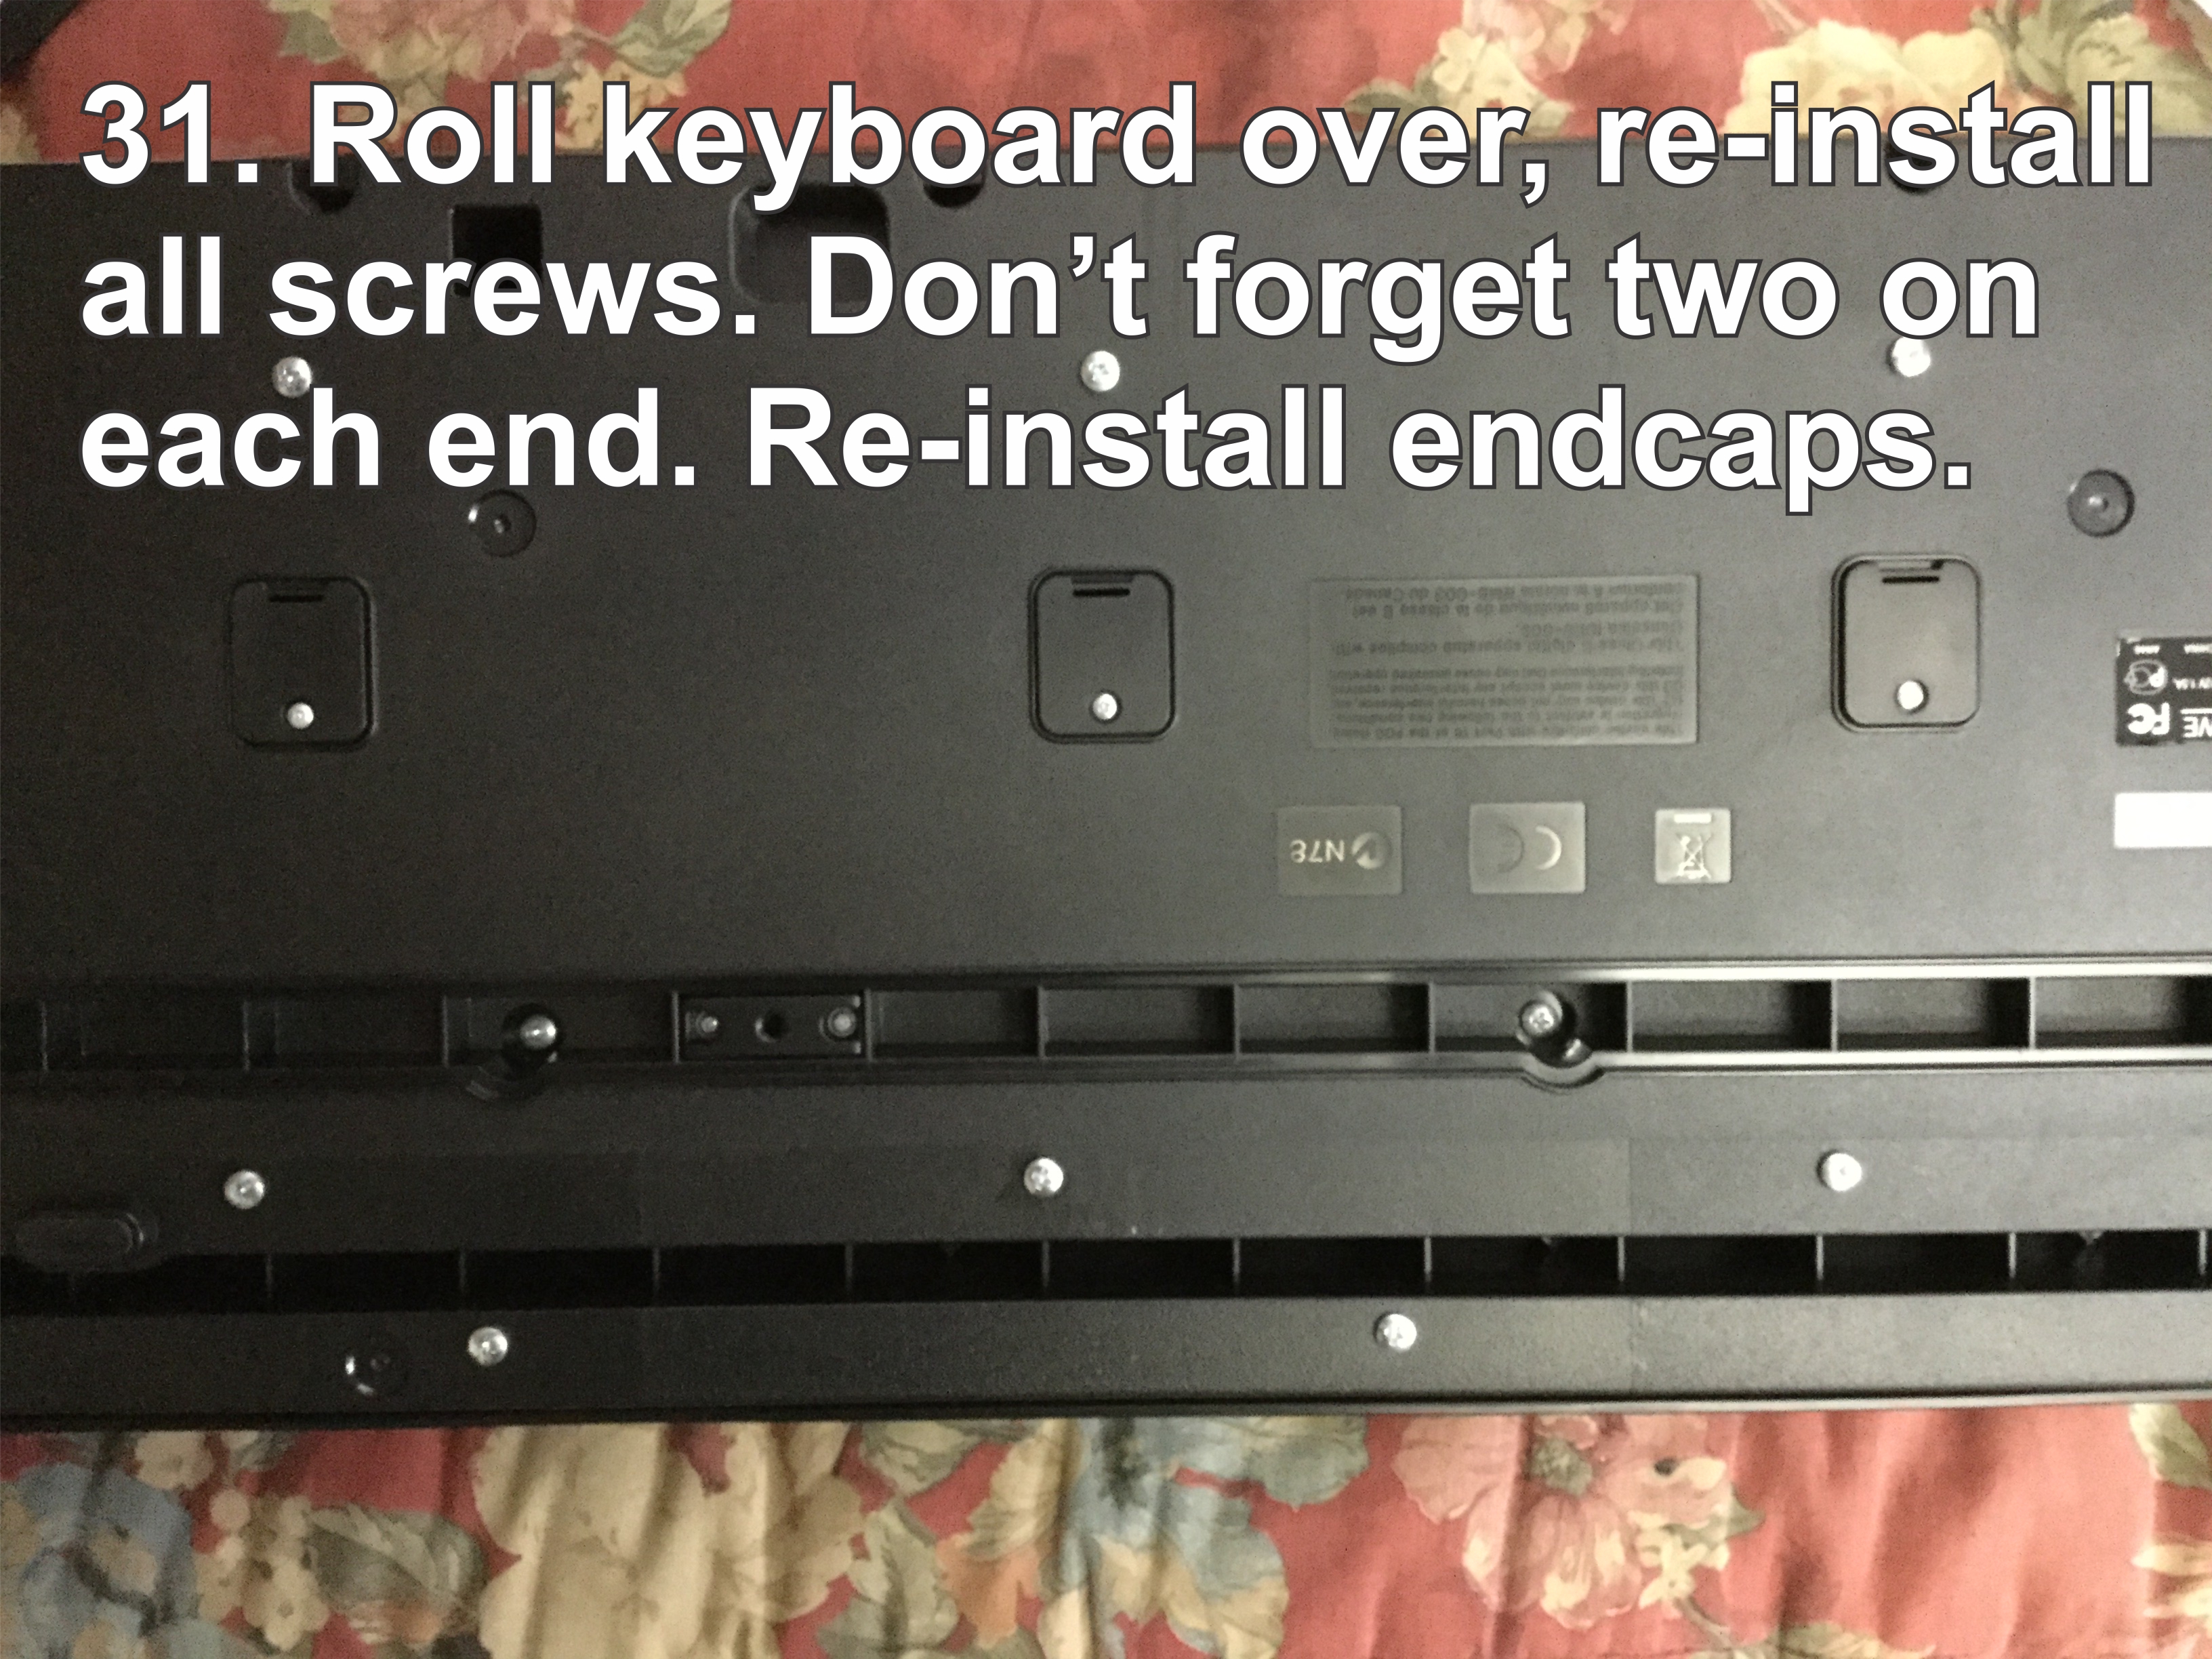
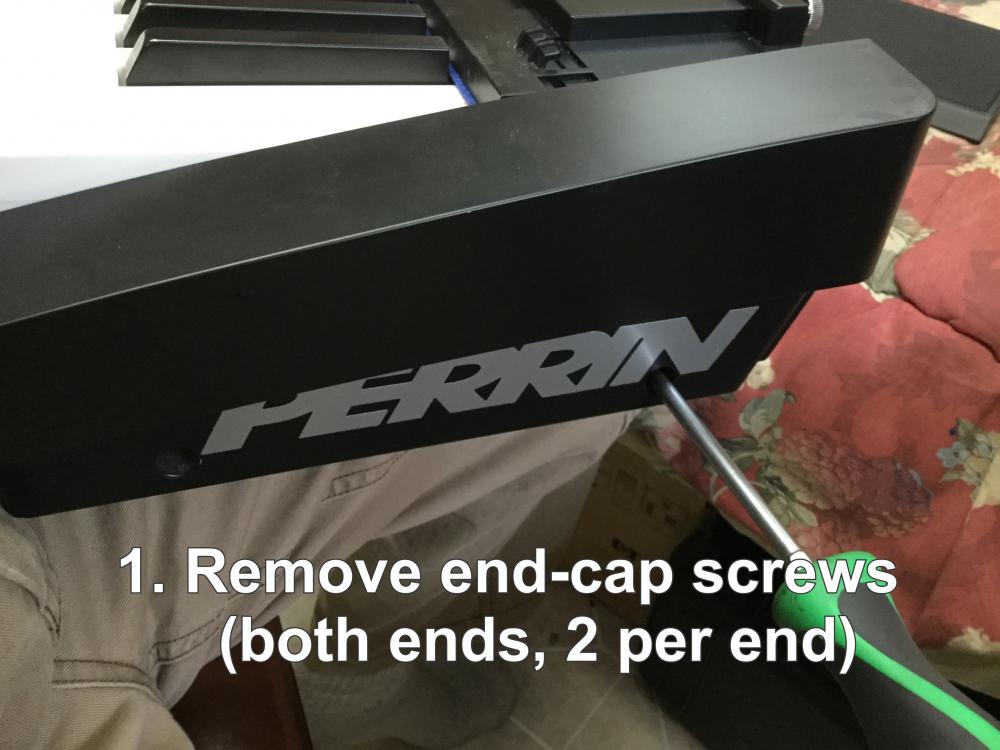
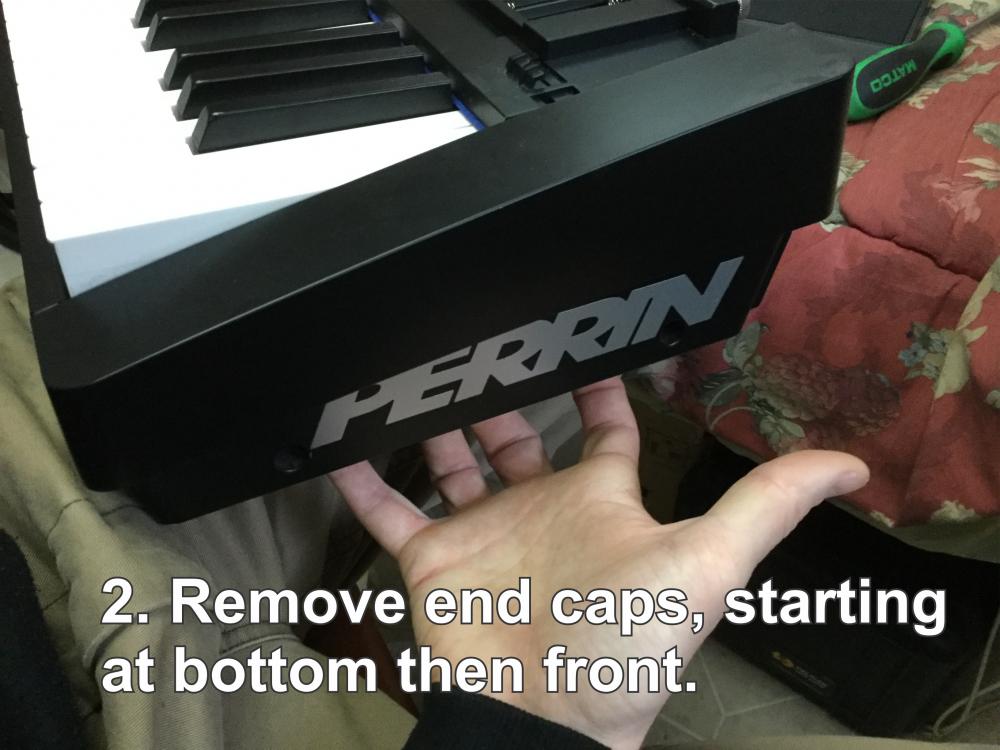
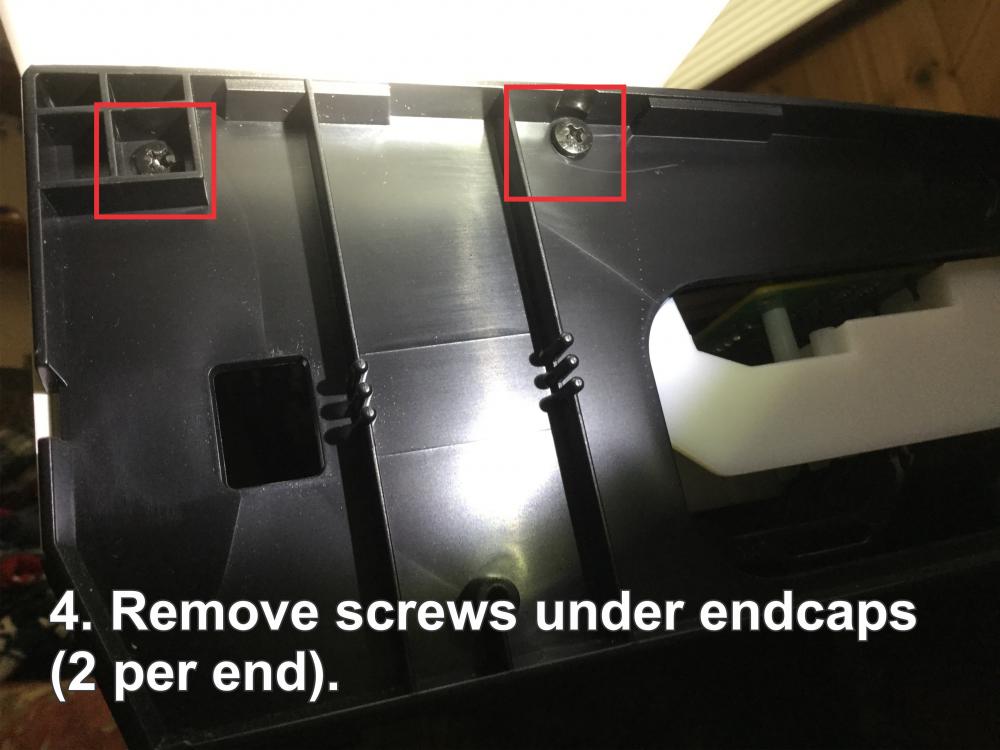
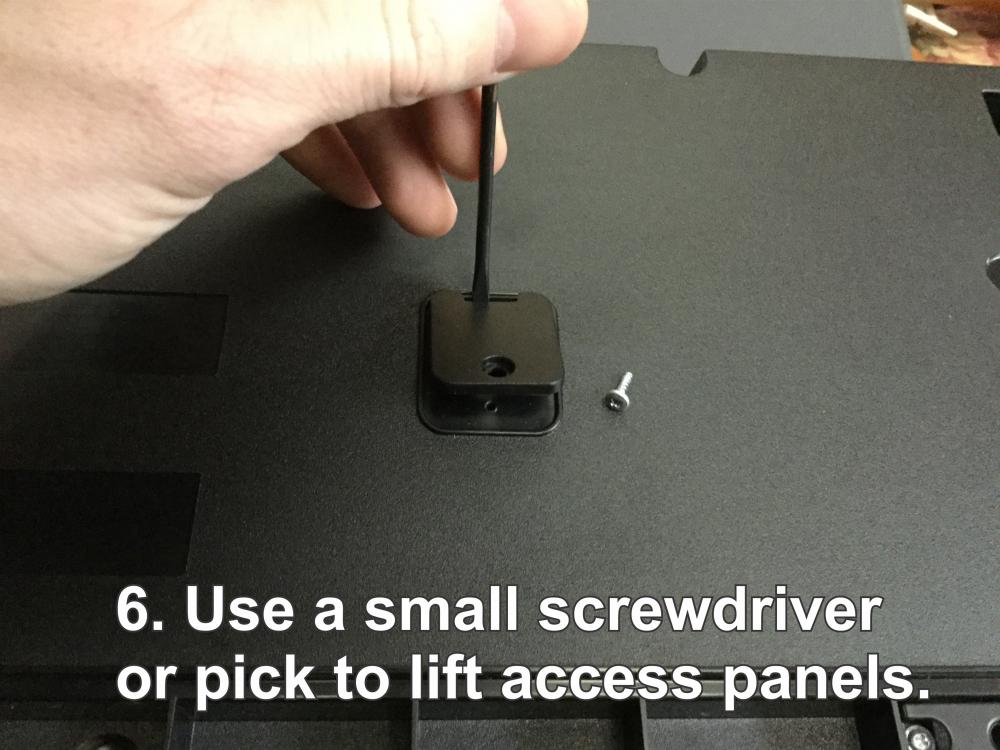
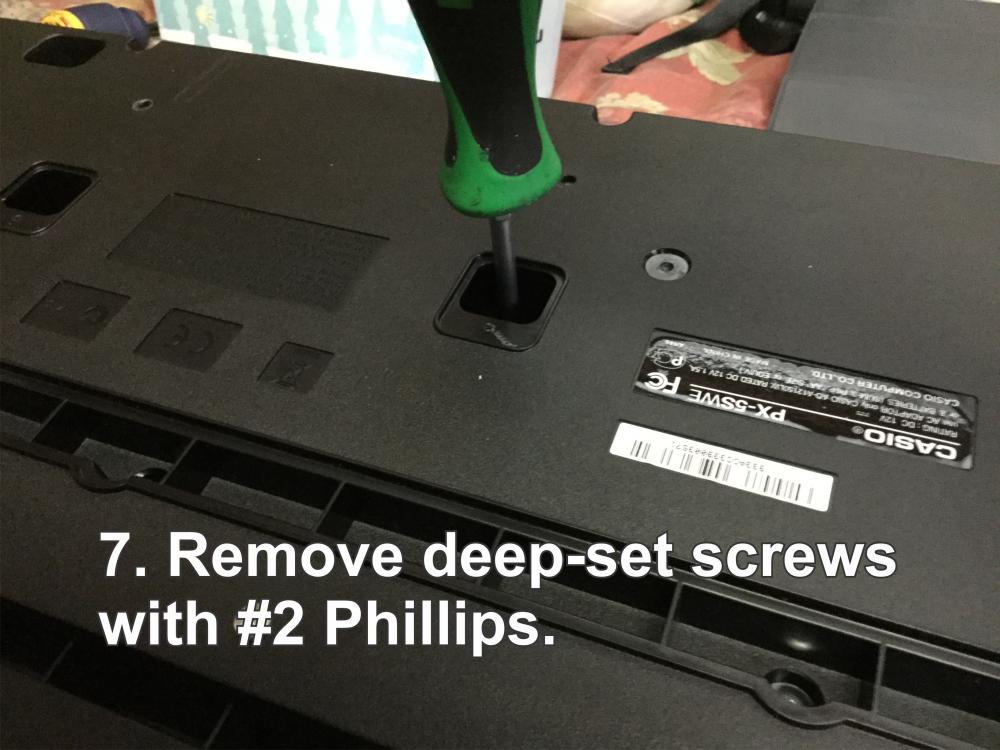
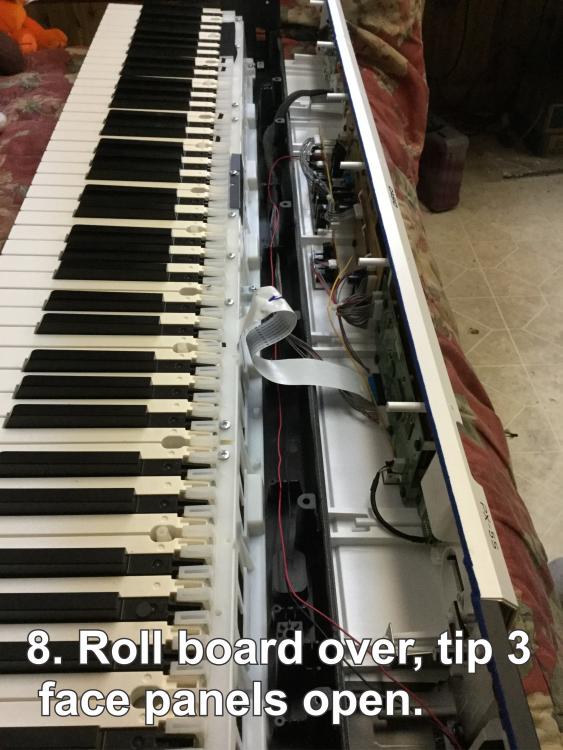
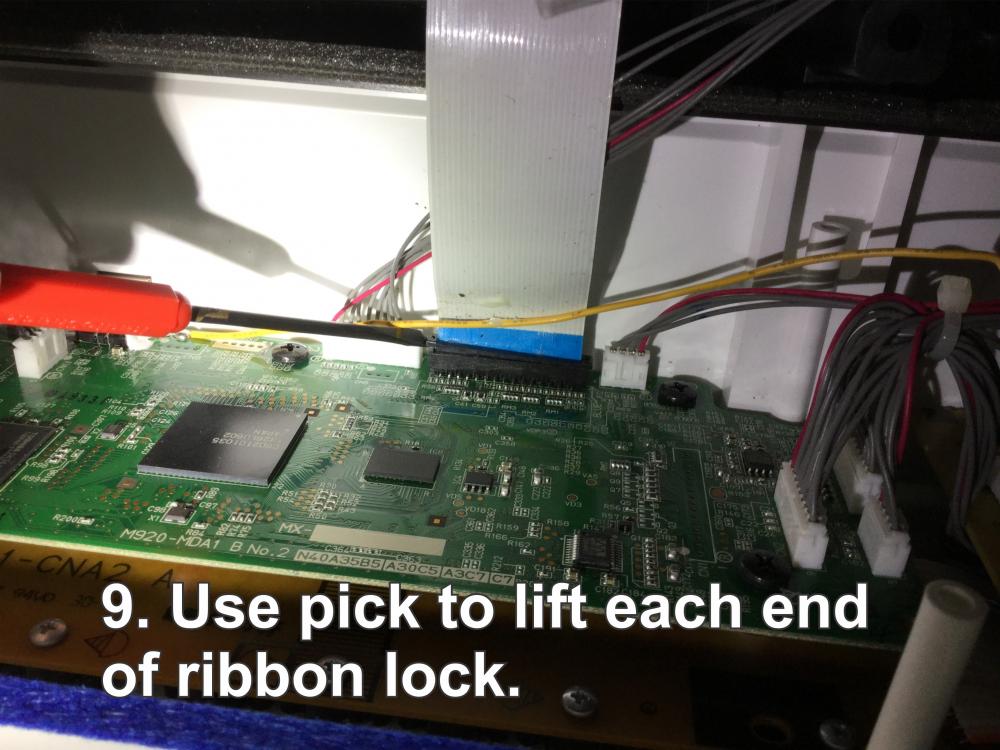
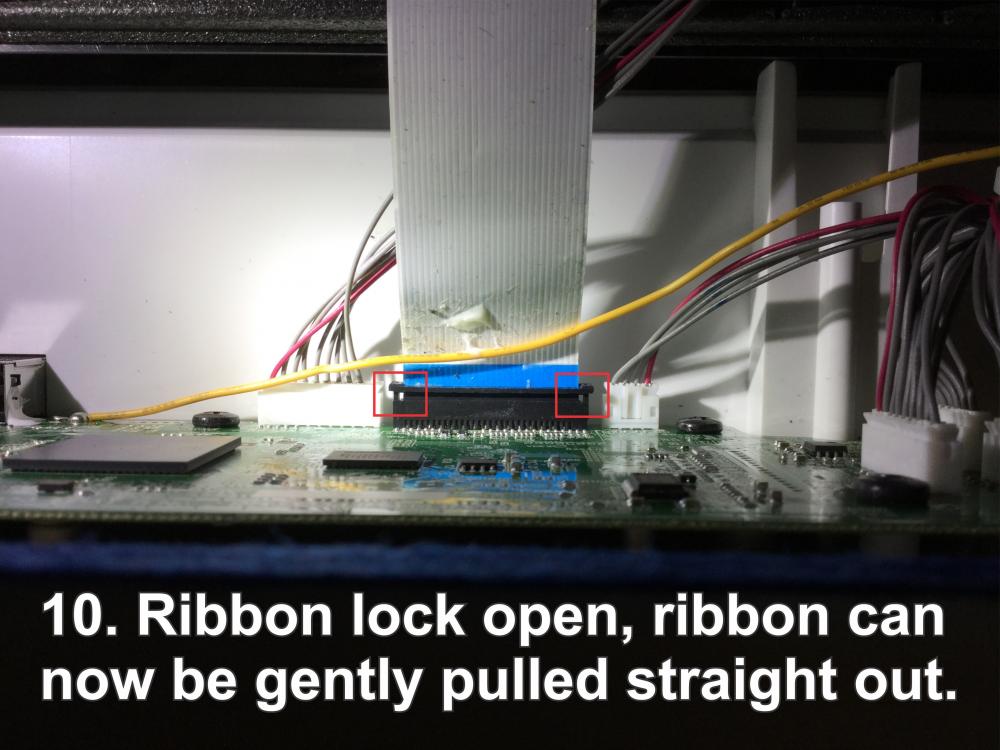
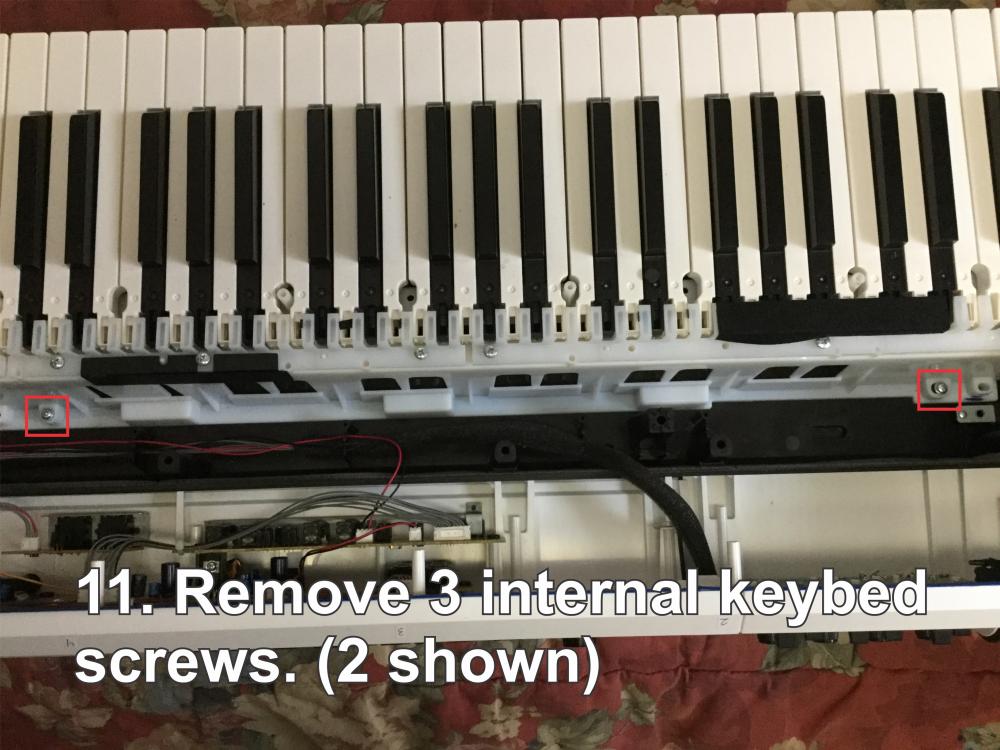
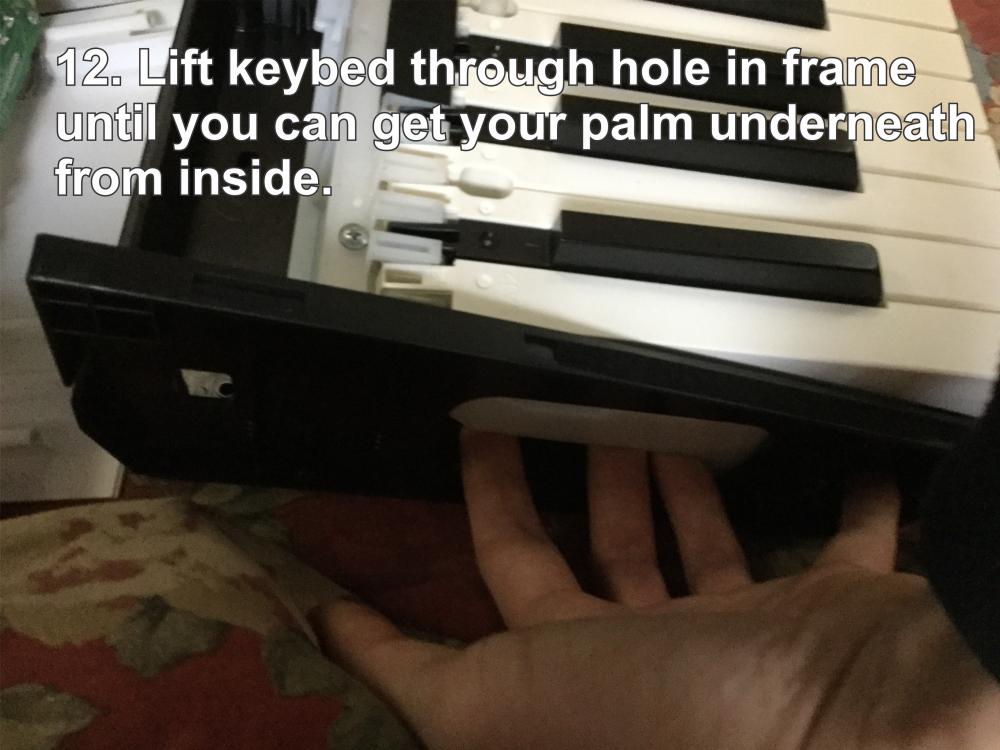
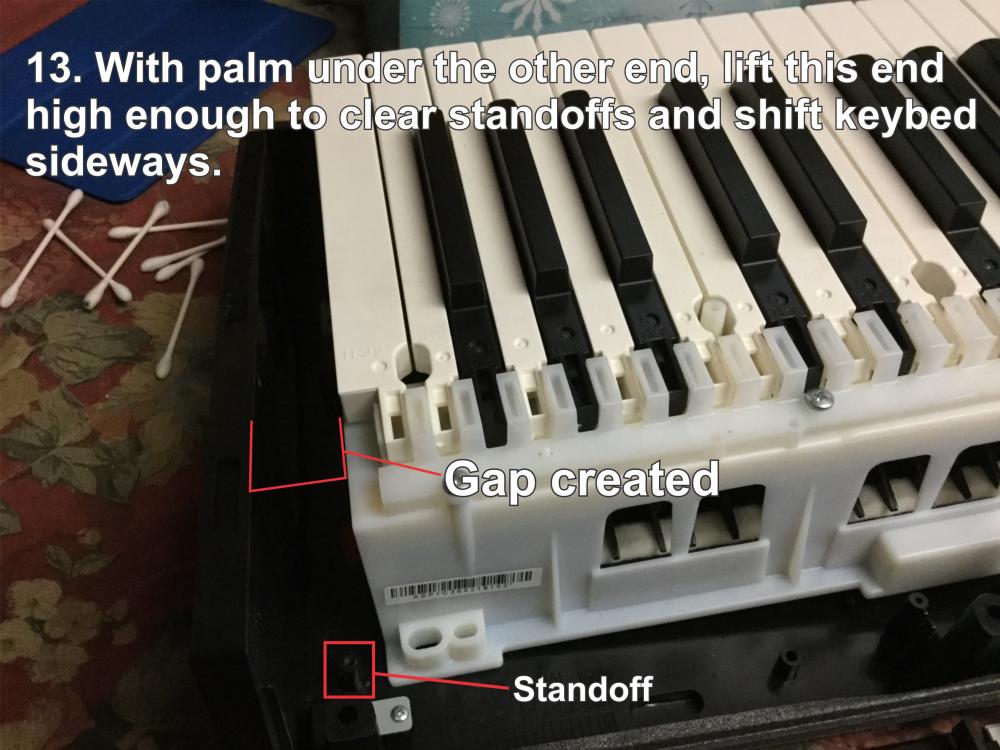
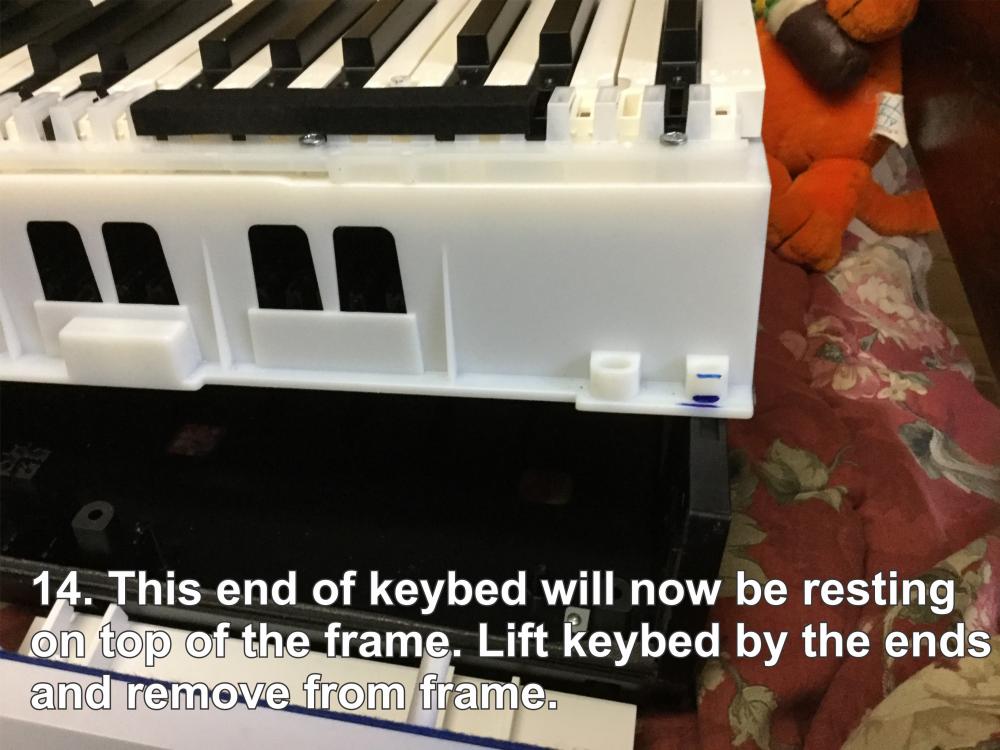
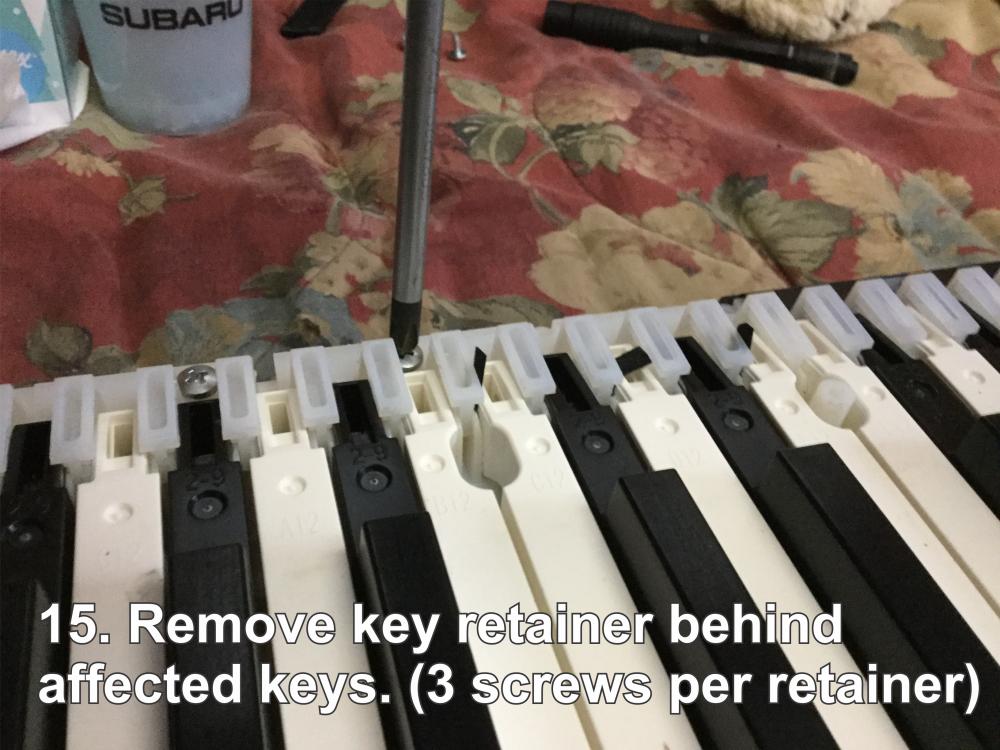
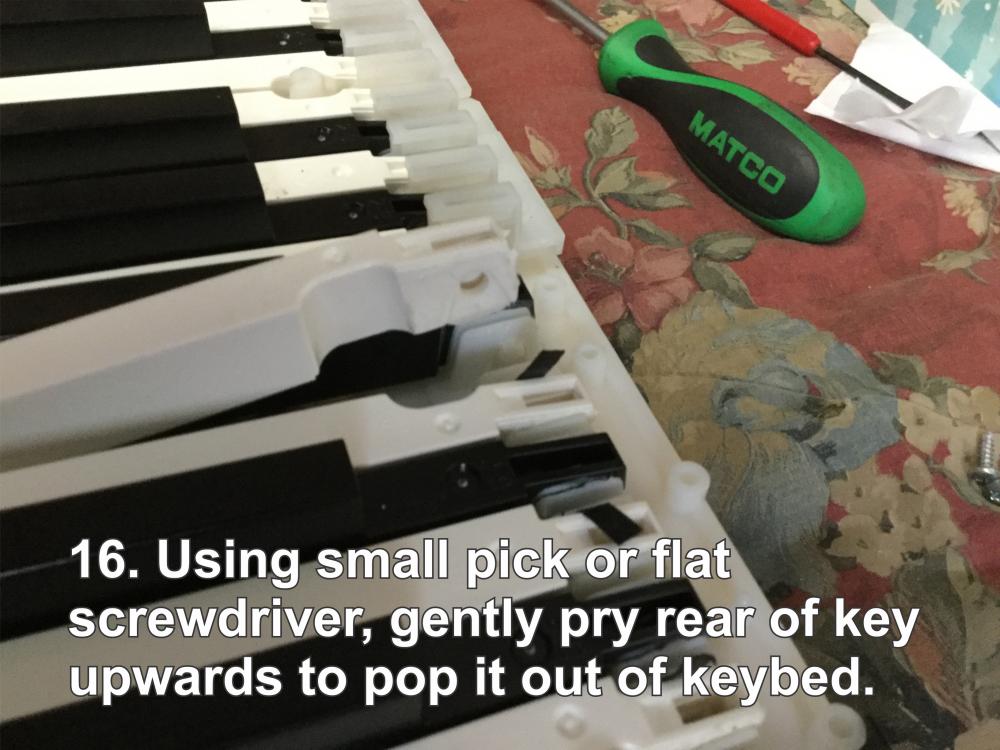
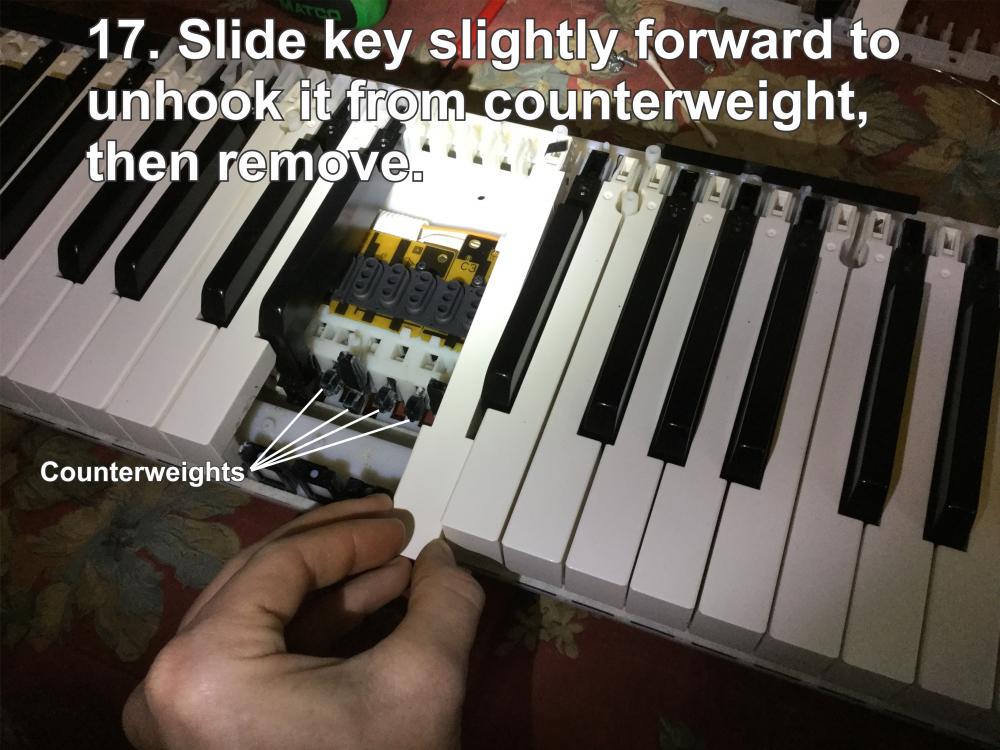
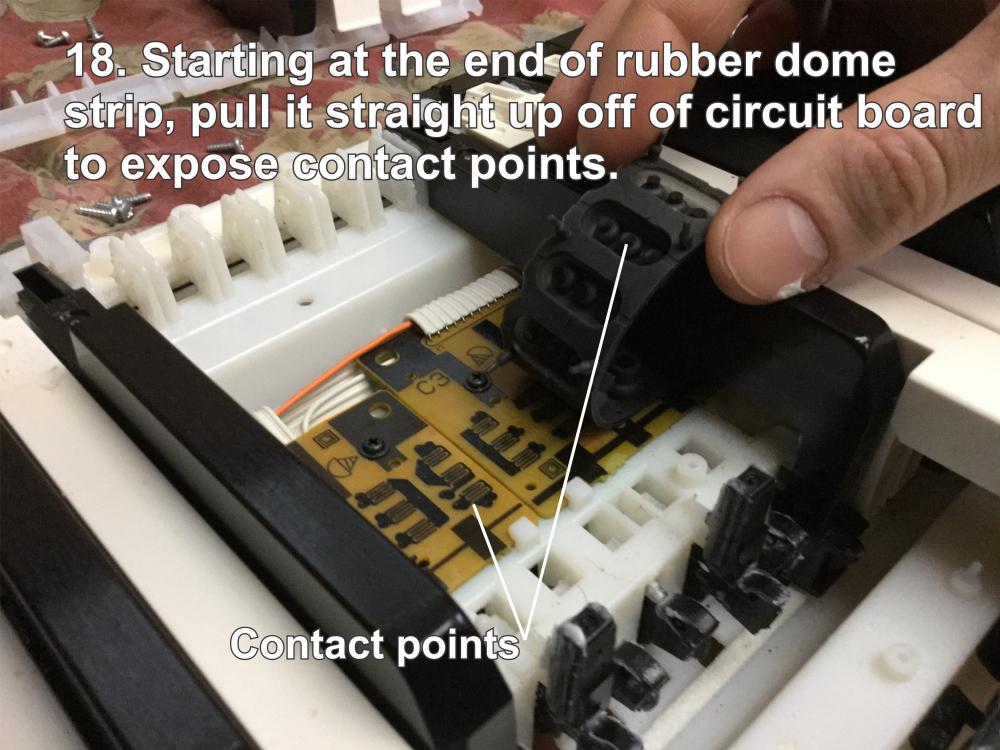
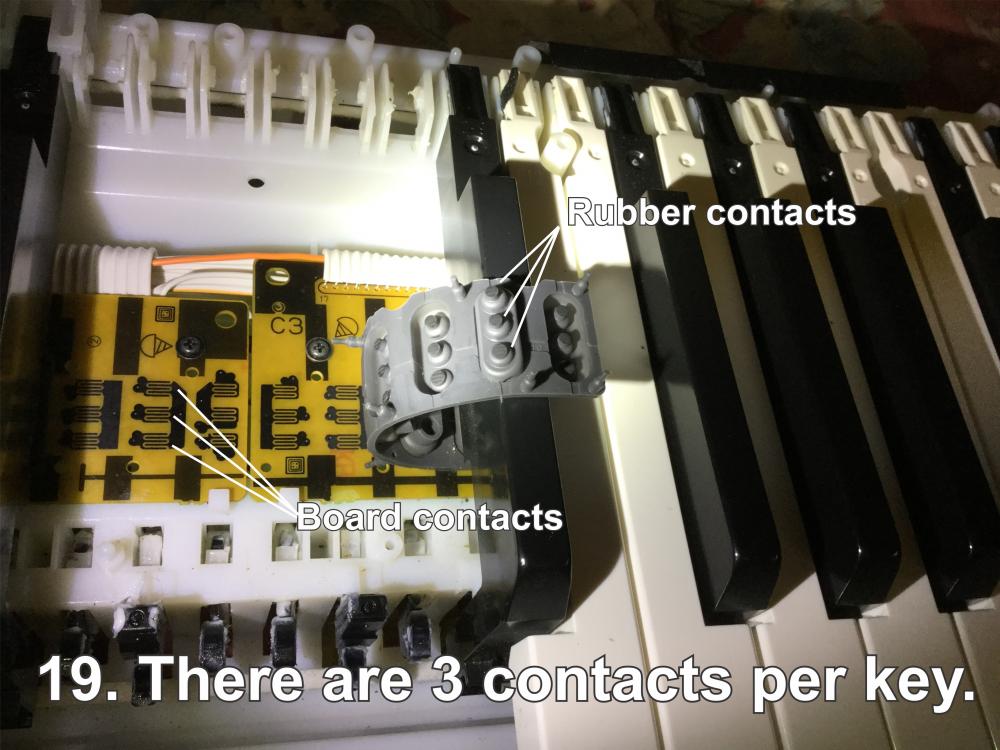
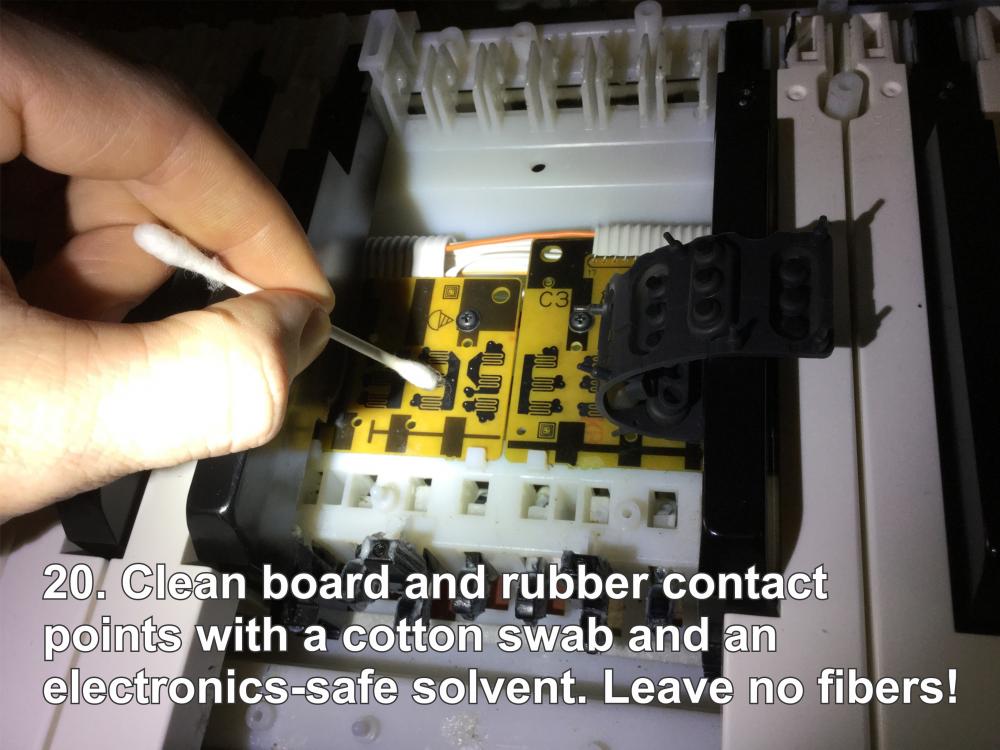
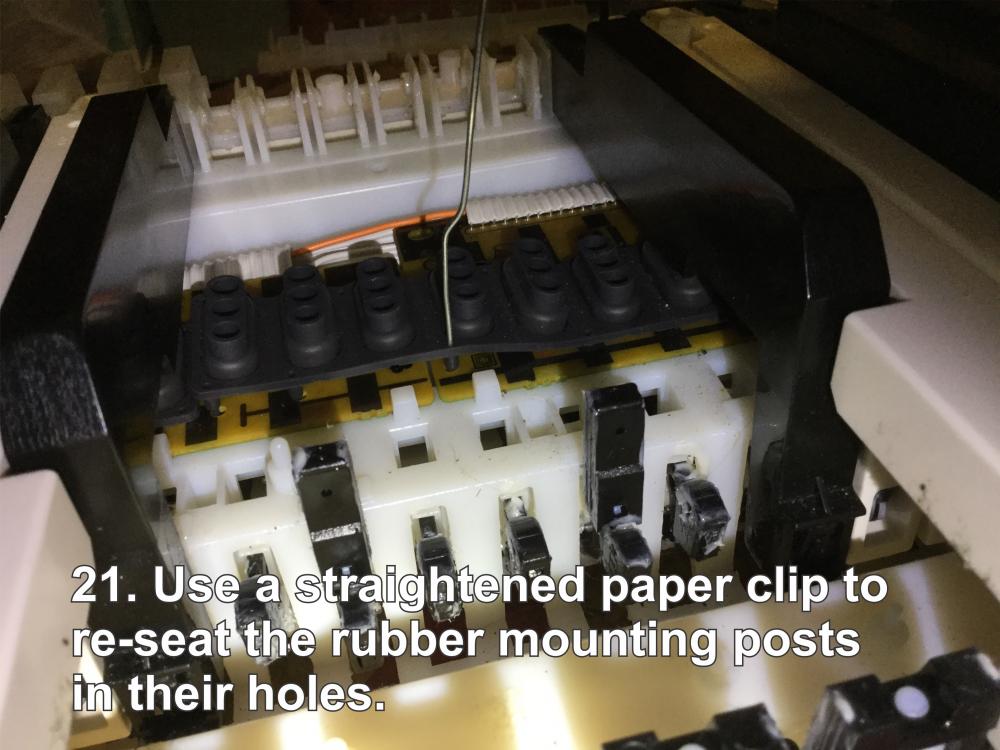
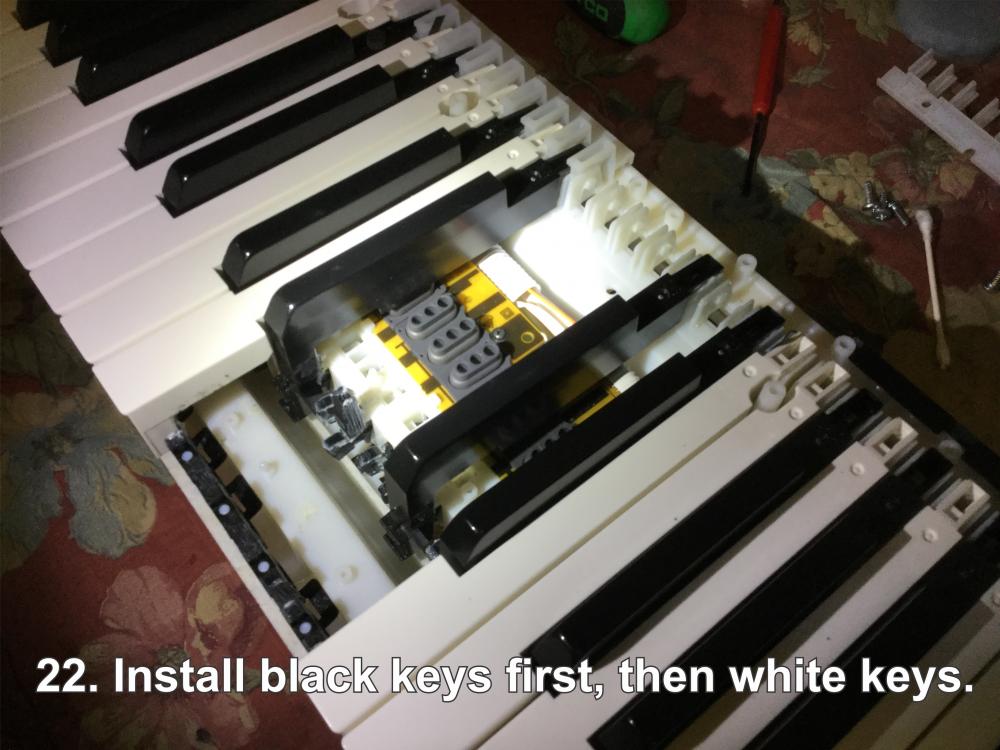
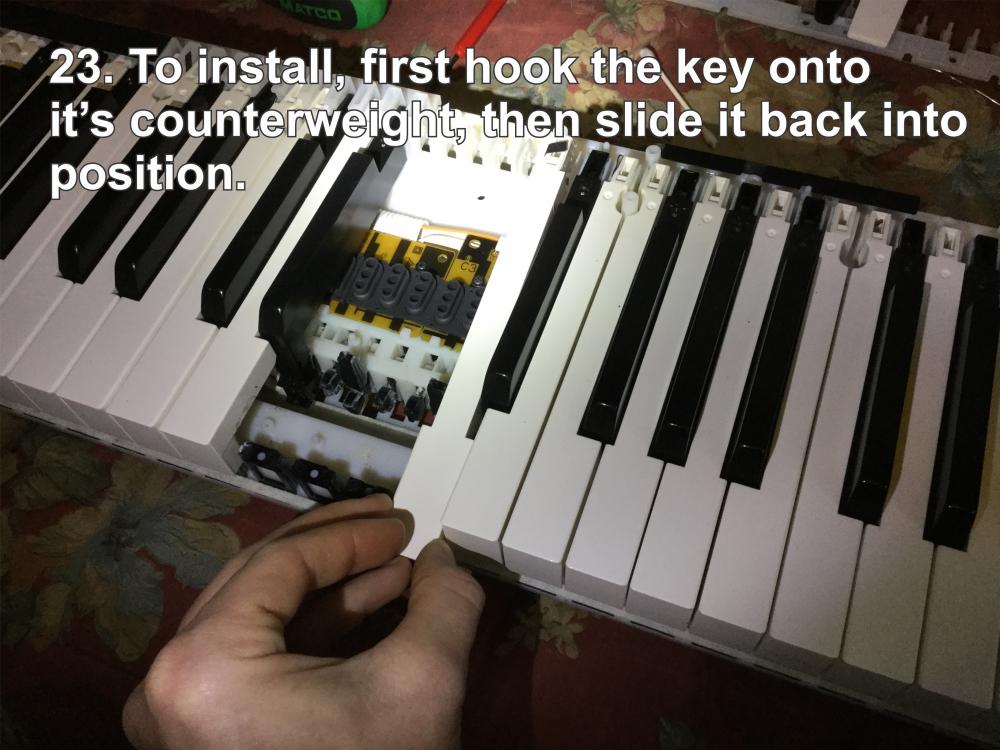
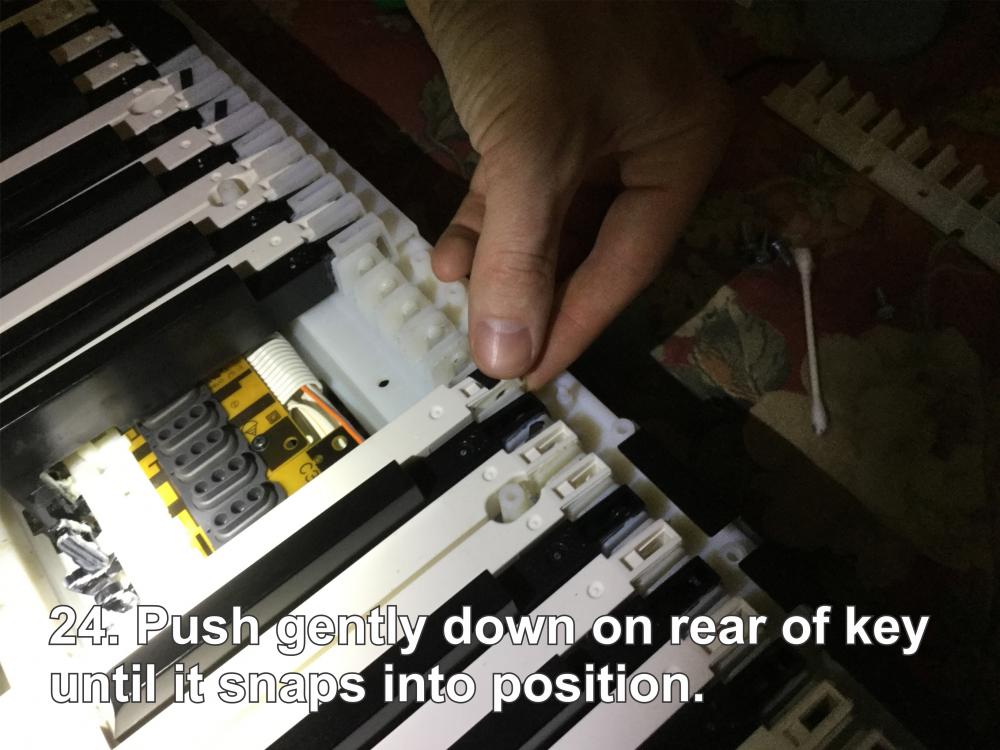
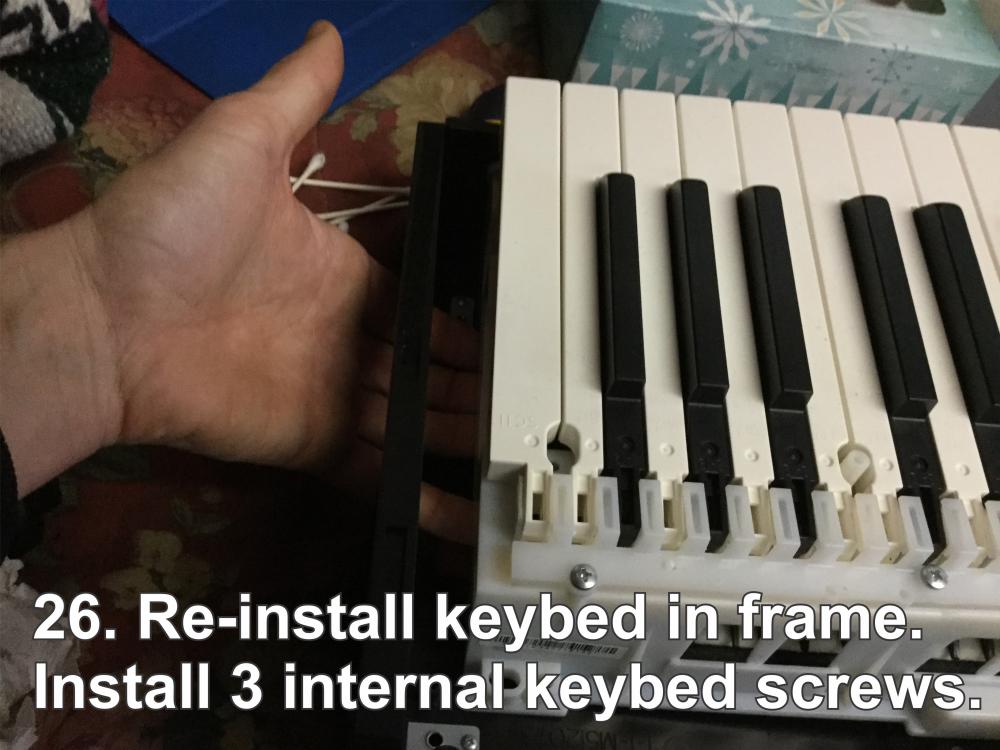
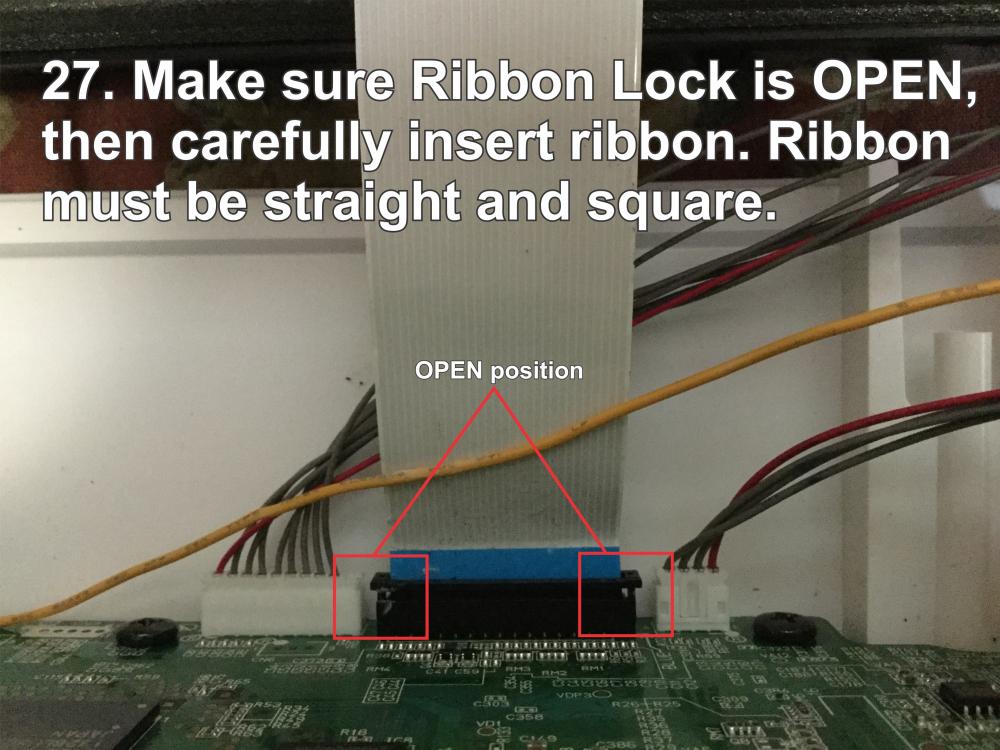
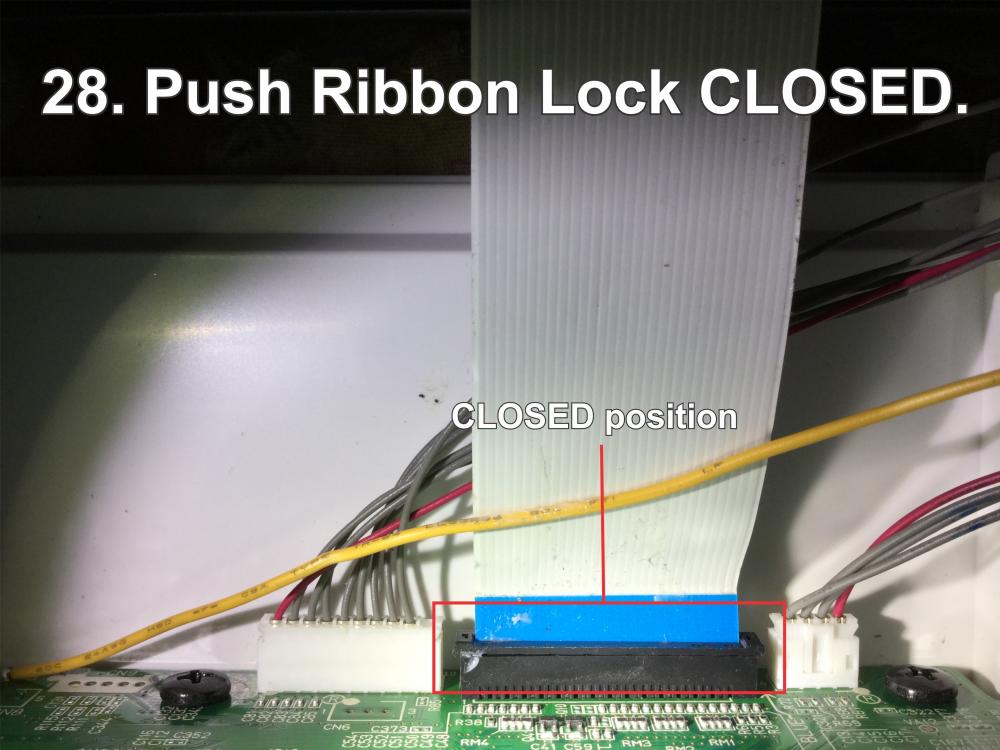
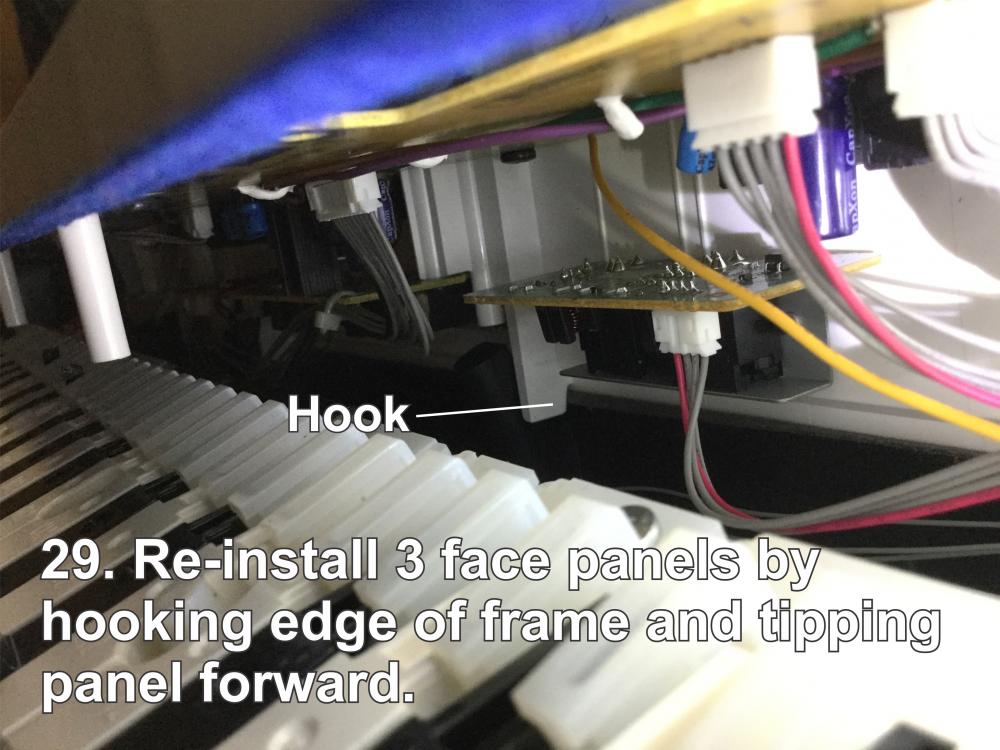
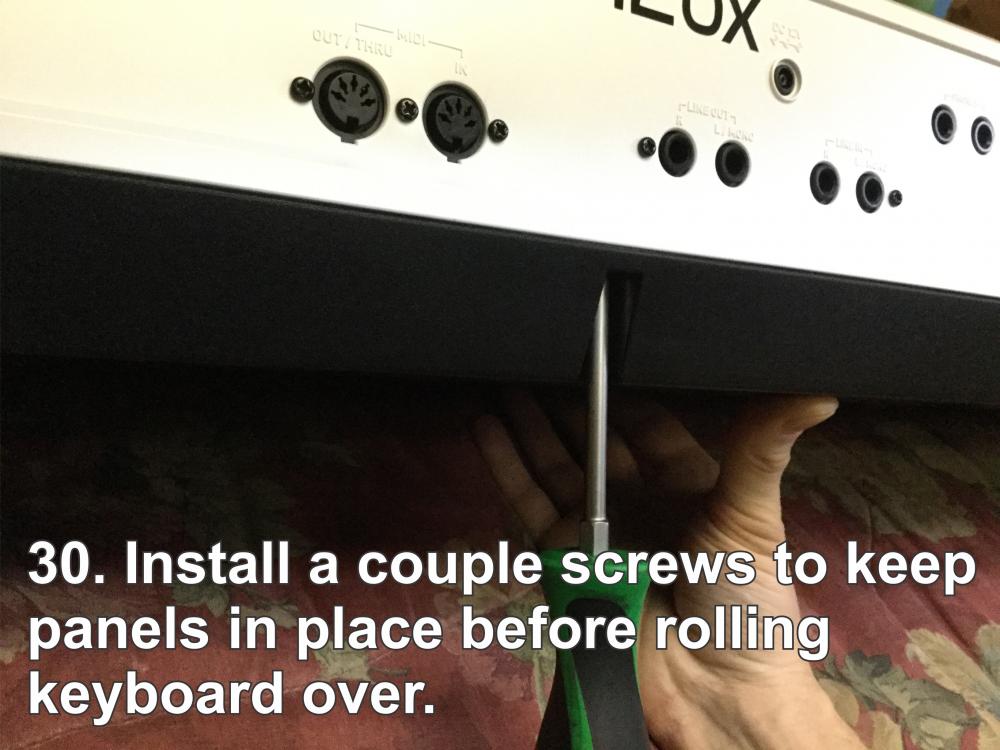
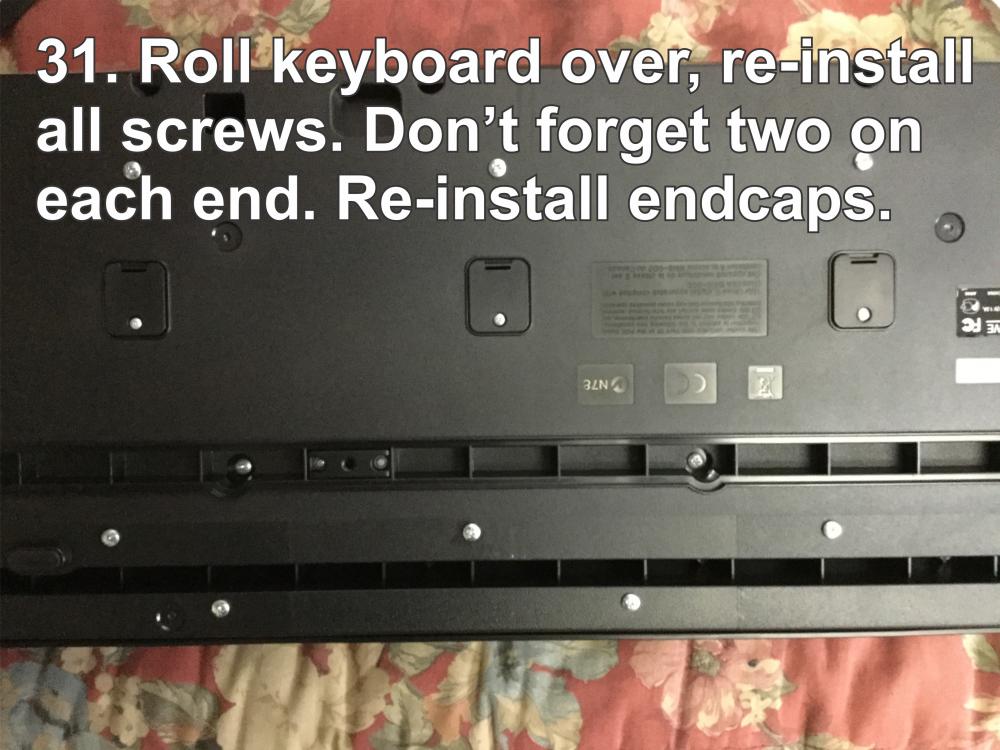
First off, this will void your warranty. However, my keyboard is out of warranty and I experienced the A sharp key going a little velocity-indiscriminate again. Here is what I did to clean the contacts and restore it back to original performance: Step 1: Read this guy's thread. His board isn't a PX-5S but pretty much everything he says still applies, the internals are similar. Step 2. Assemble the required tools: #2 Phillips screwdriver (you will definitely want one with a magnetic tip!) #1 Phillips screwdriver Cotton swabs Electronics cleaner or electronics-safe solvent Small flat screwdriver or pick Paper clip Small flashlight Some things to take note of before starting! 1. There are three face panels (battery compartment, slider/knob bank, center section) but I lifted them off as one piece since they were sort of held together by the blue felt strips. 2. All the screws are the same EXCEPT for the three internal keybed screws, which are easy to tell apart because of their distinctive heads. And also the little screws which secure the access panels, which are distinctive because they're a different size. 3. Since all the screws thread into plastic, it is imperative that you install them carefully and set the threads properly so as not to damage them. I made a short video on how to set the threads here: 4. Once you remove all the screws, the keyboard will be "loose". Leave a few in the rear bottom edge to keep everything together while you roll the keyboard upright. Then lift the edge of the keyboard and remove them. (I didn't think to do this.) 5. A bed makes a great work surface for this operation. 6. You will need a magnetic-tipped screwdriver to reinstall the inset screws behind the access panels. If you can't get one, use a bit of sticky grease to hold the screw onto the driver when you install. 7. When re-installing screws, be careful not to over-tighten! 8. When reassembling, be careful not to pinch any wires in the process. The battery compartment feeds are especially in a vulnerable spot so just keep an eye on them when you're buttoning everything up. 9. The names for various parts that I use in the captions are made-up by myself, so if you go looking for a Casio part using the terms from these pictures, you probably won't find what you're looking for. 10. If you break something, you could be in for a greater expense than if you just took the keyboard to a service center in the first place! Operate at your own risk. On to the pictures: Forgot to mention, re-install key retainer after the keys are back in! Hopefully this is useful to someone, if there are any questions or if some of the pictures are confusing please let me know. Merry Christmas! Ivan


-
I want the next PX successor to have 48 sliders and 15 knobs, an expression pedal, monophonic option, and also be gold-plated and have a 3-D touchscreen on which I can play Mario Kart between sets. All this must be done without raising the weight or the price. Seriously though, I think we need to realize what this piano is and isn't. While I do miss a couple things on my PX5S (monophonic mode and an expression pedal input to be exact), it's still an awesome board and if mine got destroyed/stolen tomorrow, I'd buy another one even after these years. It's still ahead of the competition. For my synth-action and touchstrip needs, I slave my Korg RK100S to the PX via Midi. For monophonic mode, I plug the Korg into it's own input. I agree that the PX won't quite cut it as a single keyboard for a cover band, but neither will anything else, until someone comes up with a keybed that can switch from weighted- to synth-action with a throw of a lever (keep THAT under 26 pounds!) I need both actions, so I need two boards (or, in my case, one board and one keytar). If you're not happy with the EP sounds or the bagpipes, for gosh sakes change them! There's a powerful tool called a Hex Editor, use it! Yes, some of the stock sounds are crap. But after some hex layer programming, I have a killer bagpipe sound and get compliments on "It's a Long Way to the Top" probably more than any other song. If Casio comes out with a PX-5S mark II, I might buy it or I might not. As long as mine keeps working there's nothing that would make me drop a grand on another one even if it has the aforementioned upgrades. Ivan
-
Don't You Forget About Me by Simple Minds View File Stage Setting for the song "Don't You Forget About Me" by Simple Minds. A0-G#3 is piano, A3-A4 is choir, B4-A5 is the synth-string sound that lays underneath most of the song, and B5 on up is the sparkly synth sound used to accent the chorus. Here's a quick-and-dirty demo showing where the sounds are. Please excuse the dirty pants and loud footswitch, I'm still in my work garb. Submitter craZivn Submitted 06/26/2017 Category Song Ready Stage Settings
-
Version 1.0.0
79 downloads
Stage Setting for the song "Don't You Forget About Me" by Simple Minds. A0-G#3 is piano, A3-A4 is choir, B4-A5 is the synth-string sound that lays underneath most of the song, and B5 on up is the sparkly synth sound used to accent the chorus. Here's a quick-and-dirty demo showing where the sounds are. Please excuse the dirty pants and loud footswitch, I'm still in my work garb. -
Version 1.0.0
22 downloads
We All Die Young, in the style of Eden's Curse. Notes: * The pedal used is Pedal 1, this controls the sustain for the zones used during the verse of the song. * The Mod Wheel is used to fade up the sound, as it is in the recording. * Run the Mod Wheel up and then back to the Zero position before you start to play, so the PX-5S can detect it's position. * The highest C on the keyboard is used in conjunction with the Pitch Wheel to emulate the second guitar in the chorus. * The low synth in the far left section of the keyboard is used to fill out the sound during the guitar solo. The band I play with has only one guitarist, so elements of this Stage Setting are geared towards filling in the role of the second guitar. If your group has a full complement of guitars then you can ignore the last two notes and reassign those zones as you like. Here's a short video of myself demonstrating the Stage Setting against the recording. I fade out Eden's Curse here and there so you can hear the Stage Setting by itself. Enjoy! Ivan -
We All Die Young View File We All Die Young, in the style of Eden's Curse. Notes: * The pedal used is Pedal 1, this controls the sustain for the zones used during the verse of the song. * The highest C on the keyboard is used in conjunction with the Pitch Wheel to emulate the second guitar in the chorus. * The low synth in the far left section of the keyboard is used to fill out the sound during the guitar solo. The band I play with has only one guitarist, so elements of this Stage Setting are geared towards filling in the role of the second guitar. If your group has a full complement of guitars then you can ignore the last two notes and reassign those zones as you like. Here's a short video of myself demonstrating the Stage Setting against the recording. I fade out Eden's Curse here and there so you can hear the Stage Setting by itself. Enjoy! Ivan Submitter craZivn Submitted 12/23/2016 Category Song Ready Stage Settings
-
Uprising by Muse View File Bottom two octaves are the bass synth (Zones 1 and 3). The rest of the keyboard is the lead (Zones 2 and 4). Knob 4 is used to control the filter for the bass synth sound, so you can replicate the breakdowns where the bass goes soft and back to hard again. Recommend that you stay below the 50% point for the most authentic sound. Slider 1 is also programmed to the same filter but mapped to half the range, so you can use the whole range of the slider without fear of going too "treble-ey". I prefer to use the knob because it's easier to manipulate smoothly. Both pedals are assigned to the same thing, which is the portamento on/off for the lead. (Momentary, so you have to hold the pedal down for the effect.) Depending on your PA system you may want to tweak the sound for ultimate accuracy, also make sure your Mod wheel is all the way off! Constructive feedback is always appreciated, enjoy! Submitter craZivn Submitted 10/06/2016 Category Song Ready Stage Settings
-
Version 1.0.0
75 downloads
Bottom two octaves are the bass synth (Zones 1 and 3). The rest of the keyboard is the lead (Zones 2 and 4). Knob 4 is used to control the filter for the bass synth sound, so you can replicate the breakdowns where the bass goes soft and back to hard again. Recommend that you stay below the 50% point for the most authentic sound. Slider 1 is also programmed to the same filter but mapped to half the range, so you can use the whole range of the slider without fear of going too "treble-ey". I prefer to use the knob because it's easier to manipulate smoothly. Both pedals are assigned to the same thing, which is the portamento on/off for the lead. (Momentary, so you have to hold the pedal down for the effect.) Depending on your PA system you may want to tweak the sound for ultimate accuracy, also make sure your Mod wheel is all the way off! Constructive feedback is always appreciated, enjoy! -
Version 1.0.0
73 downloads
This is the SS from a song we did called "Military Warfare". It consists of a couple custom sound effects. Key F5 triggers an air-raid siren. Pedal 1 will toggle a hold on the siren and Slider 2 is the volume for the siren. The Mod Wheel will "wind" the siren down and up, must be rolled smoothly to sound realistic. Use the tips of your forefinger and thumb, hold them at a 90-degree angle to your forearm and use your whole arm to move the wheel down and up. The siren will wind up when it's triggered and wind down when it's released. The lowest 4 or 5 keys are made to simulated a marching army, strike them as a slightly-broken staccato chord. Sliders 5 and 6 control delay and reverb, for most venues I have these full up. Other keys are mapped to the standard gunshot sound, no frills there. Enjoy!-
- 1
-

-
- siren
- marching feet
- (and 1 more)
-
Military Warfare View File This is the SS from a song we did called "Military Warfare". It consists of a couple custom sound effects. Key F5 triggers an air-raid siren. Pedal 1 will toggle a hold on the siren and Slider 2 is the volume for the siren. The Mod Wheel will "wind" the siren down and up, must be rolled smoothly to sound realistic. Use the tips of your forefinger and thumb, hold them at a 90-degree angle to your forearm and use your whole arm to move the wheel down and up. The siren will wind up when it's triggered and wind down when it's released. The lowest 4 or 5 keys are made to simulated a marching army, strike them as a slightly-broken staccato chord. Sliders 5 and 6 control delay and reverb, for most venues I have these full up. Other keys are mapped to the standard gunshot sound, no frills there. Enjoy! Submitter craZivn Submitted 06/15/2016 Category Miscellaneous