For TheMoon and other MZ-X lovers.
Thanks to all the contributors on this site for sharing their insights! I hope my experience will help someone else.
Everything I am sharing is my experience or IMO.
DISCLAIMER
-If you choose to do what I did, proceed at your own risk.
-I know my outcome but don't know you or your ability. I can't guarantee your results.
-I only advise this procedure for those "tinker-paws" with some prior technical skill.
-For disassembly and reassembly, I found the "casio_mz-x500_ServiceManuals" (Service Manual & Parts List) online. I assume you can do the same.
-Disassembly and reassembly of the MZ-X500 was fairly straight forward and not overly complex.
-My MZ-X500 was used and out of warranty, so I wasn't concerned about voiding the warranty.
-I had some experience fixing my gear so I wasn't worried about destroying my keyboard.
HERE IS WHAT I DID TO QUIET THE KEYS ON MY MZ-X500
If you want, you can skip this details section and go the the repairs section belowl
WHERE IT STARTED
Many of your comments inspired me to buy an MZ-X500. It was used, and sure enough it had noisy keys. That brought me here looking for fixes.
SURPRIZES AND DISCOVERIES
This key fix turned out to be a bit of a murder mystery for me. Like some others, I thought that re-greasing the key guides and key insides would quiet the Click, Clack and Clatter. I got inside expecting to find worn parts or lack of grease. Neither. That puzzled me and propelled me on a curriosity quest to find the noise source(s). So, I carefully examined the parts and studied all potential noise making movements. Here is what I discovered:
MZ-X KEYS ARE PERFECT PERCUSSION INSTRUMENTS
The prime noise generator on the MZ-X is the injection molded key design itself.
MISSING REENFOCEMENT
In order to save cost and weight. Casio reduced the key wall thicknesses and skipped reinforcing web work inside the key shells. That web work would have avoided several problems and made even lightweight keys quiet and steady. There would never have been noisy MZ-X keys.
As it is, the underside of the keys are hollow boxes with thin walls of hard and resonant plastic. With the absence of reinforcing webbing, these key shells function as perfect percussive noise makers. Any contact with the keys produces and amplifies the Click, Clack and Clatter. Because of this design, keys are inherently noisy and are only marginally and temporarily quieted under ideal circumstances, like when they are new or have been re-greased.
Key tops “Click” with any fingernail contact. Key side walls “Clack” when contacting adjacent keys or plastic guide posts. Flimsy key stems allow keys to lean or shift allowing keys to "Clack" against each other during play. Using muliple keys produces "Clatter". These keys become and unwelcome percussion section party crasher.
THE ROLE OF GREASE
Why doesn’t re-greasing permanently fix the noise? Because of the design of these noisy keys, the role of grease ends up being more as a noise and vibration damping filler between surfaces, than as a lubricant. Lots of grease will fill the gaps and somewhat dampen the noise, but with use, the grease squishes out as a dampening filler, leaving only a thin lubrication coating behind. It still lubricates but no longer dampen the key noise. This is why re-greasing doesn’t last and new replacement keys don’t fix the problem. Again, it isn't a grease problem, it is the noisy keys the grease is trying to quiet.
These discoveries helped me see what was needed for a lasting retrofix for my keys.
CAN THE MZ-X BE RESCUED? ABSOLUTELY.
After re-reading the posts of MZ-X lovers with angst over key noise. I thought I would reassure everyone that there is a lasting fix.
IN GENERAL, THIS IS WHAT I DID TO QUIET THE MZ-X KEYS
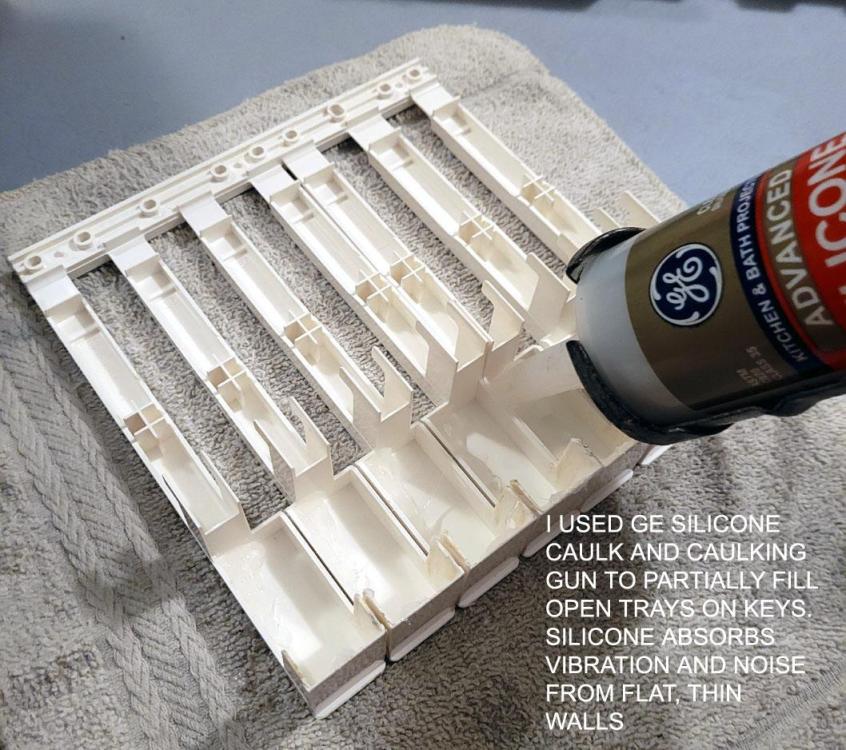
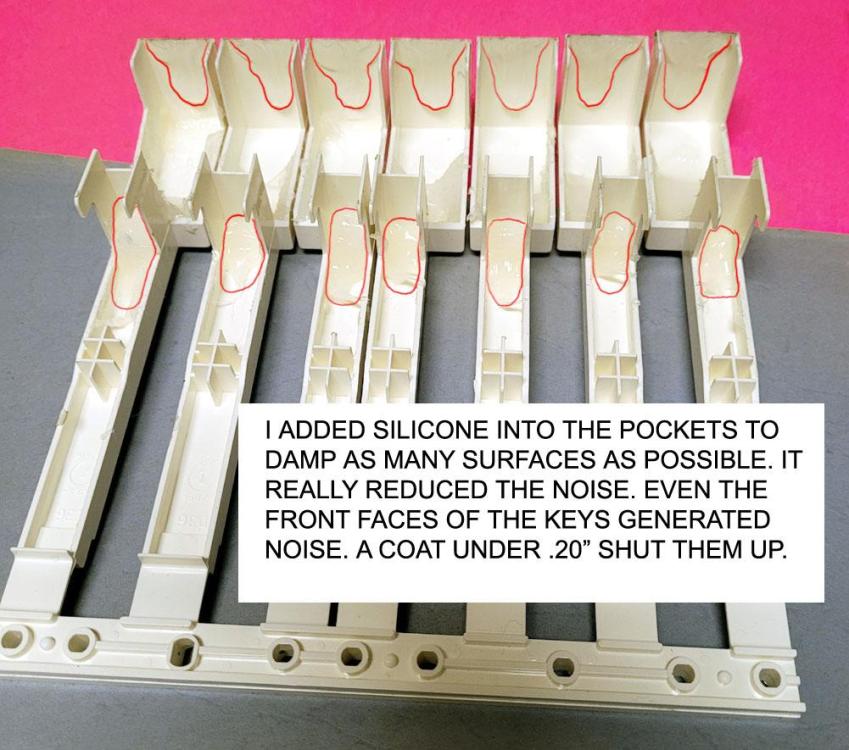
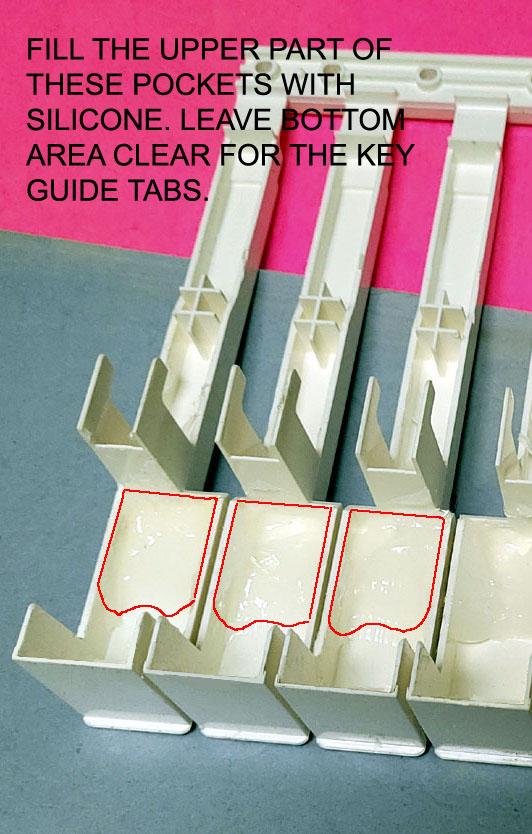
#1 ADDED SILICONE CAULK FILLING
I partially filled the hollow undersides of the keys with silicone caulk as shown in the photos #1, #2, #3. It absorbs the vibrations. It counteracts the inherent noise making resonance of these keys.
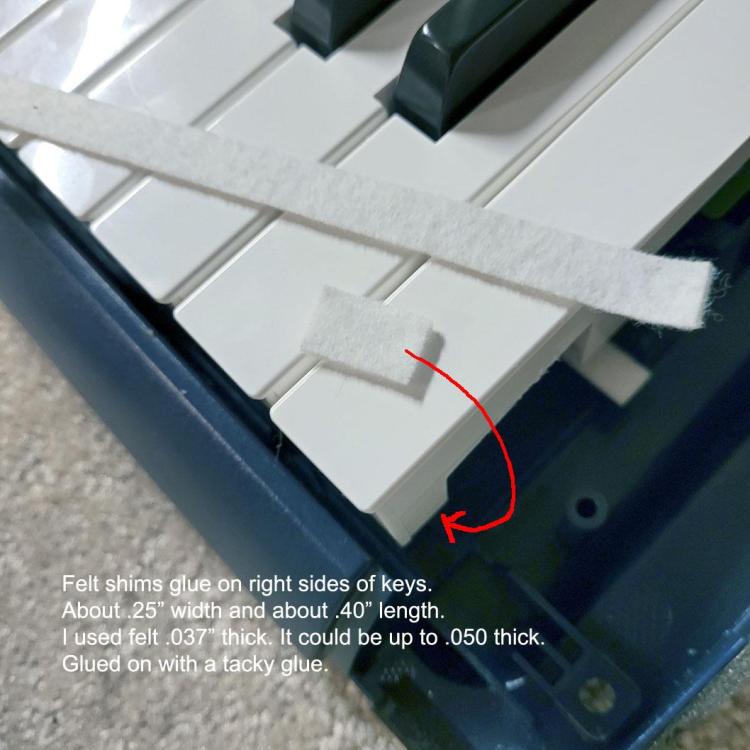
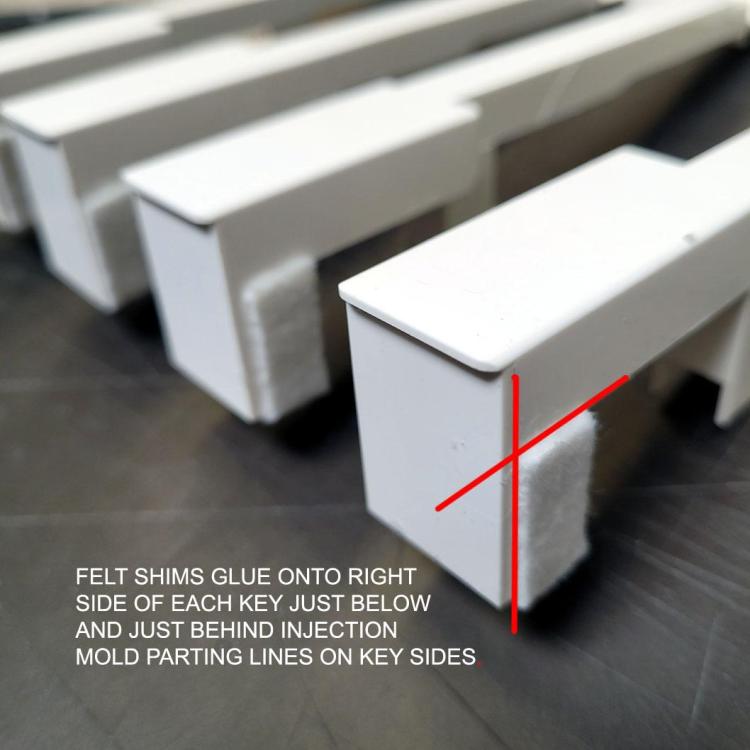
#2 GLUED ON FELT BUSHING PADS
I glued felt shims to the right side of each white key. This stopped any twisting, shifting or collisions between keys. Keys are now spaced, steady and silent. Photos #4 , #5
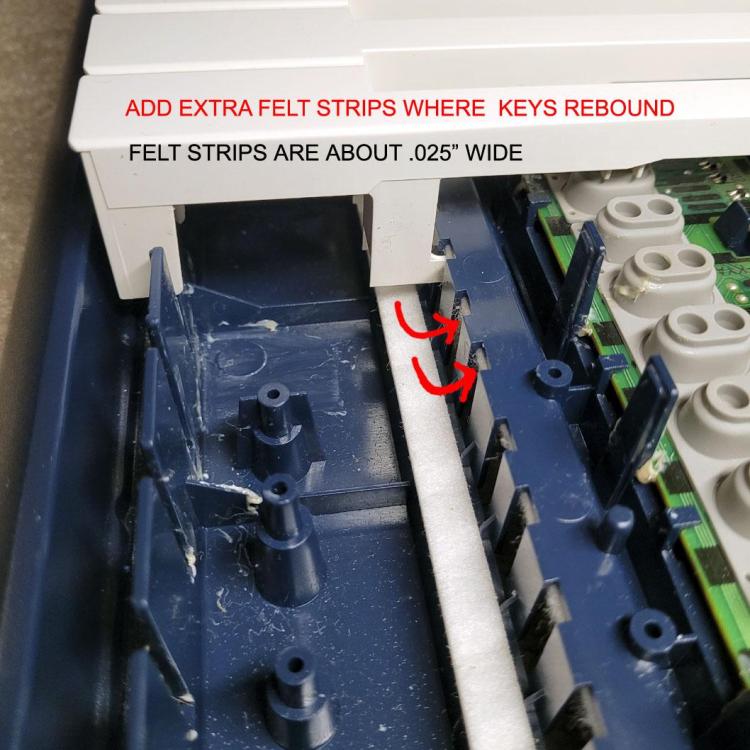
#3 ADDED EXTRA FELT BUMPERS
I also added additional felt strips at the underside of the keyboard chassis where keys rebound. This stopped key clack when keys are released. Photos #6.
RESULTS
The result is that the Click, Clack and Clatter is all gone. Quiet, smooth and confident keys. It turned out better than I expected. I have every reason to believe this will be a lasting fix because it focussed on stopping the noise at the source rather than trying to cove it up.
It is not reliant on a coat of grease.
REPAIR STEPS AND DETAILS:
#1- FILLING KEY POCKETS WITH SILICONE CAULK
The more that the silicone touches the flat and thin key walls the more vibration it will absorb and damp. I put it into the corners and up the walls. I put some on the front inside face of the keys. I was amazed to discover how much noise these paper thin front walls broadcast. They are like little speakers. A little Silicone shut them right up. Probably under .20” thick coat so it doesn’t rub on the key guide posts.
#2- FELT SHIMS FOR SIDES OF KEYS
I added Felt shims on right sides of keys. About .25” width and about .40” length. Felt I used was .035” thick. It could be up to .050 thick or more. Glued on with a tacky glue. Glues on the side wall just below the horizontal parting line and just behind the vertical parting line at the front of the key.
#3- ADDITIONAL FELT BUMPERS FOR KEY REBOUND
I cut 12" x .25" strips of .035" felt and glued them on top of existing felt bumper in the channel on the bottom of the chassis. These are the felt bumpers that the keys rest on in their up position. They added just enough additional cushioning that I no longer hear the thunk or rattle when the key is released.
#4- SILICONE GREASE FOR KEY GUIDE POSTS
When I started this MZ-X key noise project, I assumed I needed silicone grease. I found it in hardware suppliers but in larger quantities and high prices. Then I found silicone grease for plastic parts in the repair tool section of my electronics store. Smaller tube and modest price. After other fixes to the noise issues, re-greasing seemed like a redundancy, but I was already there so I added a little for good measure. Photo #7.
"EXTRA" NOTE:
For many of us keyboard players, subjective subtleties like "key action" make a difference in feel and expression. If you choose to "tame" your noisy MZ-X keys with silicone caulk as I did, this is something extra that you can consider while you are at it. I knew I needed X amount of silicone to stop the resonant noise in the hollow key shells, but how much more? What I added didn't really fill the cavities with silicone so there was space for more. As an experiment, I added more silicone to the keys on one of the octave key combs and found that I liked the feel of the extra mass. Silicone caulk is heavy. The keys still had the same semi-weighted spring pressure but that little extra mass felt good. It gave my fingers that little "heft" and push-back confirmation of the key presence. Instead of the feather weight key mass of the original MZ-X keys, it gained a little bit of inertia and momentum. This is something that is independent of the spring pressure. Something to think about and tinker with.
Korg PA4X, Casio PX 560, Casio MZ-X500, Casio CT-S500


")