
Chas
-
Posts
1,041 -
Joined
-
Last visited
Content Type
Profiles
Forums
Downloads
Everything posted by Chas
-

There's a complete list of synth engines used by Casio?
Chas replied to Jensen_PD's topic in General Casio Discussion
DSP = Digital Signal Processing. All DSP is software/ algorithm based. Whether it is accessed via a menu in a synth, via a VST/ plugin in a DAW, or even via a standalone box (i.e. many digital guitar effects pedals), it's still digital processing of an audio signal via software. -
As Brad says, My Setup is used if you need specific system and keyboard configuration settings to be loaded on start up. Registrations are used to recall tones, rhythms, performance layouts (i.e. layers and keyboard splits) etc. and anything related to those. Think of My Setup being for how you want the keyboard to respond when playing, and Registrations being for what sound(s) you want it to play for a specific song.
-
Quick response. A trim pot is simply a variable resistor. Without a circuit diagram, I am guessing that with my PT80 it simply gives a value to the LSI CPU to tell it where to set the base value for tuning. The CPU probably starts out with a maximum value and subtracts the value it receives from the trim pot. Without a value from the trim pot, it will default to the maximum value. Thus it would be possible for the PT80 to still work without the trim pot. As said, this is at a guess because I don't have access to the schematics, so don't take this as gospel!
-
I can try and help you with some of these questions: It's almost certainly intentional. It is likely a type of glue use to hold the components in place, especially the larger capacitors, and it is used to stop them from moving about. However, if the large capacitors show signs of bulging and/ or splitting, then it could be gunk from a dying capacitor. But the fact that other components also have signs of this glue as well suggests that it is indeed intentional, more so if the glue is specifically under individual components rather than randomly over the board or located in a localised area near a suspect capacitor. That looks most likely to be where the tuning trim pot should be. A few years back I bought a PT-80 needing repair, a model from around the same era as the PT30/ 31 and similar(ish) in design. It had an access hole on its underside for the trim pot, and someone had been bashing something in that hole and damaged the trim pot on the circuit board. I identified the damaged component, purchase a similar trim pot with the same rating, and swapped it over for the damaged trim pot. It was then all up and running again after that. As to why it's not there on your PT31, likely someone has heavy handedly shoved something into that hole and broken it off, similar to what happened with my PT-80. If it's not rolling around inside the case, then there's a good chance your PT-31 has been opened at some point in the past and someone removed it. And I think the keyboard will still work without it. I'm trying to remember how my PT-80 behaved before I repaired it, though I'm pretty sure it still turned on. I think that is the case. My PT-80 still had the damaged trim pot in place, and I was able to identify the rating based in that. Or I might have read the circuit board screen print. I still have a bunch of the trim pots back home as they came in packs of 5. When I return home at the weekend I will dig them out and see what the rating is on them. Yes, it's easy to replace with a little bit of careful soldering. IIRC, they're soldered on to the board at 3 points. You just have to be careful not to use too much heat and damage tracks/ lift the solder pads. Definitely be very careful with those LCD ribbon cables, as yes, they are very easily damaged and very hard to repair. Early Casios are very well built but its often the ribbon cables that are the weakest link. Same applies to the early Casio calculators. That might be possible, though rather than cutting wires I'd try and go the de-solder route. Generally the golden rule is not to do anything that can't be reversed. It looks like that tape memory circuit board is open circuit until the tape device is place on the connecting pins, so at quick glance you could probably just cut that part out of the circuit entirely without any noticeable effect other than not being able to use the tape load/ save feature. But without the service manual, it's not certain exactly how it's all connected, so be very careful if you do remove it from the circuit. I've also tried to find a Service Manual but no luck. I did find a PT30 discussion on the Circuit Benders UK forum that confirms that the board in question is glued into place. There's also some interesting insight of its construction that might also help you with your PT-31: https://www.circuitbenders.co.uk/forum/index.php?topic=490.0 Most of the components that you see are general electronic parts that are still easy and dirt cheap to find - capacitors, resistors, diodes, transistors etc. The problems only come about when its one of the custom LSI chips or custom displays that have failed, because most of those are long since out of production. As mentioned, I tried to find a Service Manual for both the PT-30 and PT-31 but to no avail. It's possible that there's another related model than shares much of the same circuitry that was used when servicing these models. If you haven't already seen it, Mr. Cyber Yogi has a lot of useful information about the PT30 (and related models) on his TableHooters website: http://weltenschule.de/TableHooters/Casio_PT-30.html I'd suggest just getting some power going into your PT and then use a multimeter to probe and check for voltages. Just a simple check of the power switch points could indicate whether that is what is causing the issue if you can determine that power is reaching the switch, and is/ is not leaving the switch when it is turned to the "on" position. If the switch is at fault and cannot be repaired, it is possible to bypass it entirely and have the keyboard permanently on, though I would advice trying to get a functioning switch to have things working as they should. Do you have a voltage/ test multi meter? If not, grab hold of one as trying to go much further will be groping in the dark, plus they are very inexpensive for a basic model. With a test meter you will much more easily determine of voltages are reaching the various components and boards. Oh, and as I've mentioned in a previous topic, the brown board is likely the analogue rhythm section of the keyboard, and the green board is the melody and main controller section. That will help you to know what part you are examining/ investigating. Keep up the investigation and let us know what you uncover. Hopefully it will be something simple and you can get your PT up and running again. 👍
-
@534N - Yup, the Casio Chaos Theory YouTube channel - that be me! I've been on this forum for quite a number of years under a different name, then about three years ago I decided to set up my own channel on YouTube and Casio Chaos Theory was born. Thank you for subscribing! 🙂 Regarding the Service Manual for the MT65/ 68 and CT405, no the MT400V (nor CT410V) aren't specifically mentioned in it. However, much of the feature set of the MT400V is the same/ identical as those other models, so an MT400V (and CT410V) appear to share much of the same circuitry with the exception of the filter, stereo chorus and "waw" LFO. I haven't checked myself, but if you open up and check the circuit boards of the MT400V and compare it with the MT65/ 68 and CT405 Service Manual, there's a good chance you'll find much is the same, if not almost identical. This is very common among some series of Casios, as Casio often repackaged and added/ subtracted features to create "new" models. That's also why some Casios are full of "Easter Eggs", as it was common to use the same main LSI CPU across a large range of models, but engage/ disengage features depending on the market sector and price point they were targeting. When you get the chance, have a look inside your MT400V and compare the circuit boards with those shown in the MT65/ 68 & CT405 Service Manual. There's a good chance you'll find a lot of matching, and that will help you to locate and diagnose issues and/ or add those switches I mentioned. Good luck, keep us updated and hope that you can get your MT400 fixed up. 👍
-
@HauntedHarmonics - I did a search online but couldn't find a Service Manual. I did find this site that states a Service Manual may not even exist for this model. It does, however, have some useful information that might help: https://circuitbending.miraheze.org/wiki/Casio_PT-100
-
@CRABFLAG - Good luck with your CT6000, and I hope you can get it back to good health again. They are very unique and very lush sounding keyboards, and they're most definitely worth saving. I can't add much more advice to what @pianokeyjoe has already suggested. Only thing that I could have added would be to hook it up via MIDI to a DAW/ other MIDI keyboard and see if it's sending MIDI correctly. If it is, then that suggests the main CPU and associated controller circuits are functioning correctly. Though as you've already got yours apart to tackle the soldering and volume slider that might not be possible at present. Fingers crossed the soldering and volume slider will sort it all out. Good luck!
-
Hey all, Here's an update video to add to my CT-S1000V review series. In this video I explore the recently released 1.02 Firmware Update for the CT-S1000V, examine the changes and improvements, backup my Casiotone, walk through the update process, test and demonstrate the changes/ new features, then I reassess my Pros and Cons list from Part 9 before drawing a conclusion. Enjoy!
-
A couple of easy things you can try with the CZ1000 and CZ101. There is a reset button on the underside of the case, in a small recessed hole marked "P". With the unit powered on, use a ball point pen or blunt toothpick to press and hold the reset button for approx. 5 - 10 seconds. That might do something, though it's normally used for clearing the patch memory if it gets scrambled. The other thing you can try is to power it with batteries. That would rule out any issues with the AC adapter and the associated circuitry. If neither of the above do anything, you'll have to get hold of the service manual, take the CZ apart and perform diagnostics tests to identify the problem(s).
-
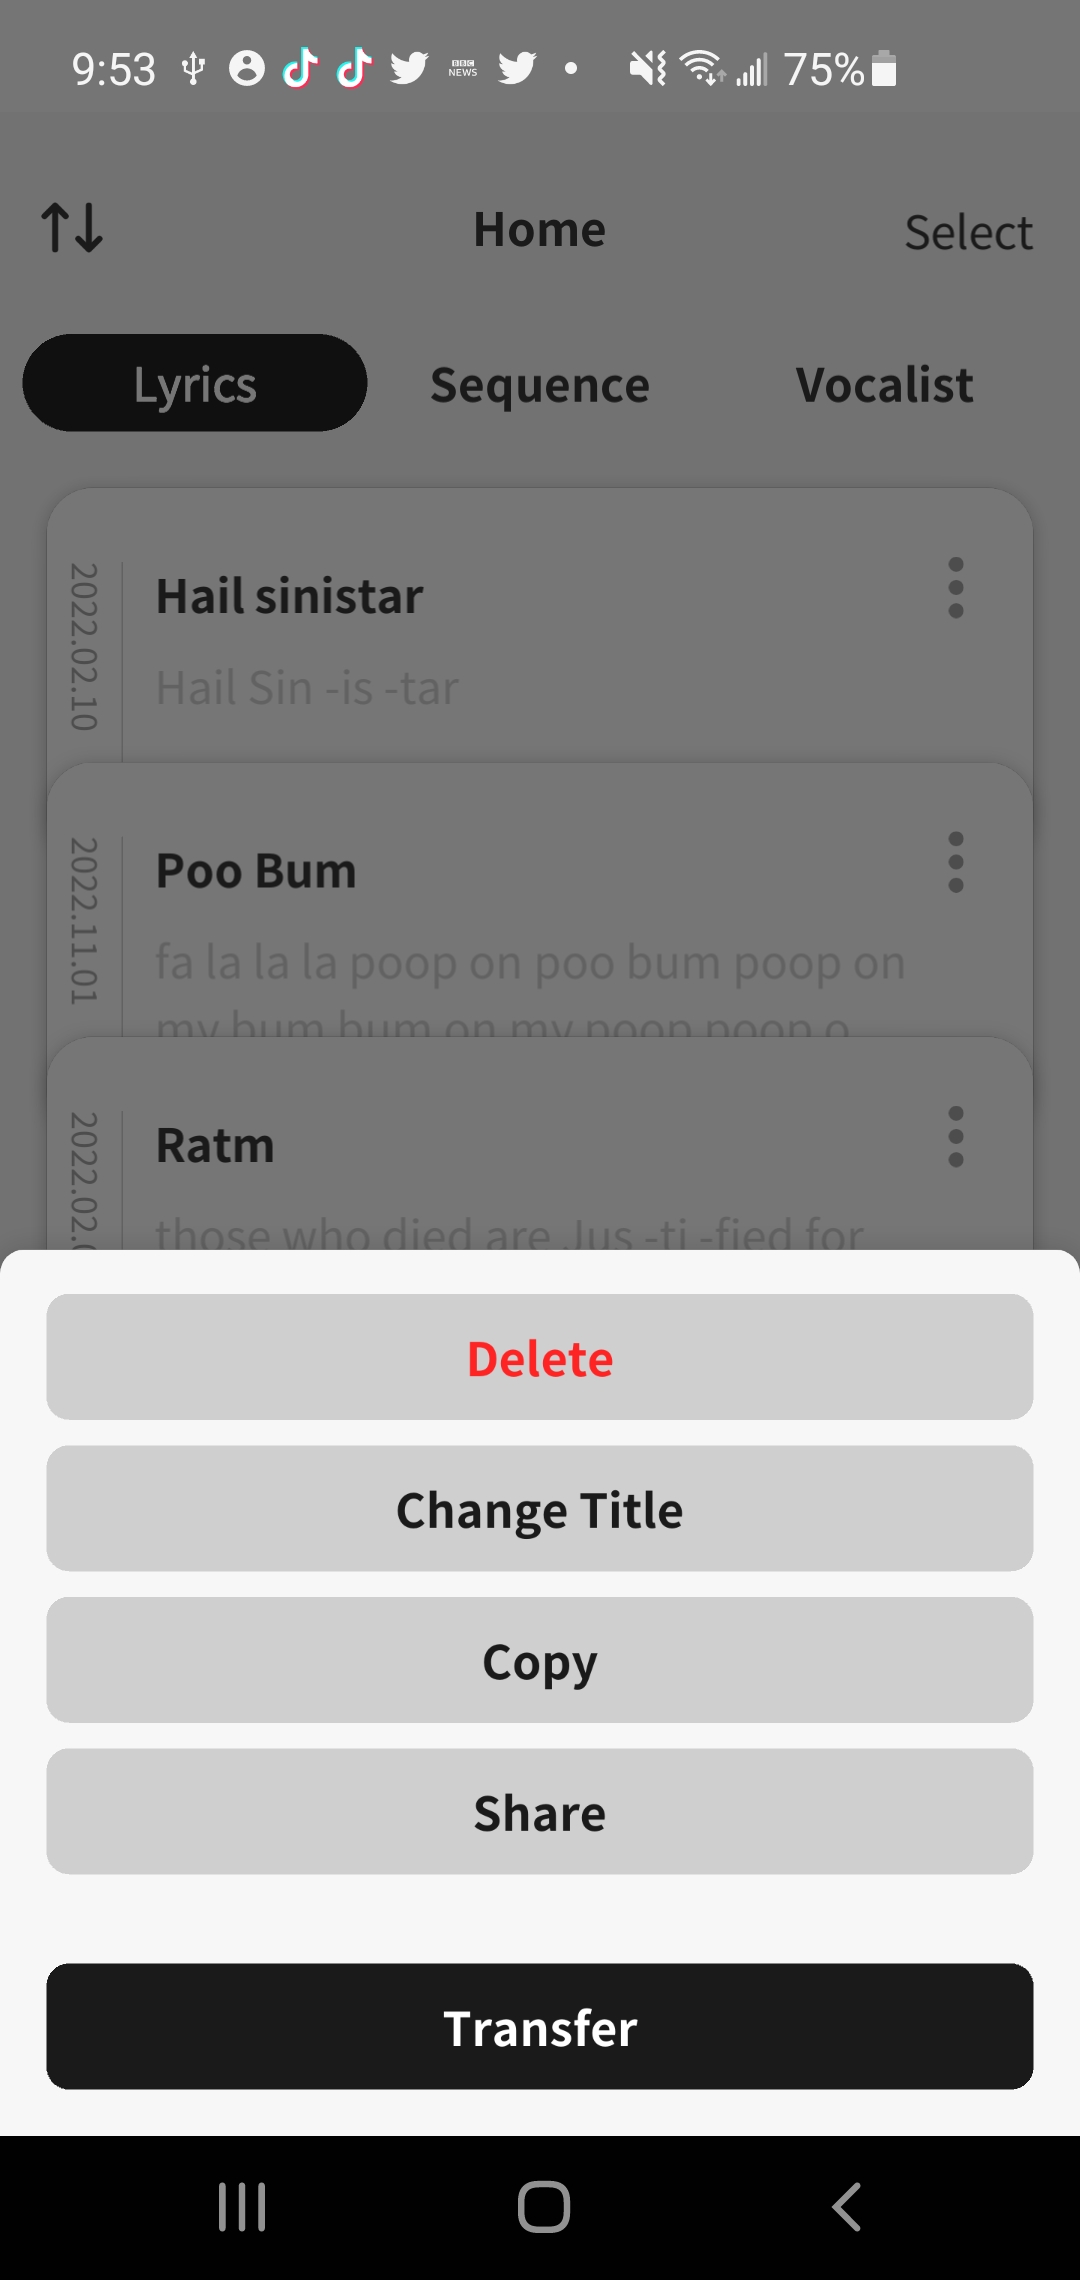
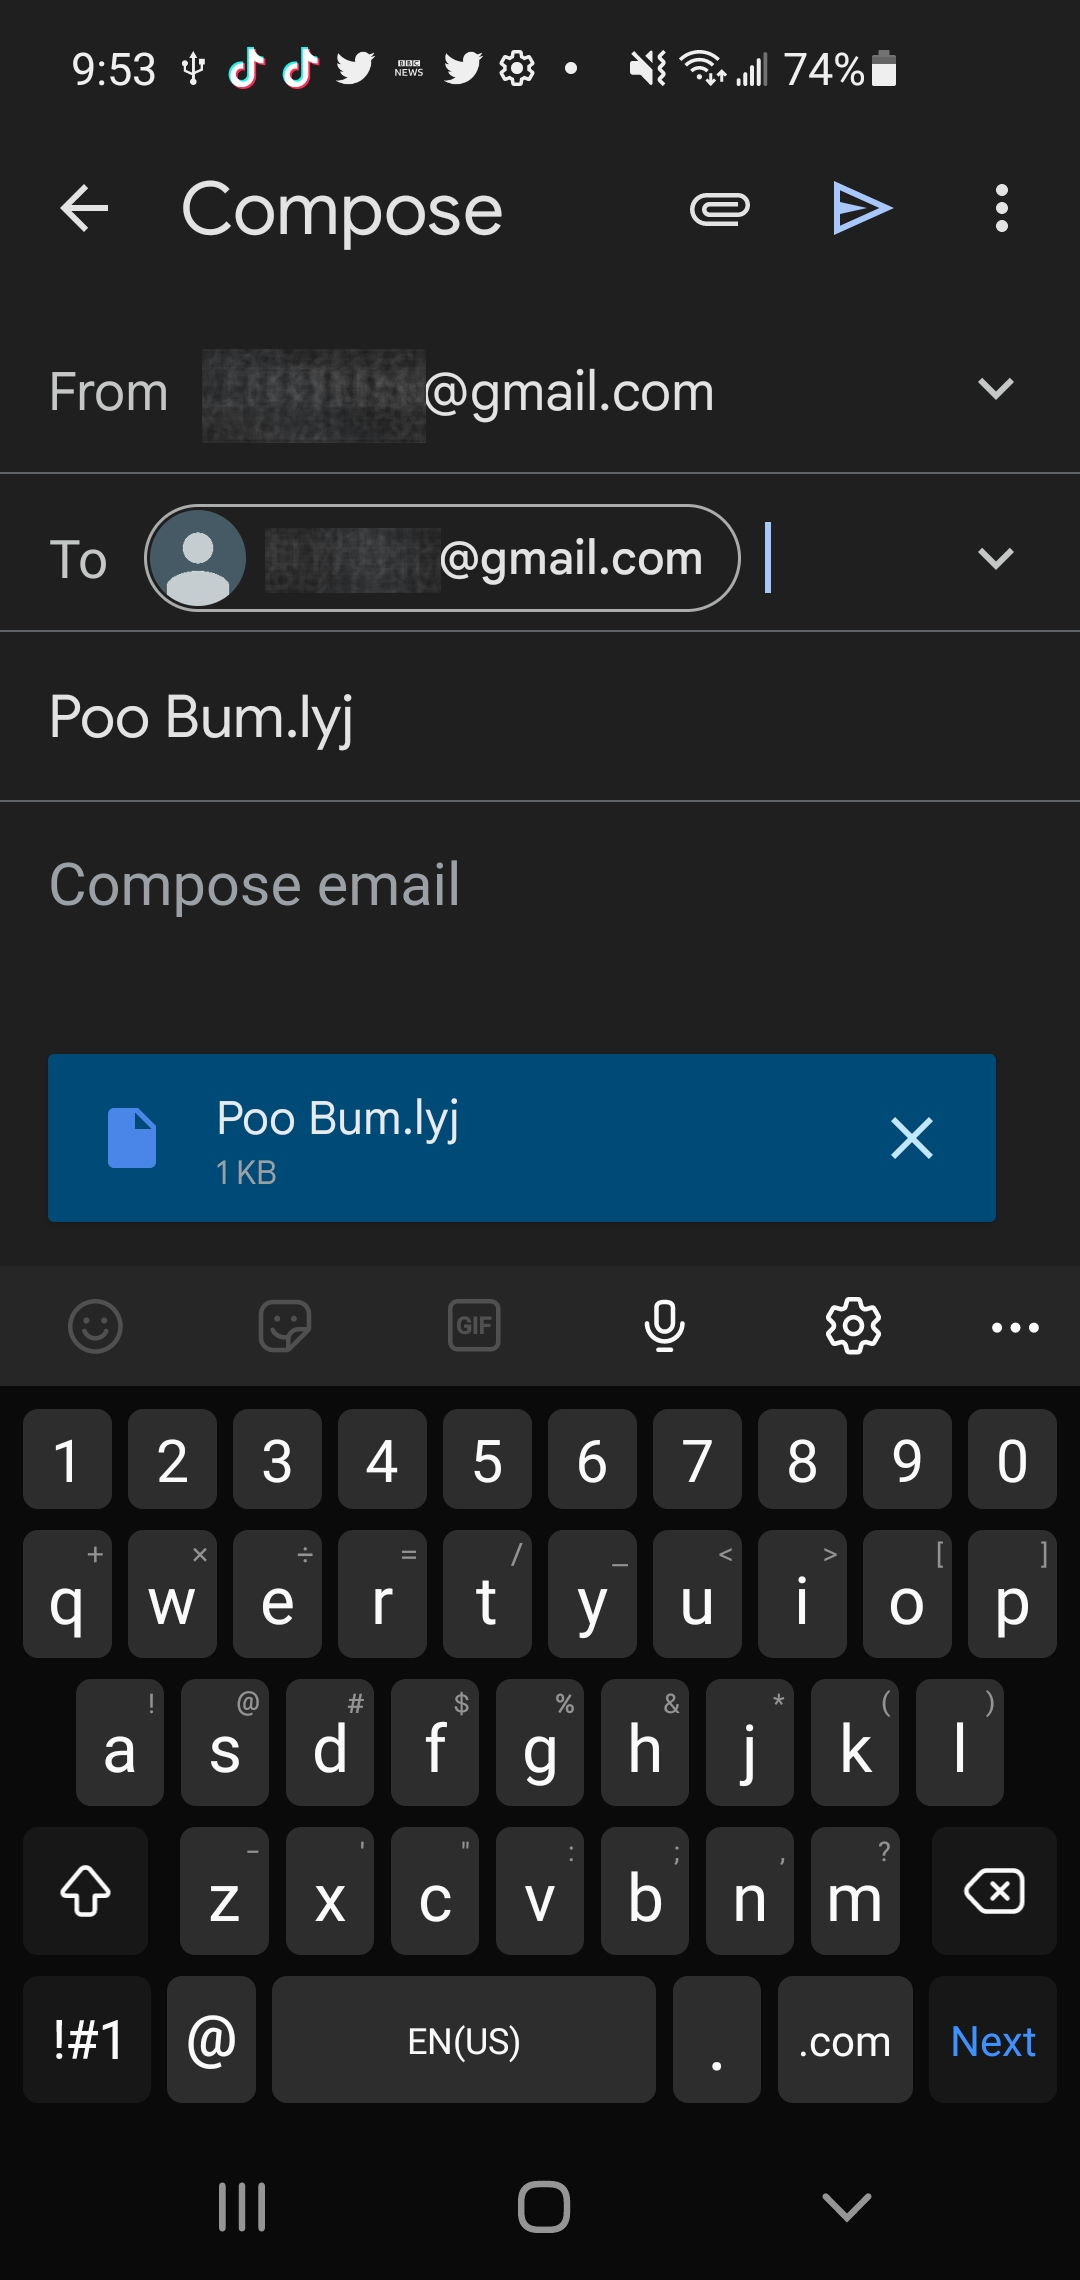
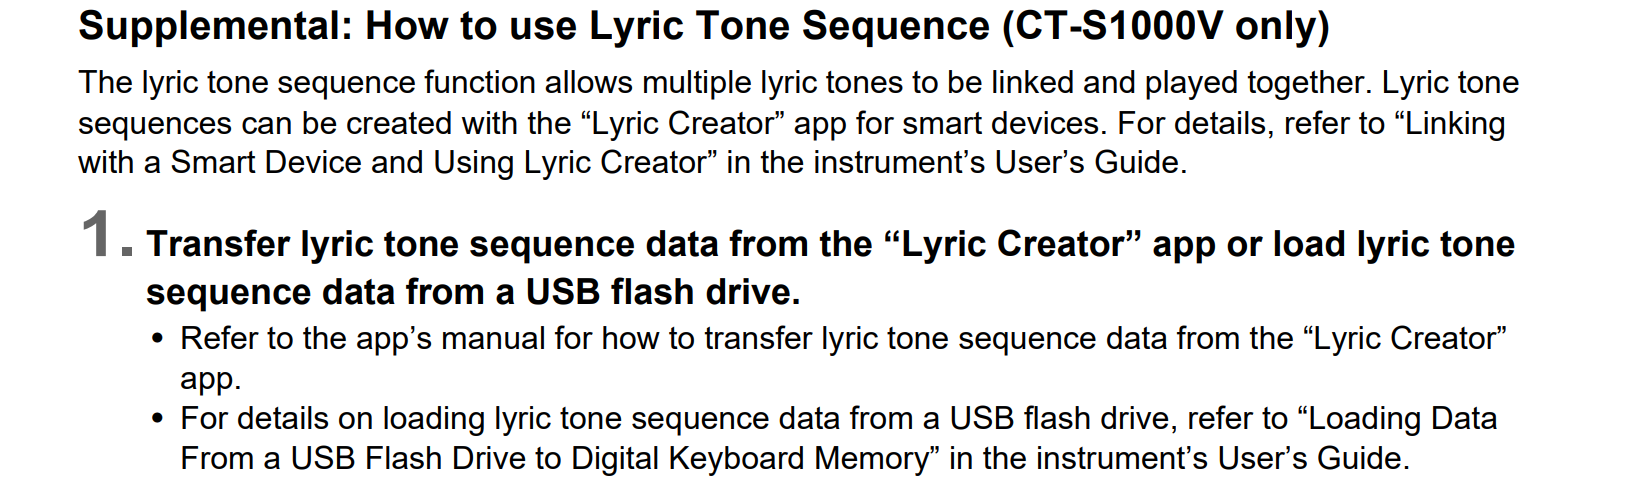
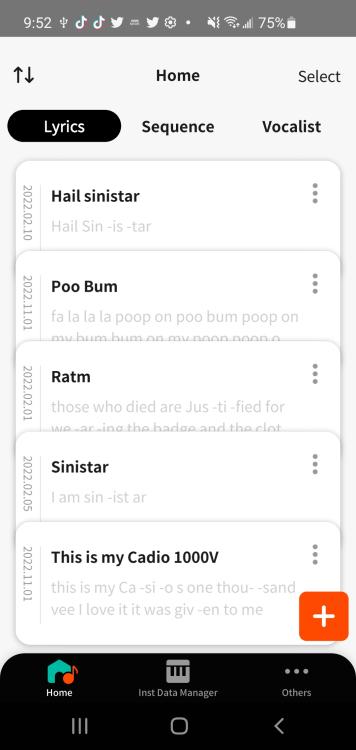
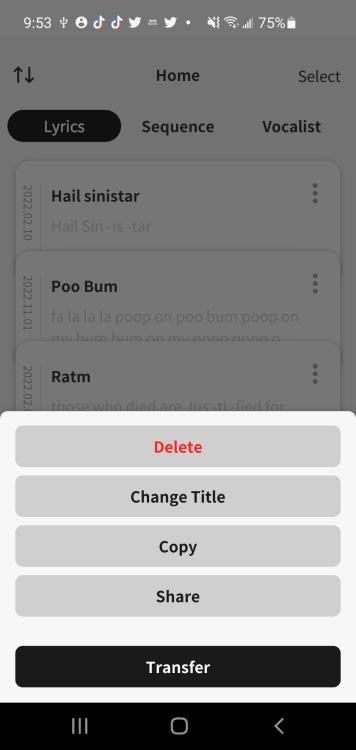
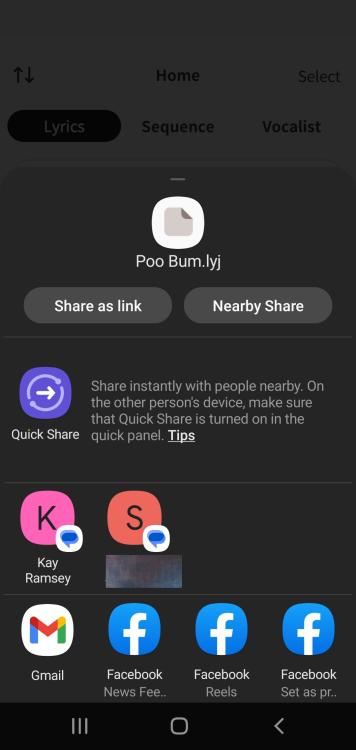
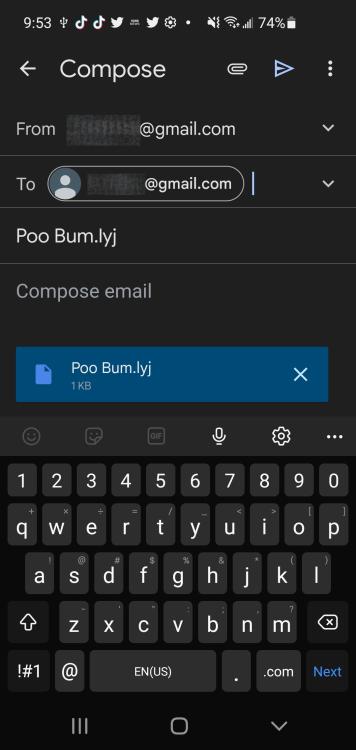
That did the trick! By using "Transfer" and then selecting "Transfer to other", I could then select "email", send the file to myself, download the file to my computer, copy it to the MUSIC DAT folder of my flash drive, install the flash drive into my S1000V, and then I was able to select the file and load it into a user lyric slot successfully and it played back fine. I guess the terminology confused me, as I took "Transfer" to mean transfer the lyrics from the app to the keyboard (as "Transfer" was normally used for), and I took "Share" to mean the universal "Share Externally" i.e. via all other types of apps such as Email, Messenger, DropBox etc. FWIW, I'll attach some screen shots showing that the lyric file ends up with a .lyj file extension if I use the "Share" option: This first pic shows my lyrics stored in the app on my phone. Poo Bum is the lyric I want to put onto a flash drive. I tap the three vertical dots to get the options, and select "Share": After I tap "Share", I can select which app I want to used to share the file with. Note that the file is shown at the top but now has a .lyj extension - Poo Bum.lyj I then emailed it to myself, and again, you can see that the file is called - Poo Bum.lyj instead of Poo Bum.lyr If I tried to load this file into my S1000V via flash drive, the S1000V couldn't "see" this file. If I changed the extension from .lyj to .lyr, the S1000V could now see the file and would attempt to load it, but would then give - [ERROR] Wrong Data. I notice as well that the firmware update PDF Guide shows all the updates/ changes, but doesn't detail the steps required to copy a Vocal Synthesis file to a USB flash drive. Also, the main user manual hasn't been updated and doesn't show that LYR/ Vocal Synthesis files can be loaded in via USB under the USB Flash Drive Operations section. Just an observation, as others might also get confused and/ or use the Share option and encounter errors as I did. Out of interest, what exactly is the "Share" option in the App meant for, and why does it change the file extension from .lyr to .lyj? Still, it's all working now and thanks once again Brad for pointing me in the right direction 👍

-
Yup, hitting the share button and then choosing "email" to send the file to myself. I'll take some screen shots and captures to show what I am encountering.
-
Thanks Mike, appreciate it. FWIW, I've tried to go directly into my phone's storage (Samsung Galaxy S10) by connecting it to my PC (Win 10) via a USB cable, found the Android Apps Data folders - (Android> DATA> jp.co.casio.LyricCreator> FILES - and there I found LyricData folder along with LyricSequenceData and VocalData folders. In the Lyric Data folder I could see my Lyric Data files that I created, and when I clicked on a file to show its properties, it tells me that it is a ".BYTES" file type. The files don't show a .LYR file extension. I tried copying one of these files to my flash drive and renaming it to have a .LYR extension, and though my S1000V can see and select this file, if I try to load it I still get - [ERROR] Wrong Data. Just thought I'd add this extra info in case it may help identify the issue.
-
@534N - I've uploaded the MT65/ 68 & CT405 Service Manual and Parts List to the files section. You can download it via this link: Go to Page 16 of the actual manual (your PDF reader will probably show Page 21), and you'll see a block diagram showing the routing of all the main parts. Coming out of the main LSI you can see the Bass, Arpeggio and Chord Circuits next to each other, these go through individual filters, then they are summed into Mixer 1 before passing through a volume control potentiometer. This potentiometer is the actual accompaniment volume control on the MT65's front panel. Therefore it should be possible to insert switches between each of these three circuits and the mixer to individually turn them on and off before they get to the mixer. Note that percussion circuit is covered on Page 17 and 22. On P.17 it shows that the main LSI sends triggers to the percussion circuit, and that's because unlike the melody and accompaniment sections, the percussion is generated by separate analogue circuit boards. If you take one of these Casios apart, you'll find the separate percussion circuit board (they're normally brown coloured) full of discrete components and trim pots. Some even have the drum parts printed on the board i.e. SD, BD, HH etc. It should be possible to locate the line out for each percussion instrument and then send them to an individual output. P.22 shows the circuit for each drum/ percussion part with a brief explanation as to how the sound is generated. Hope this helps, and welcome to the mini keyboard rabbit hole!
-
-
I thought that I'd better check the manual (RTFM...!), and noticed that a lyric file should have a .LYR extension. I renamed the file on the flash drive so it's now .lyr and not .lyj This time the S1000V can now see the file and I can select it in the MEDIA menu, but when it tries to load it I get - [ERROR] Wrong Data It seems that when I share the file via email it gets sent as a .lyj file. And if I try to send it via FB Messenger, it got sent with a completely different file name and with a .BIN extension 🤔 Is there a preferred method for "sharing" a lyric file from the mobile app?
-
Loading Lyric files via a USB flash drive - I'm having no luck! I've opened the mobile app on my phone, created a new test lyric, then used the "Share" option to send it to my email address as an attachment. Go to my email, download the attachment that is a ".lyj" file. Transfer that file to a flash drive that I am already using with my S1000V and place the file into the MUSICDAT folder. Install USB flash drive into my S1000V and let it mount. I then go to - MENU> MEDIA> LOAD> VOCAL SYNTH> LYR TONE, but get - [ERROR] No File - on the display. All other S1000V file types on this flash drive and in the same MUSICDAT folder can be seen and loaded into the S1000V - i.e. .RRF, .MID, .SPM and .WAV I can transfer this new lyric file no problem via the mobile app connected by USB cable to the S1000V. But if I share it via email and put the .LYJ file into the MUSICDAT folder of a flash drive, the S1000 doesn't seem able to "see" the file. Any pointers for where I'm going wrong here? Also, just in case it's something to do with being case sensitive, I notice that the lyj file name and extension are in lower case whereas all other S1000V file name and type in the MUSIC DAT folder are all upper case. I tried changing the file name and extension to upper case, but it defaults back to lower case!
-
Ah, gotcha. I was kind of concluding that after some trial and error. Something else I also noticed with regards to the using ACT DSPs over MIDI. If you use the change registrations feature via MIDI, from a Registration that didn't have any ACT DSPs to a Registration that does have ACT DSPs, the ACT DSPs will not be activated. A Registration with ACT DSPs will only engage the ACT DSPs to be played over MIDI if the Registration is manually selected from the S1000V itself. At least, this is what I have found to be the case in my experience. Thank you Brad, that makes it much clearer now 🙂
-
Hey All, I'm currently working on a "Firmware Update" video, and have successfully update my S1000V's firmware from 01.01 to 01.02. I have also been exploring the updated features and seeing how they apply, and have a couple of questions: The updated feature that I eagerly wanted to try is being able to use ACT DSPs over MIDI. I've gone into the MENU settings and changed "MIDI In 1-5Ch Port" from Port C to Port A, and have indeed now been able to send MIDI data from my DAW to my S1000V and have it play with ACT DSPs in operation. One thing I have noticed is that if I record my S1000V MIDI data into my DAW, and if I use the K1 - K3 knobs that I've assigned to some of the ACT DSP parameters during recording, the K1 - K3 knob CC data is not recorded. When I play back a MIDI recording to the S1000V, any knobs changes I made during the recording that affected the ACT DSPs are not there - the recording will play back the S1000V with the ACT DSP parameters at the point the knobs were last used (unless I change/ reset a Registration). Is it possible to record/ send ACT DSP parameter changes over MIDI? Note that this only applies to ACT DSPs - if I use the assignable knobs for the main filter, envelopes and modulation (when activated) for instance, those are recorded over MIDI and correctly sent back to the S1000V on playback. Also, I have successfully recorded Registration changes over MIDI by manually changing a Registration while recording. I've looked at page 8 of the updated MIDI PDF Guide, and though it explains the use of MSB and LSB to switch Registrations, is there a list anywhere that shows what MSB and LSB values correspond to each Registration? I've yet to try the loading of Vocal Synthesis files via USB flash drive, but I suspect that will be straight forward. Oh, and thanks again to Casio and the powers that be for making this firmware update happen 🙂
-
There's nothing in the supplied information saying this is possible, and after updating mine I can't see any way of naming registrations.
-
A lot of older Casios use fairly standard barrel style power jack sockets, most commonly PCB mounted. There are a few different types, so ideally open up your CTK1000 and see what it has and how it is mounted. You should then be able to locate a suitable replacement on Ebay or electronic parts specialists such as Mouser. Here's an example listing from a seller showing different sockets available: https://www.ebay.com/itm/175444061841?hash=item28d947ee91:g:SOUAAOSwU15hEnaU&amdata=enc%3AAQAHAAAAsFPFMvF7AJvbDcrgFI2BdUilOVYVSLkgp%2BG9oY1pCtyZwQifOr5jKIMWGpAvDS6dztGkep2ctHPGhHDlW9Or3HIPU67mnVhy9irhizX7bhyQ0M1KWC9ZMSfCvH%2FXv8Ak1cFuVKm%2Be%2FmFynflRoJnYyV%2F5dfnt%2BrsnKoFBMMfF5dgzwidtpxfBMHPF5PaR9sJAQbZVfTE0Aqxt7ZN4F1WIhy%2B4HP4mMCXMGgbprgMwcGH|tkp%3ABk9SR4LW-seFYQ But as said, you'll need to open your Casio and look inside to see what type of socket yours has.,
-
@534N - I don't think that was me on Reddit, as I don't recall posting on that site. Certainly not in the last few years, though many years ago when the internet was a much different place, maybe I did! I totally understand your reservation when it comes to modifying instruments. I'm not a fan of doing this kind of thing, mostly because I only have basic electronics and soldering skills and wouldn't want to damage anything. I'm also not much of a fan of "circuit bending", where much of the time the "bent" instruments just end up making random and in many cases unusable glitch sounds. As the saying goes, "just because you can, doesn't mean you should"! Saying that, I also appreciate "circuit enhancing" that to me differentiates from "circuit bending". For instance, adding a line out to a keyboard that didn't come with one is a no brainer IMO. Unlocking hidden features/ Easter eggs is also a good thing, and expanding on existing features to give them greater range and usefulness is all good stuff. An example of this is taking the filter in the HT Casios, increasing the resonance and filter range, adding external controls for the filter and making a fare more musical and powerful feature. Of course that would mean having to drill into the case and add extra potentiometers, but if done well, it can almost be made to look factory standard. And some of the vintage Casios had a ton of extra features that weren't activated in some models, such as the 1980 M10. Check out Robin Whittle's modification guide for the M10 to see just how much more that keyboard can do beyond its original design! https://www.firstpr.com.au/rwi/casio/ Also, your idea of making individual outs for the accompaniment parts is similar to what I am considering for my MT65 and MT68. I've written a track with mine, but would like to isolate the bass and the arpeggiator, and chord section, so that I can multitrack them and have far better control at mixing them. I've looked at the service manual and it is indeed possible to isolate these parts as they are all routed and summed to a front panel mixer/ volume control. It should possible to tap into and isolate each part's circuit before it reaches the "mixer" and send them to individual line outs. Another alternative that I am more likely to consider is to break the circuit traces for these parts, bridge them with switches, and then you can turn on or off any combination of parts at will. What holds me back though is the need to add switches somewhere, and I don't really want to spoil the clean aesthetics of these vintage keyboards. My other thought is to use microswitches on an extendable loom that can be hidden in the battery compartment. When needed, take off the battery compartment cover and pull out the switches, and activate/ deactivate each of the parts as required. When finished, set the switches to "default settings" and hide them back in the battery compartment. One of my many potential projects sitting on a list as long as your arm!
-
@534N- I certainly wouldn't give up on your MT400V, and if you can get it sorted and you wish to have the extra features found on the MT65 and MT68, well, hidden inside the MT400V (and its full size but otherwise identical twin the CT410V) are those very same features. For some reason Casio not to include then in the MT400 and CT410 🤦♂️ By tapping into the LSI matrix and adding extra switches, you can now activate those Easter eggs. Then you will have the equivalent of an MT65/ 68 with added filter, WAW and stereo chorus! You can find details of these Easter eggs on the very informative Table Hooters site: http://weltenschule.de/TableHooters/Casio_CT-410V.html
-
Getting internal audio from my CT-S300 to my Macbook Air
Chas replied to lcovers's topic in General CT-S and LK-S Discussion
If you plug headphones into your CT-S300, and if you can hear the audio perfectly, then the issue will be at your MacBook end or with an OBS setting. OBS is a very powerful and extremely flexible program, but it also has a lot of settings that can catch you out if they're not set correctly. If you're not getting sound input with garage band either, then likely it's an issue with the way you are connecting the audio cables to your mac. I am not familiar with macs so I don't know how it deals with analogue audio signals going in via a USB C socket. Is the TX a USB C dongle? Does your mac have the ability to convert analogue audio to digital directly via its USB socket? When I capture audio with both my desktop/ workstation PC and my laptops, I always use a USB audio capture device - a Behringer UMC404HD 4 x channel device for my workstation, and a Behringer UCA222 2 x channel device for when I'm using a laptop on location. Both show up a USB audio devices and I simply select them as my audio input for whatever app I'm using. BTW, if you're in the USA, Sweetwater have recently offered the UCA222 for $10 with free shipping. Hope some of this info helps! -
One or two batteries inserted the wrong way round is unlikely to have any adverse effects other than the keyboard won't power on. If ALL the batteries are inserted the wrong way round, then it's possible voltages could be fed the wrong way into certain components. There are also likely to be diodes involved to stop this as they only allow current to flow in one direction. However, I am not an expert so hopefully someone with more electrical knowledge than me can offer some words of wisdom. More information is necessary though before any advice can be given. Was the SK60 working correctly before the batteries were inserted back to front? Have you tried powering it with an AC adapter? Other than the LED, are there any signs of life when the SK is powered on, i.e. a click or any noise from the speaker? Have you opened the keyboard and had a look inside? Answers to the above may help to identify where the issue potentially lies.
-
Awesome!