Oh_Man
-
Posts
24 -
Joined
-
Last visited
Content Type
Profiles
Forums
Downloads
Everything posted by Oh_Man
-
Thank you all for the input, I was clearly too slow on the draw and someone else snagged it. It looked a little rough for wear with the corners kinda looking banged up / paint removed so perhaps used a little harder than not. Anyway kinda immaterial now but good knowledge to have if another should come up in my area.
-
MIDI - Navi. Ch? And Splitting the board for 2 plugins?
Oh_Man replied to Oh_Man's topic in General Casio Discussion
WK's...I notice it's the same on all of them. I have [selling a 225] and a 6500. O -
Privia - PX-5S
-
Hello, Looking at one in my area that looks to be owned by a gigging musician. Curious how the keys and their hammer action mechanics would be holding up? Do they suffer the semi 'clackiness' of other Casio boards? And reading a review on SoundOnSound they said it's "bouncy for one with such a short front‑to‑back scale". What does short front to back scale mean...shorter keys? Any issues I should be looking for or asking the seller about? O
-
Hello ... 1. I cannot seem to figure what Navi. Ch is for [default is 4]? 2. I'd like to split the board to play 2 separate plugins - is that done in the DAW? Thanks, O
-
I have a similar issue - it's plastic against plastic and 'most' of the sound seems to occur when the keys snap back up. Having taken these apart is seems to the the triple layering of the key assemblies and other spots where plastic hits plastic. Couple options - the board is reasonably disassembled so that's first. One I've done and the other about to try. Lubrication - to lube the keys with silicone. Don't buy the blue stuff it's corrosive to plastic but the orange stuff for brakes works or Synthetic Grease which is thicker. That said I think the brake stuff is better but more expensive. Option 2 [multiple] - There's a lack of screws holding down the keys - there's holes drilled for more screws so one option to make the assembly more stable with additional screws. Cloth tape used for wire / stereo harnessing OR I'm about to use hockey tape which is 'clothy' and just as thin. I'm about to put this in between the key assemblies and anywhere else the plastic is striking plastic to operate as a pad. There's a thread on this forum - search clack keys but it's for a different model but essentially talks about using cloth tape.
-
I would say take it apart which is fairly easy, more a pain due to all the screws, but you'll want to see what's going on in there. Might need some contact cleaner or something but you won't know until you've got it apart. If you have a cat then the contacts might have gotten hair on them [just a thought]. The 2 main bodies separate easily, the wires are long enough to all you to pull them apart. While you're in there put some silicone grease on the inside of the keys to reduce some of the clackiness and will simultaneously offer a little more resistance when playing them.
-
Call Casio service - I'm about to have the mic knob sent to me.
-
Hello ... On my 6500 the 60's EP and even the Dyno EP both have a sort of Fender Rhodes bark. Is that right? I got this second hand and did what I thought was a reset so making sure that's correct. That said it's not overly consistent, sometimes playing faster or hitting triads gets it going ... is there a way to increase, decrease or make it more consistent? Orion
-
6500 - No sound from Outputs to computer speakers?
Oh_Man replied to Oh_Man's topic in WK-6500/6600 - CTK-6000/6200
Hi Brad, First...thanks for reaching out. Thanks for the headphone suggestion - yes that worked and got me doing another round of testing. It all works. I must be losing my mind as I get older, that or my ears are going to heck or maybe it was just late in the night. I did make sure this morning that those plugs were in there good so maybe something is up there but it's good and I feel like a twit. That said, the sound is quite low coming out of those outputs - ran it to my stereo system which has pretty respectable sound and had to turn it up more than thought. Does that sound right? Like is the impedance on those outputs quite high? For the record the 225 is louder in the same set up. O -
Hello ... Ok picked up the 6500...deal was too good to pass up and love all the sound controls. First question and I'm sure they'll be more. I have a 1/4" Left/Right cable with a 3.5 mm adapter on the other end to run sound to some computer speakers - in this case. Got the 6500 plugged in and getting nothing going to the speakers. I know the cable is good, used it with a Lowrey when I had it and it's essentially new. Not impossible it doesn't work but highly unlikely. My 225 has a single out and so I just use a 1/4" to 3.5 mm adapter to the same speakers, no problem. On that note I tried the same set up to the Mono on the 6500 ... still no sound. Does the 6500 not dig computer speakers, or did I just buy a board with hooped outputs making it not so good a deal after all? O
-
CASIO WK-6600 MIDI Tools software
Oh_Man replied to luis666999sinl's topic in WK-6500/6600 - CTK-6000/6200
Could you please offer the usage of this software? -
6500 and Internet Data Expansion System?
Oh_Man replied to Oh_Man's topic in WK-6500/6600 - CTK-6000/6200
@Chandler Holloway Ok thank you...good to know and thanks for the additional context. Yes it appears they took the sampling functionality out? Odd as that would allow 'some' ability to extend the tones, ie; record some virtual via the MIC and done. I've never tested it with my WK 225 but that's how I understand it works. That said, via an online demo the 6500's DSP tones are pretty extensive especially considering the configuration ability so not a big deal for me. Sounded pretty damn good to me though shame they only offer 10 user tones vs the 7600's 100 user tones. Also, regarding SoundFonts/Wav/etc - that are all over the place, is there anyway to do converts to this AHL? I've searched that but haven't found anything yet or if there's a different method? And am I missing something but it seems the CTK 900/WK 3200 offered greater drawbar type functionality vs the 6500 or is it just factored into the 6500's DSP Tone editing/manipulation they offer? Seems confusing. Thanks... Orion -
Hello, It seems Casio for at least a little while allowed/gave extension functionality to their Tones. Came across the below link which is not for the 6500 but curious if this would work or there's something else available for the 6500? A 6500 has come up in my area and considering buying it and this would be excellent! It really seems that Casio pulled out all the stops with the CTK-900/WK-3200 - from it's extended Drawbar functions to this... https://music.casio.com/e/ https://music.casio.com/e/data_ex4/ Did the same for the CTK- 671 https://music.casio.com/e/data_ex2/ O
-
Hello ... I'd be curious to know what you ended up doing, if there was a workable solution, especially as I'm considering picking up a 6500 which is for sale in my locale. Might not be the greatest solution but there's a solid VST called iSpinner. https://www.kvraudio.com/product/ispinner-by-iliadis-instruments Download link: http://www.vstplanet.com/VST_effects/Modulation/iSPINNER.zip O
-
Right ...Active Subwoofer. I currently have a passive one...it's useless. Also, my 225 only has the single 1/4" output. That said I recently found what looks to be a good used PA in my area for $40.
-
Nice ... cheaper than an amp or PA. I'll ask the newbie question...how did you hook that up - Connections types?
-
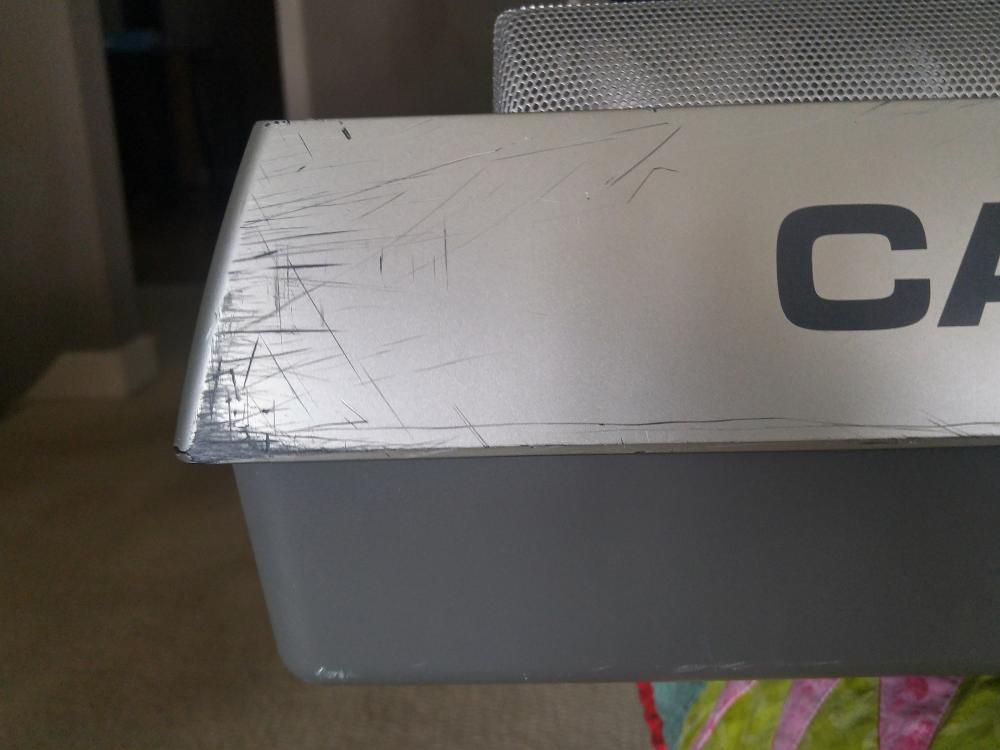
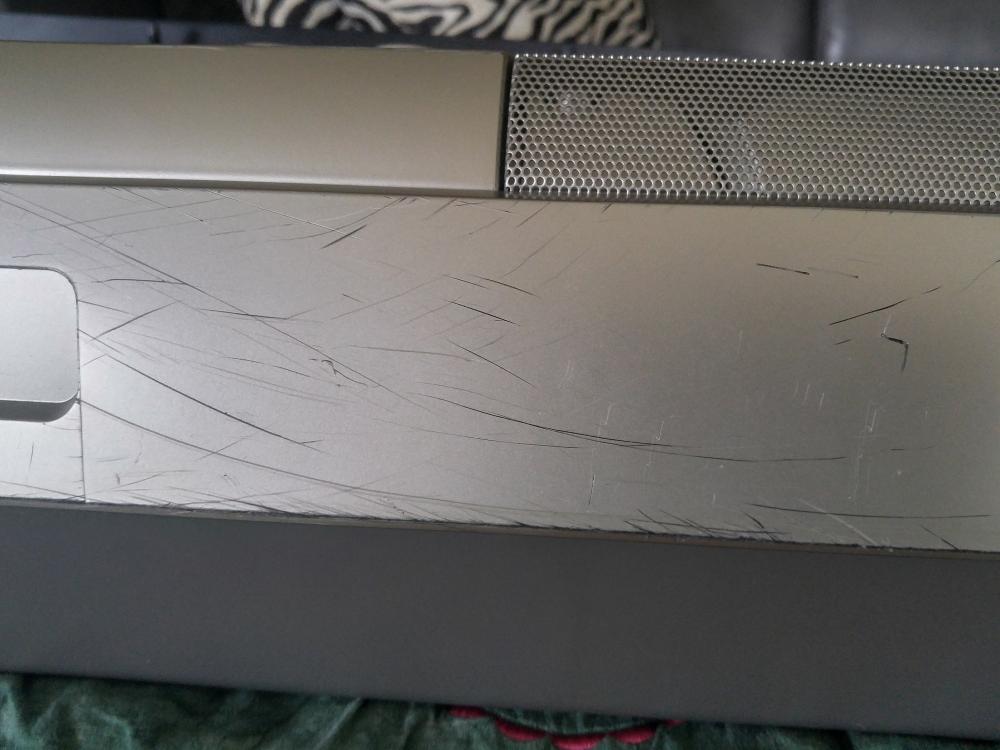
I'll keep you all posted as to how the DYI goes. Yes, thanks for the reminder on the scratches needing to be fully buffed out. Upon closer inspection of the finish, it looks metallic, a very fine 'sparkle' to it. It'll all be on the back so I'm slightly less concerned with it being 'perfect' just not all scratched up like the photos. Anyhow I'll make sure to post pics when I'm done. O
-
Hi Jokeyman, Wow, that's awesome info! Thanks for the honesty on the failures...I've done the same in other DIY projects Yeah, I'm going to avoid the lettering by taping that off - only a couple minor scratches 'near' the various lettering and the face is pretty clean so lucky there. For the record I'm not going to attempt on getting this brand new, just want to take a solid run at it so I'll take a 'blending' approach vs the whole cabinet body. Majority is on the back with only a few bumps and bruises on the face. Thanks for the rubbing alcohol tip...and does that take off the paint? I came across some instructions [see link] around prep, wet sanding with fine grit [800-2000], etc, which given the depth of some scratches will be the solution. I've tried the toothpaste/baking soda in the past and that's useless Otherwise, all 'seems' easy enough as I've done a little auto-body in past and the process is similar. IE; taping off areas before sanding/painting to isolate, cover everything, polish/buff after BUT the painting seems the tough part in terms of picking the right product for finish/color. Spraying is the obvious choice but things like sheen and color match...not so easy. So on the subject of learning from your adventures... What paint and sheen did you find worked best...and which product? Please tell me I can go pick this up at the local home improvement store vs some specialty product that I have to search hell's half acre for. I'll post this link as a quick how to on the prep stuff which will hopefully help other travelers who figure it might be nice to do if the process isn't too bad. https://www.bobvila.com/articles/how-to-remove-scratches-from-plastic/
-
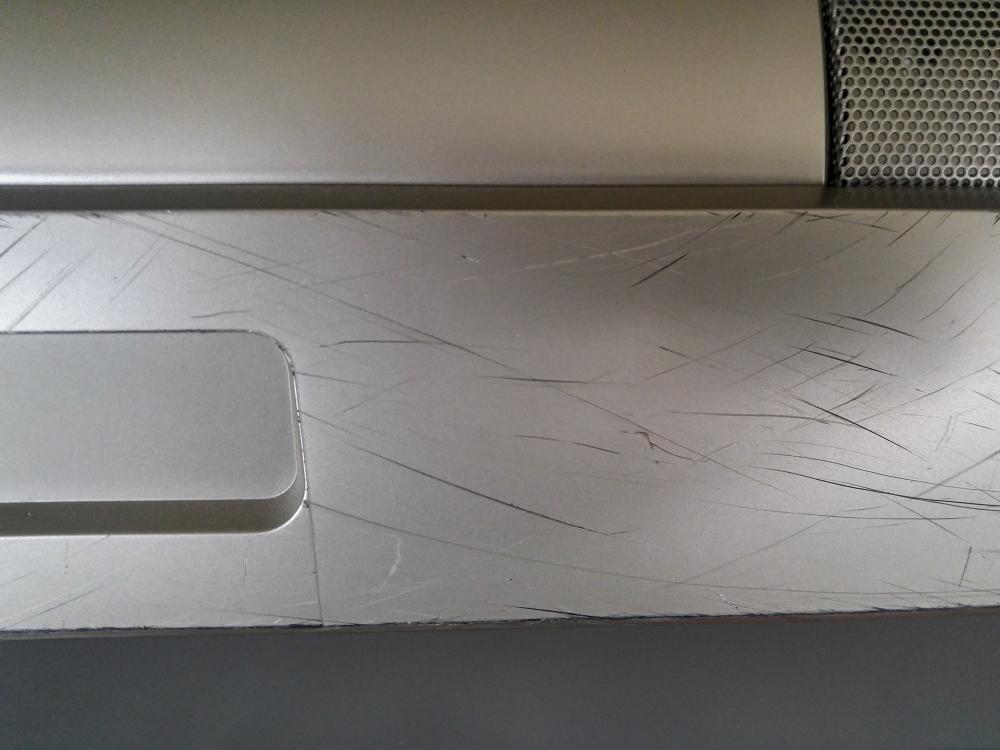
Hello All, Wasn't sure where to post this. I just picked up what I believe is one of the first WK-200's, seems in solid working order as I go through the functionality [knock on wood]. However the upper body casing which is Casio's silver color [common to CTK/WK/LK] is quite scratched up. Some are genuine scratches into the plastic and others are mostly just cosmetic paint scratches. And pretty much around the back, so the top got sparred. Has anyone figured how to fix this, perhaps experimented with paint or, ... ? Great instrument and it would be nice to have it look as good as it plays. O
-
Just thought I'd update. I would say the great board is suffering slightly from not being used much prior to my ownership. My experience is electronics don't like sitting idle...they like power going through those circuits. It did the behavior again, this time while playing with the split and layering functions. After using them for a bit and leaving the power on again the issue went away. Almost like I was waking up those parts of the organ that clearly hadn't been used in sometime. Perhaps the moral here is, if you purchase these used and they've said they're not using much if at all...take it home, turn it on and leave it on for a bunch of hours while getting on it periodically to play and go through the various functions. Just my 2 cents. O
-
Hi Brad ... I've continued to test and play with it and it's 'seems' to have stopped it. I left it powered on for quite a few hours - I was servicing it and who knows. It was creating a tail end sound of piano overtop whatever organ or EP Tone I had selected like the software was getting confused. Anyhow fingers crossed it doesn't come back.
-
Hello ... I probably know the answer but just in case - ie; something in the hardware isn't doing what it should. When set to another tone [any] and not using the Layer function, periodically the keyboard will produce a piano tone [sounds like 000] as if the Layer function was on. Only occurs when the keys are struck harder. As I understand there's not "factory reset" with this model, apparently that occurs every time its unplugged and doesn't have batteries in it. Thoughts?
-
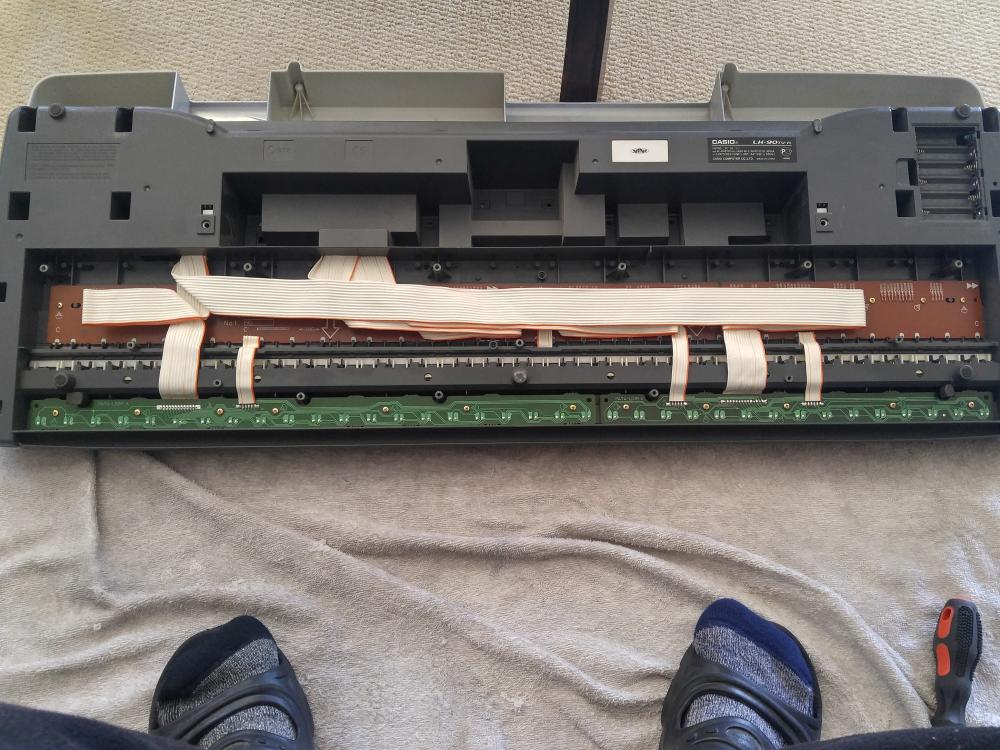
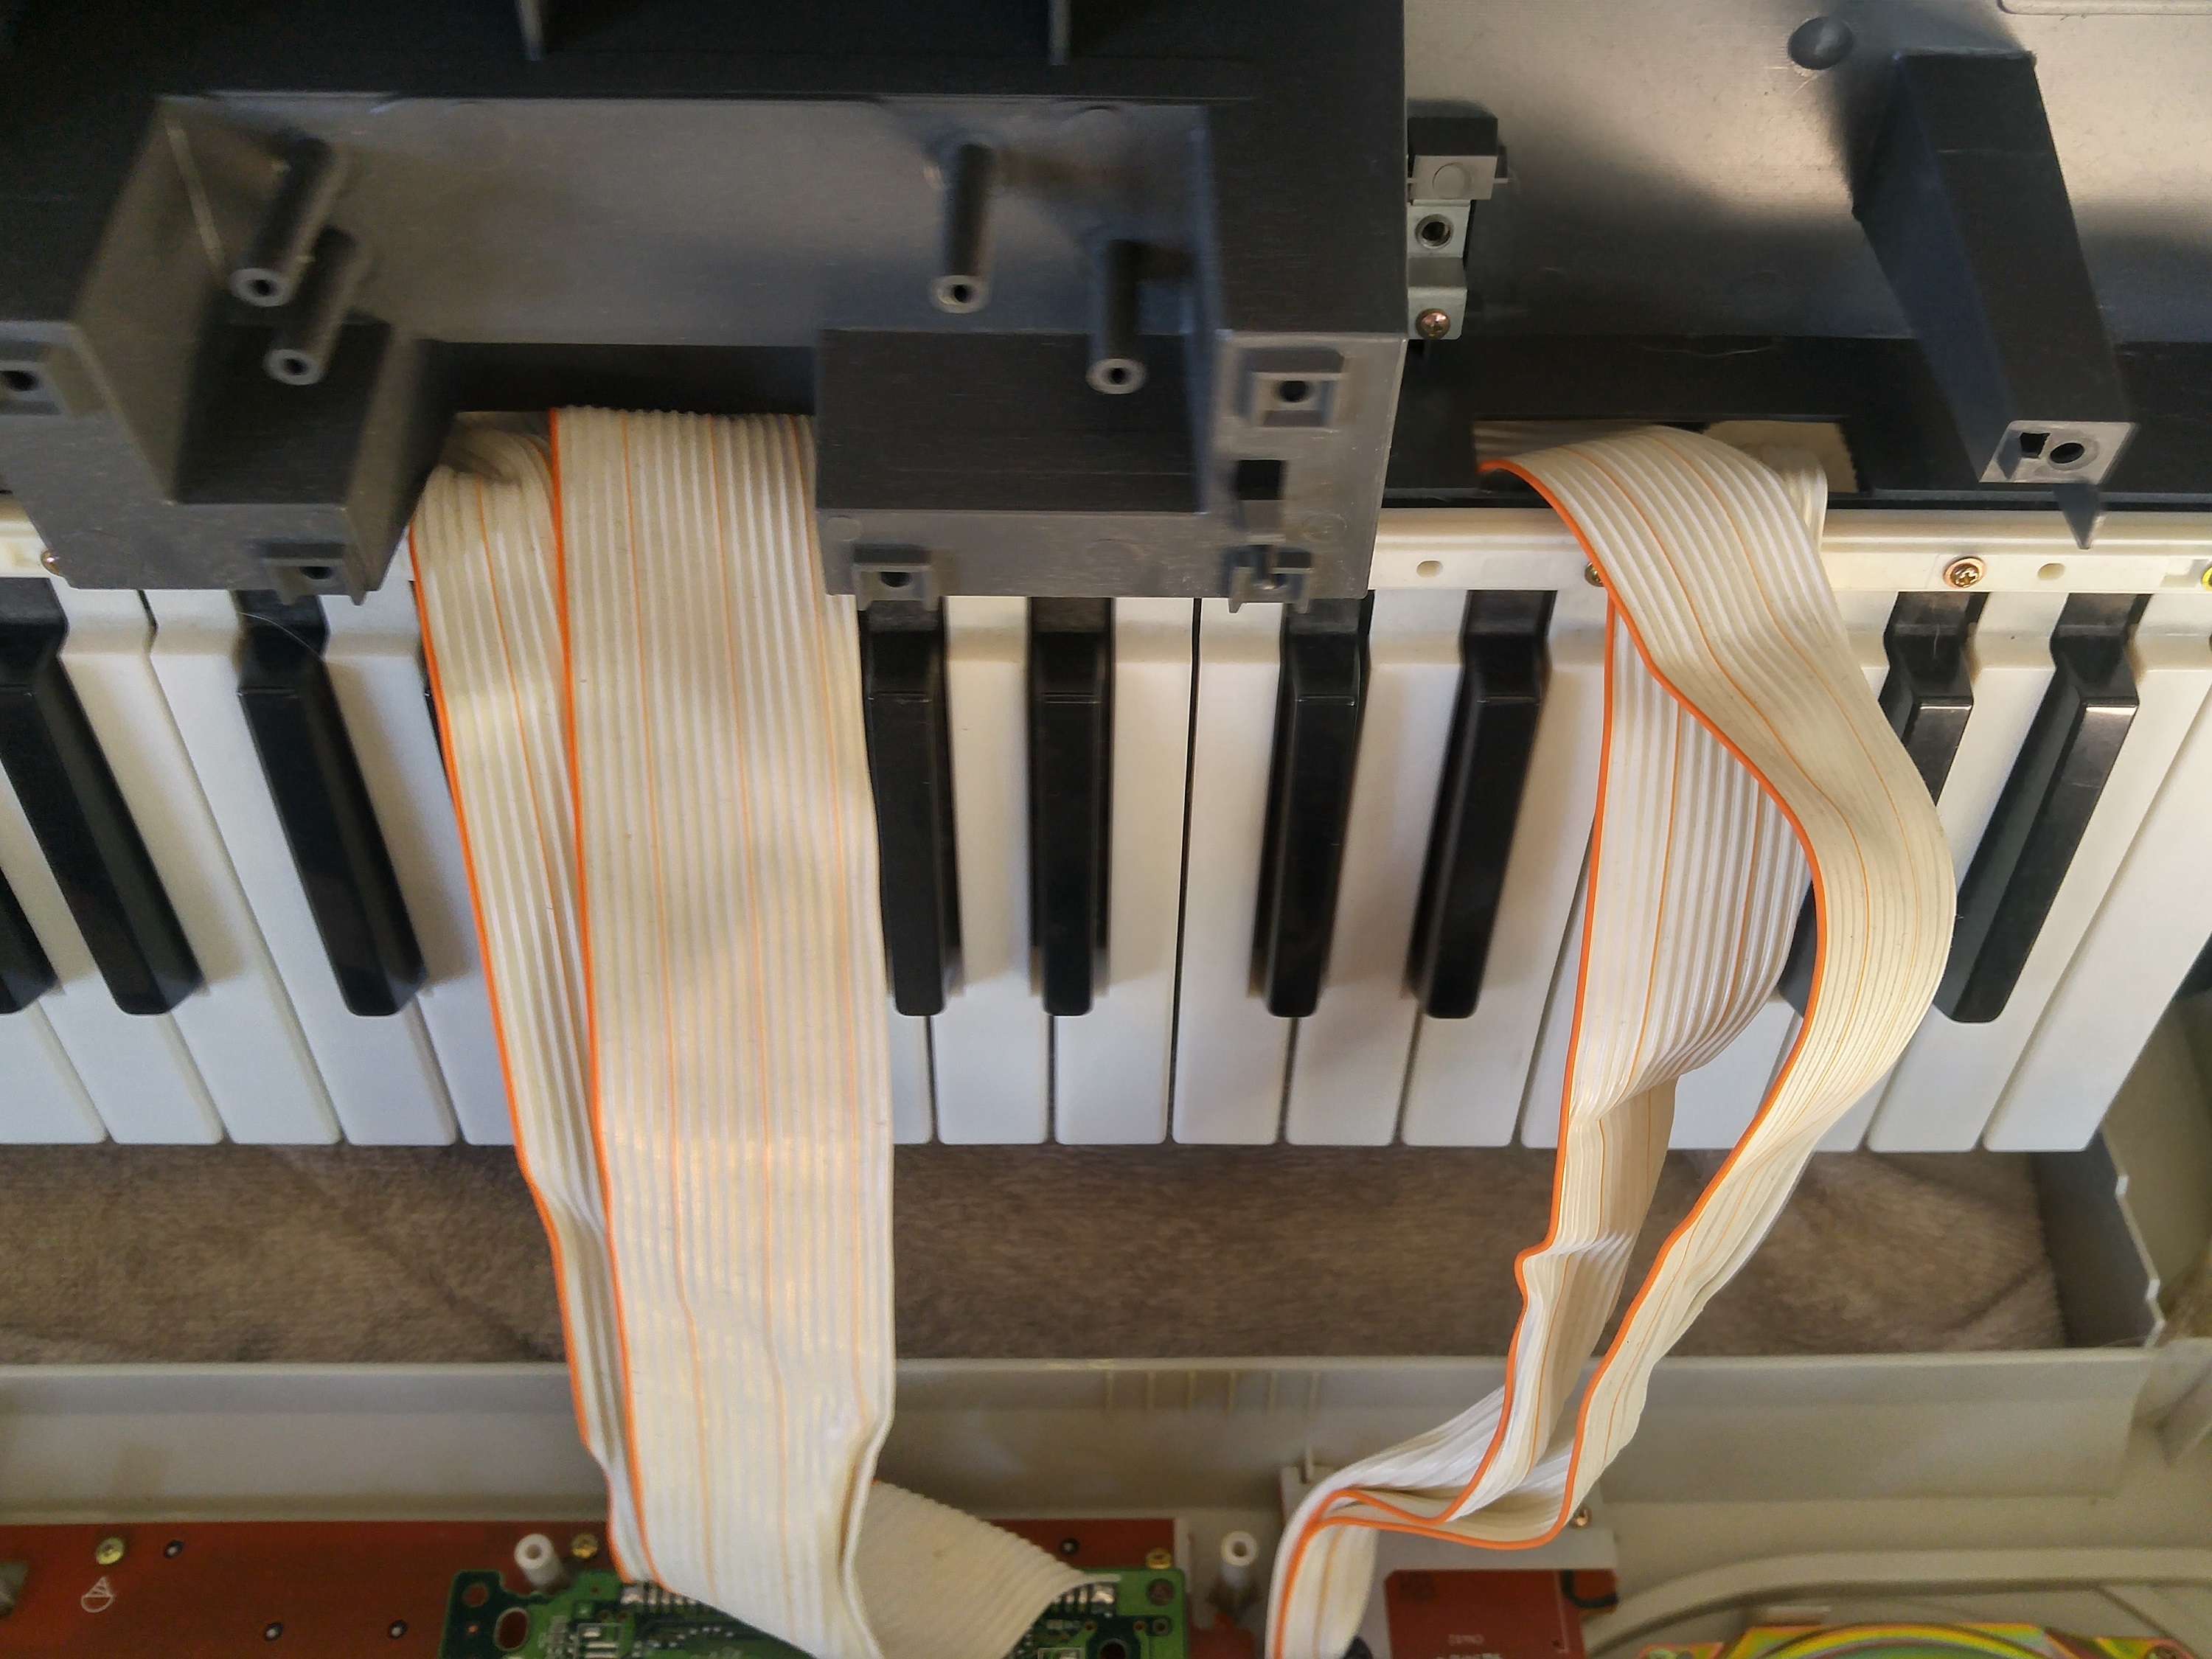
Hello ... Glad I found this forum, as I go through some posts it looks like it'll be a great resource! I'm new on several levels - actually have the LK90 and just picked up a WK-225. Answered my own question by taking a closer look after having taken all the screws out but still couldn't separate the 2 bodies beyond a couple cm's. Upon further inspection, slack needs to be created but you have to push/pull the wires through some tight conduits - see pics So ... Process is "reasonably" simple. Take the batteries out if applicable and keep the battery plate off - not sure why...seems irrelevant. Remove a bunch of screws on the bottom - metal plate first followed by the others holding the big grey plastic body. The important part...once doing that you'll think I should be able to pull this apart but there's no slack with those wide wires going through snug fitting holes - see pics. Gently feed those wires through the ports - you'll have to do a push pull as they're snug. Once that's done the bodies can be separated enough for access. I took this project on because one of the speaker grills was slightly bent/pushed and causing some vibration - holding it down the buzz went away. Hope this helps someone.