Search the Community
Showing results for 'Arpeggiator trigger'.
-
Hi, I'm thinking of using the PX-560M as my "backup band" for an acoustic duo, as well as in my home studio. I'm torn between this new unit and a PX-5S. Synth programming is quite low on my priorities, but authentic "acoustic instrument" sounds is a primary concern. I've got some questions for you: 1. Onboard Tones: I've looked everywhere I can think of and have been unable to find a list of onboard tones. My concern is, with diminished "synth" capacity, will the PX-560M include enough electric piano, strings, brass and/or orchestral tones. Will there be a full complement of, for lack of a better word, ethnic instruments like mandolin, banjo, bouzouki, guitar, steel guitar, etc.? 2. Purpose of the System Track on the sequencer: I'm trying to understand the purpose of a 17th track that lacks volume control. Please explain. What other controls are missing? 3. Sequencer track mixer app: One of the videos shows how the onboard screen is used to mix the sequencer tracks. It looks quite small and difficult to use. A mixer app for using a tablet to mix tracks might be useful. Any such plans? 4. Arpeggiator: How limiting is only having one arpeggiator? From what I can discern, I can store a single arpeggio and trigger it with a single key, or I can switch to arpeggiating between the keys I've pressed. I can select between a couple different arpeggiator functions. Correct? Can I store one arpeggio and switch to "keys played" mode without erasing my stored arpeggio? Can you give more details? 5. Countoffs: It might be helpful to have a countoff part stored in the rhythm tracks. Maybe a male voice saying, "One....two....one, two, three, four....." Just to make it easier for everybody to at least start together. I've always wondered why no manufacturer has ever considered this. If I've got a vote, I say a male voice with a British accent. ;-) 6. Internal speakers: Defeatable? 7. Auxillary Audio Ins: Can both the 1/4" and 1/8" audio inputs be used simultaneously? How are the levels balanced? Using only the level controls on each auxillary audio source? I realize its stil early in the process and things may change, but I need as much detail as you can provide. Then I'll ask for even more. ;-) Thanks, BC in CA
-
Phrases (or songs/midi) - pianokey trigger
Brad Saucier replied to Arczii's topic in Privia Pro PX-5S
It's possible to play a phrase by pressing a key. The arpeggiator in each zone can be configured to play a phrase. It's not possible to assign a different phrase to each key within a zone. It's also not possible trigger a MIDI or audio file from USB with the keys. -
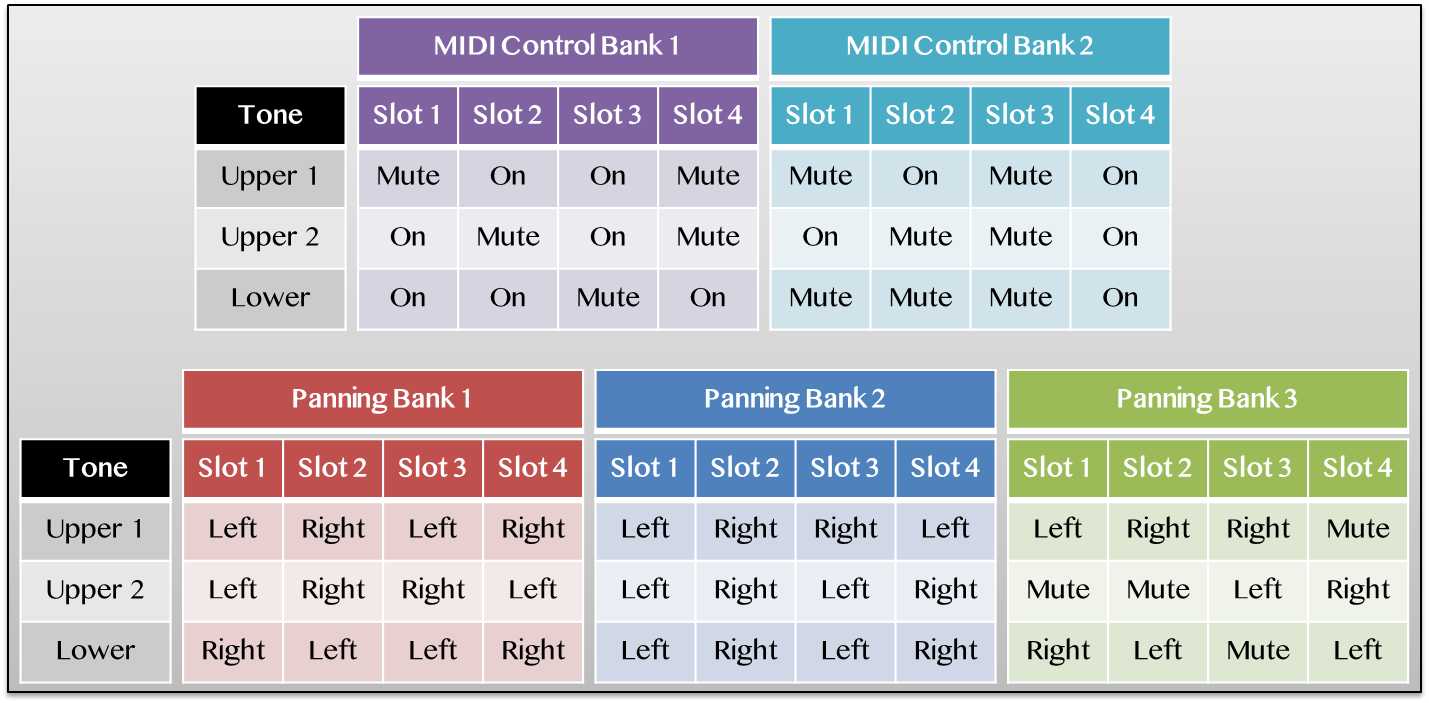
 I've just released a set of specially modified Registration bank files for the CT-X700 and X800, created using my RBK Mixer program (still in development). Loading these bank files into your CT-X700 or X800 will unlock functionality that would otherwise be impossible through the onboard controls alone, such as more flexible MIDI control and the ability to route specific tones to individual mono outputs for external effects processing. Note that you must have an account on the forums to download these files. MIDI Control Banks (MIDICtr1.RBK and MIDICtr2.RBK) These Registration Banks set the volume levels for specific tones (Upper1, Upper2, Lower) to zero, muting them within the CT-X's internal sound engine. For reference, when you use your CT-X as a USB-MIDI controller to trigger external sound sources (like software instruments in a DAW, or hardware synthesizers), you can disable all of the internal sounds by turning Local Control off in the MIDI Menu. This disconnects the keyboard from the internal sound source, essentially muting all three tone layers, the Rhythms and Accompaniment, and Auto-Harmonizer and Arpeggiator playback. Although you can't hear any of the internal sounds, the keyboard is still sending out MIDI note messages, and MIDI note messages received from external sources will still trigger the internal sounds. However, Local control is an "all-or-nothing" solution for MIDI control, as it turns off everything you can normally control from the onboard controls. On more advanced models like the CT-X3000 and X5000, an easy way to get around this is to use the built-in Mixer menu to disable any internal sounds you don't want to hear by muting them (setting the volume to zero). So, for example, if I wanted to use the CT-X3000's Stage Piano sound layered with a Synth Strings tone produced by an external software instrument in my DAW, I would enable Layer mode, but set the volume of the Layered tone to zero in the mixer menu. I wouldn't hear the CT-X3000's string sound, but because the Layer tone is still technically enabled, the CT-X will still send out MIDI notes on the Layer tone's MIDI channel (MIDI channel 2 by default). Unfortunately, the CT-X700 and X800 do not have a Mixer menu, so it's normally impossible to mute a specific layer within the internal sound engine. These custom made RBK files circumvent this limitation by muting the appropriate layers whenever a specific Registration Slot is selected. This is accomplished by modifying "hidden" mixer parameters that are not accessible through the onboard controls, something that I only learned was possible thanks to @mrmr9494's initial investigations into the subject. Conveniently, you can connect the audio output of your external sound source to the 1/8" Audio Input on the CT-X700's back panel, allowing you to layer these external sounds on top of the CT-X tones without the need for an external mixer. The above image shows which slots correspond to a specific layer being muted. Some things to note: A specific layer must still be enabled in order to send out MIDI note data. By default, the Upper 1 (Main) tone send MIDI data on Channel 1, the Upper 2 (Layer) tone sends MIDI data on channel 2, and the Lower (Split) tone sends MIDI data on channel 3. You can define a specific MIDI channel for the Upper 1 tone by going to Function -> Scroll to MIDI, Press Enter -> Use +/- buttons to set the Keyboard Channel from 1-16. Whatever channel the Upper 1 tone is set to, the Upper 2 tone will transmit on the next highest channel, and the Lower tone transmits on the next highest channel after that. For example, if I set the Keyboard Channel to 5, Upper 1 transmits on channel 5, Upper 2 transmits on 6, and Lower transmits on 7. If I set the Keyboard channel to 16, Upper 1 transmits on channel 16, Upper 2 transmits on channel 1, and Lower transmits on channel 2. Arpeggiator data is sent out over MIDI, a very helpful feature for controlling external synthesizers that don't have their own built-in arpeggios to play with (or only have a few to choose from, whereas the CT-X has 100 different Arp patterns). However, keep in mind that the Arpeggiator will only work for U1, so you'll want to use a slot that has Upper1 muted for this particular application. Slot 3 in the second MIDI Control Bank, which mutes all three layers (U1, U2, L). This may seem useless, but it is very handy if you only want to use the CT-X for its Rhythms and Accompaniment sounds. Turning Local Control off will mute the keyboard tones as well as the Rhythm sounds, so if you want to use the CT-X as a dedicated drum machine or backing track generator (but still control external sounds via USB-MIDI), this is the way to do it. Even though the keyboard tones are muted within the internal sound engine, the CT-X is still processing them as if they were being played normally, meaning each note you hold down will still count towards the maximum polyphony limit of 64 simultaneous voices. Likewise, even if a specific layer is muted, it will still send out Program Change and bank select messages depending on which tone is assigned to that layer. If your external sound source responds to Program change messages for external tone selection, you can use this to recall a specific tone on the external instrument simply by recalling this Registration on the CT-X. However, this may result in unintentional tone changes on the external instrument, so if you don't want the CT-X's layers to trigger tone changes, you may need to filter out (or disable the receipt of) Program Changes in the settings for whatever external instrument you're using. To see which tones on the CT-X send out which Program Change messages, refer to the Tone List in the CT-X's appendix. Panning Banks for Individual Outputs (PanBank1, 2 and 3.RBK) These Registration banks, similar to the MIDI control banks, work by setting values in the CT-X700 and X800's hidden mixer menu whenever a specific Registration is loaded. This time, the mixer parameters being set are the pan position of each layer in the stereo field. Normally, the CT-X outputs a stereo signal with all three of the keyboard tones (U1, U2, and L) centered, meaning they are heard equally in both the left and right channels. Using the mixer menu (or in this case, a specially modified RBK file), you can change the default pan setting of 64 such that a particular tone will be skewed towards either the left or right ends of the stereo field. Values lower than 64 will skew the balance towards the left output, and balances higher than 64 will skew the balance right. By panning certain tones hard left (pan position = 0) or hard right (pan position = 127), it's possible to give your CT-X a pair of individual mono outputs rather than one combined stereo output. For example, let's say I have a Stage Piano tone assigned to Upper 1 and an Acoustic Bass tone selected as the lower split voice. If I hard pan Upper 1 to the left and hard pan Lower to the right, the left channel will only carry the signal of the piano tone, and the right channel will only have the bass tone. Using a splitter cable, I can send these isolated mono signals through separate outboard effects, allowing me to process the sounds with much more flexibility and precision. If you don't already have a splitter cable, this PDF guide should help you decide what to buy depending on what you already have and your specific recording/performance needs. CT-X700 X800 Individual Outputs Adapter Guide.pdf Alternatively, for a lower cost option, you could skip the splitter cable, record into your DAW as a stereo track, and then split the stereo recording into two separate mono tracks after the fact. You'd still end up with two isolated recordings of each tone that can be processed, trimmed and EQ'd independently of one another, which is a very convenient time-saver during the mixing process. Without isolated outputs, you'd have to record the piano track and the bass track in two separate takes to gain access to the same kind of post processing flexibility, as recording with both of them outputting in stereo at the same time would prevent you from making individual changes to either track afterwards. To cover a wide range of use cases, this utility pack includes three separate panning banks with multiple different combinations of tones assigned to the left or right output. Refer to the same image at the top of this page to find out which specific bank and slot contains the right combination of pan values to suit your recording or performance needs. Panning Bank 3 takes this a step further and combines these hard panned tones with muted layers for MIDI control purposes. With one layer panned hard left, another layer panned hard right, and the third layer muted so it can be used to control an external software instrument, it's now possible to record three entirely separate audio tracks at once, each of which can be run through its own specific effects, EQ, and post-processing for an unprecedented amount of mastering versatility on a keyboard of this price. There are some limitations to keep in mind, however: The internal reverb and delay effects on the CT-X models are stereo effects, so you cannot achieve fully independent outputs when the internal Reverb is enabled. Even with hard panned layers, the decay of the reverb and delay effects will always "bleed" into the other output, so Reverb has to be set to Off in order to have completely isolated mono outputs. The three panning banks will automatically set Reverb to "off" when you recall a Registration, so as long as you don't turn reverb back on, you'll be fine. By default, this will mean your signals will always be "dry" in terms of Reverb and Delay, but you can always add in Reverb and Delay effects with outboard effects units/pedals, or during post-processing in your DAW. Some tones are not "mono-compatible", and as such, cannot be used for this individual outputs workaround even when their pan position is set to 0 or 127. These tones include "Wide" variants of standard tones (Grand Piano Wide, Vibraphone Wide), as well as some ensemble tones (Chamber Strings, Brass Section). There are also some synth tones that have stereo delay effects hard coded into them (Synth Sequence, X Synth 4), meaning they will always be stereo. A list of these "Forced Stereo" tones has been included in the .ZIP archive, so if you find that you a certain tone doesn't seem to be working with these panning banks, double check that it isn't on the list before you continue troubleshooting. Chorus (and Flanger effects) are not always stereo, and as such, they are compatible with certain tones when using this mono outputs trick. However, it seems that chorus behaves differently for some tones than others, so if you have chorus turned on and you find that an otherwise mono compatible tone isn't working right, try turning chorus off and see if that solves the problem. If it does, please leave a comment on this download page so I can update the list of forced stereo tones to warn other users in the future. The Panning Arpeggiator will un-do the effects of these Registration banks to create the auto-panning effect, so you cannot use this type of arpeggio under any circumstances. If you do accidentally end up using it, you'll need to recall that same Registration slot again to re-apply the pan values. Importing and Using these RBK Files If you have a CT-X700, you will need to use Data Manager for CT-X and a USB-B to USB-A data cable to transfer the files (here's a video tutorial if you need it). If you have a CT-X800, you have the option of connecting a flash drive to transfer the files (tutorial video), or you can use Data Manager if you'd prefer. Data Manager does have the advantage of letting you import one slot from a specific bank rather than loading in all four slots at once, but either way works. Use the image at the top of this download page to figure out which utility bank contains the slot that you want to use. Using either Data Manager or a flash drive, import that RBK file into one of the 8 Registration banks in the onboard memory. I prefer to keep the Registrations I use the most in Bank 8, as it's hard to accidentally overwrite slots in Bank 8 since it's at the very end of the bank list. Navigate to whatever bank you chose in the previous step and recall one of the slots by pressing the appropriate button. Play a few notes to verify that it applied the settings you wanted it to. If it's not what you expected, double check that you chose the right file and recalled the right slot. These banks contain placeholder tones (Piano on U1, Strings on U2, and Acoustic Bass on L), but you can change tones without undoing the muting or panning effects that were applied by recalling the slot. Once you're sure you've recalled the right slot for your particular application, you can change these tones around to adapt the registration to suit the needs of your performance or recording. (Optional) If you're using the Panning Banks for individual outputs, be sure to check the list of Forced Stereo Tones included in the zip file so you can avoid using any tones that are incompatible with hard panning. At this point, you can hook up whatever you're using to split the signal and test the signal coming out of both outputs to see if the sounds are properly isolated. You can also try applying a Chorus or Flanger effect if desired, although again, this might mess up the mono outputs trick depending on what tone you use. The Rhythm, tempo, arpeggiator, touch response, pedal assignment etc are also placeholder values in these Registration banks, so once you've got your tones, layers, and splits squared away, you can start configuring all the other settings you want to store in this Registration. Store these settings as a new Registration in whatever bank and slot you'd like. Note that switching to another (unmodified) Registration will undo the muting and panning effects applied by these files, so you'll have to recall this specific slot again to re-apply these special effects. Turning off the keyboard and turning it on again will also remove the muting and panning effects, so again, you'll need to recall this slot to revert back to these special settings. (Optional) Once you've created all the personalized Registrations you want for the time being, export the Registration bank containing your newly created Registration slot (or slots) and store the RBK file externally on your computer or a flash drive. That way, if you accidentally overwrite this slot at some point down the road, you can just re-import the archived version instead of having to start from scratch with the utility banks and replace all the placeholder settings again. If you're having trouble getting these files to work for you, please don't hesitate to ask for help. If you want to report any errors in the list of Forced Stereo Tones (or just inform me that a specific tone is not usable with Chorus or Flanger effects), I'd very much appreciate your help there as well. Thanks for reading, and enjoy! -Chandler
-
 I have a midi chord sequence in my DAW playing it out to the PX5s which has the arpeggiator turned on for a few zones but it just plays the chord sequence without arpeggiating them. Is it possible for the arpeggiator on board the PX5S to be triggered by external midi? Maybe there is a system setting I need to change?
 -
Hi, how do I trigger the arpeggiator via Midi on the Px - 5s. Thanks Gareth
-
I just released a set of specially modified Registration bank files for the CDP-S350, created using my RBK Mixer program (still in development). Loading these bank files into your CDP-S350 will unlock functionality that would otherwise be impossible through the onboard controls alone, such as more flexible MIDI control and the ability to route specific tones to individual mono outputs for external effects processing. Please note that you will need an account on the forums to access these files. MIDI Control Banks (MIDICtr1.RBK and MIDICtr2.RBK) These Registration Banks set the volume levels for specific tones (Upper1, Upper2, Lower) to zero, muting them within the S350's internal sound engine. For reference, when you use your S350 as a USB-MIDI controller to trigger external sound sources (like software instruments in a DAW, or hardware synthesizers), you can disable all of the internal sounds by turning Local Control off in the MIDI Menu. This disconnects the keyboard from the internal sound source, essentially muting all three tone layers, the Rhythms and Accompaniment, and Auto-Harmonizer and Arpeggiator playback. Although you can't hear any of the internal sounds, the keyboard is still sending out MIDI note messages, and MIDI note messages received from external sources will still trigger the internal sounds. However, Local control is an "all-or-nothing" solution for MIDI control, as it turns off everything you can normally control from the onboard controls. On more advanced models like the CT-X3000 and X5000, an easy way to get around this is to use the built-in Mixer menu to disable any internal sounds you don't want to hear by muting them (setting the volume to zero). So, for example, if I wanted to use the CT-X3000's Stage Piano sound layered with a Synth Strings tone produced by an external software instrument in my DAW, I would enable Layer mode, but set the volume of the Layered tone to zero in the mixer menu. I wouldn't hear the CT-X3000's string sound, but because the Layer tone is still technically enabled, the CT-X will still send out MIDI notes on the Layer tone's MIDI channel (MIDI channel 2 by default). Unfortunately, the CDP-S350 does not have a Mixer menu, so it's normally impossible to mute a specific layer within the internal sound engine. These custom made RBK files circumvent this limitation by muting the appropriate layers whenever a specific Registration Slot is selected. This is accomplished by modifying "hidden" mixer parameters that are not accessible through the onboard controls, something that I only learned was possible thanks to @mrmr9494's initial investigations into the subject. Conveniently, you can connect the audio output of your external sound source to the 1/8" Audio Input on the S350's back panel, allowing you to layer these external sounds on top of the S350's tones without the need for an external mixer. The above image shows which slots correspond to a specific layer being muted. Some things to note: A specific layer must still be enabled in order to send out MIDI note data. By default, the Upper 1 (Main) tone send MIDI data on Channel 1, the Upper 2 (Layer) tone sends MIDI data on channel 2, and the Lower (Split) tone sends MIDI data on channel 3. You can define a specific MIDI channel for the Upper 1 tone by going to Function -> Scroll to MIDI, Press Enter -> The display shows "Keyboard Channel", Press Enter -> Use selection wheel to set the Keyboard Channel from 1-16. Whatever channel the Upper 1 tone is set to, the Upper 2 tone will transmit on the next highest channel, and the Lower tone transmits on the next highest channel after that. For example, if I set the Keyboard Channel to 5, Upper 1 transmits on channel 5, Upper 2 transmits on 6, and Lower transmits on 7. If I set the Keyboard channel to 16, Upper 1 transmits on channel 16, Upper 2 transmits on channel 1, and Lower transmits on channel 2. Arpeggiator data is sent out over MIDI, a very helpful feature for controlling external synthesizers that don't have their own built-in arpeggios to play with (or only have a few to choose from, whereas the CDP-S350 has 100 different Arp patterns). However, keep in mind that the Arpeggiator will only work for U1, so you'll want to use a slot that has Upper1 muted for this particular application. Slot 3 in the second MIDI Control Bank, which mutes all three layers (U1, U2, L). This may seem useless, but it is very handy if you only want to use the CDP-S350 for its Rhythms and Accompaniment sounds. Turning Local Control off will mute the keyboard tones as well as the Rhythm sounds, so if you want to use the S350 as a dedicated drum machine or backing track generator (but still control external sounds via USB-MIDI), this is the way to do it. Even though the keyboard tones are muted within the internal sound engine, the S350 is still processing them as if they were being played normally, meaning each note you hold down will still count towards the maximum polyphony limit of 64 simultaneous voices. Likewise, even if a specific layer is muted, it will still send out Program Change and bank select messages depending on which tone is assigned to that layer. If your external sound source responds to Program change messages for external tone selection, you can use this to recall a specific tone on the external instrument simply by recalling this Registration on the CDP-S350. However, this may result in unintentional tone changes on the external instrument, so if you don't want the S350's layers to trigger tone changes, you may need to filter out (or disable the receipt of) Program Changes in the settings for whatever external instrument you're using. To see which tones on the CDP-S send out which Program Change messages, refer to the Tone List in the S350's appendix. Panning Banks for Individual Outputs (PanBank1, 2 and 3.RBK) These Registration banks, similar to the MIDI control banks, work by setting values in the CDP-S350's hidden mixer menu whenever a specific Registration is loaded. This time, the mixer parameters being set are the pan position of each layer in the stereo field. Normally, the S350 outputs a stereo signal with all three of the keyboard tones (U1, U2, and L) centered, meaning they are heard equally in both the left and right channels. Using the mixer menu (or in this case, a specially modified RBK file), you can change the default pan setting of 64 such that a particular tone will be skewed towards either the left or right ends of the stereo field. Values lower than 64 will skew the balance towards the left output, and balances higher than 64 will skew the balance right. By panning certain tones hard left (pan position = 0) or hard right (pan position = 127), it's possible to give your S350 a pair of individual mono outputs rather than one combined stereo output. For example, let's say I have a Stage Piano tone assigned to Upper 1 and an Acoustic Bass tone selected as the lower split voice. If I hard pan Upper 1 to the left and hard pan Lower to the right, the left channel will only carry the signal of the piano tone, and the right channel will only have the bass tone. Using a splitter cable, I can send these isolated mono signals through separate outboard effects, allowing me to process the sounds with much more flexibility and precision. If you don't already have a splitter cable, the attached PDF guide should help you decide what to buy depending on what you already have and your specific recording/performance needs. CDP-S350 Individual Outputs Adapter Guide.pdf Alternatively, for a lower cost option, you could skip the splitter cable, record into your DAW as a stereo track, and then split the stereo recording into two separate mono tracks after the fact. You'd still end up with two isolated recordings of each tone that can be processed, trimmed and EQ'd independently of one another, which is a very convenient time-saver during the mixing process. Without isolated outputs, you'd have to record the piano track and the bass track in two separate takes to gain access to the same kind of post processing flexibility, as recording with both of them outputting in stereo at the same time would prevent you from making individual changes to either track afterwards. To cover a wide range of use cases, this utility pack includes three separate panning banks with multiple different combinations of tones assigned to the left or right output. Refer to the same image at the top of this page to find out which specific bank and slot contains the right combination of pan values to suit your recording or performance needs. Panning Bank 3 takes this a step further and combines these hard panned tones with muted layers for MIDI control purposes. With one layer panned hard left, another layer panned hard right, and the third layer muted so it can be used to control an external software instrument, it's now possible to record three entirely separate audio tracks at once, each of which can be run through its own specific effects, EQ, and post-processing for an unprecedented amount of mastering versatility on a keyboard of this price. There are some limitations to keep in mind, however: The internal reverb and delay effects on the S350 are stereo effects, so you cannot achieve fully independent outputs when the internal Reverb is enabled. Even with hard panned layers, the decay of the reverb and delay effects will always "bleed" into the other output, so Reverb has to be set to Off in order to have completely isolated mono outputs. The three panning banks will automatically set Reverb to "off" when you recall a Registration, so as long as you don't turn reverb back on, you'll be fine. By default, this will mean your signals will always be "dry" in terms of Reverb and Delay, but you can always add in Reverb and Delay effects with outboard effects units/pedals, or during post-processing in your DAW. Some tones are not "mono-compatible", and as such, cannot be used for this individual outputs workaround even when their pan position is set to 0 or 127. These tones include "Wide" variants of standard tones (Grand Piano Wide, Vibraphone Wide), as well as some ensemble tones (Chamber Strings, Brass Section). A list of these "Forced Stereo" tones has been included in the .ZIP archive, so if you find that you a certain tone doesn't seem to be working with these panning banks, double check that it isn't on the list before you continue troubleshooting. Chorus (and Flanger effects) are not always stereo, and as such, they are compatible with certain tones when using this mono outputs trick. However, it seems that chorus behaves differently for some tones than others, so if you have chorus turned on and you find that an otherwise mono compatible tone isn't working right, try turning chorus off and see if that solves the problem. If it does, please leave a comment on this download page so I can update the list of forced stereo tones to warn other users in the future. The Panning Arpeggiator will un-do the effects of these Registration banks to create the auto-panning effect, so you cannot use this type of arpeggio under any circumstances. If you do accidentally end up using it, you'll need to recall that same Registration slot again to re-apply the pan values. Importing and Using these RBK Files You'll need to connect a USB flash drive to the CDP-S350 transfer the files. For more information on how to set up your flash drive and navigate the Media menu, refer to this tutorial video. Use the image at the top of this download page to figure out which utility bank contains the slot that you want to use. Using a flash drive, import that RBK file into one of the 8 Registration banks in the onboard memory. I prefer to keep the Registrations I use the most in Bank 8, as it's hard to accidentally overwrite slots in Bank 8 since it's at the very end of the bank list. Once the bank is imported, navigate to whatever bank you chose and recall one of the slots by pressing the appropriate button. Play a few notes to verify that it applied the settings you wanted it to. If it's not what you expected, double check that you chose the right file and recalled the right slot. These banks contain placeholder tones (Piano on U1, Strings on U2, and Acoustic Bass on L), but you can change tones without undoing the muting or panning effects that were applied by recalling the slot. Once you're sure you've recalled the right slot for your particular application, you can change these tones around to adapt the registration to suit the needs of your performance or recording. (Optional) If you're using the Panning Banks for individual outputs, be sure to check the list of Forced Stereo Tones included in the zip file so you can avoid using any tones that are incompatible with hard panning. At this point, you can hook up whatever you're using to split the signal and test the signal coming out of both outputs to see if the sounds are properly isolated. You can also try applying a Chorus or Flanger effect if desired, although again, this might mess up the mono outputs trick depending on what tone you use. The Rhythm, tempo, arpeggiator, touch response, pedal assignment etc are also placeholder values in these Registration banks, so once you've got your tones, layers, and splits squared away, you can start configuring all the other settings you want to store in this Registration. Store these settings as a new Registration in whatever bank and slot you'd like. Note that switching to another (unmodified) Registration will undo the muting and panning effects applied by these files, so you'll have to recall this specific slot again to re-apply these special effects. Turning off the keyboard and turning it on again will also remove the muting and panning effects, so again, you'll need to recall this slot to revert back to these special settings at the start of each session. (Optional) Once you've created all the personalized Registrations you want for the time being, export the Registration bank containing your newly created Registration slot (or slots) and store the RBK file externally on your computer or a flash drive. That way, if you accidentally overwrite this slot at some point down the road, you can just re-import the archived version instead of having to start from scratch with the utility banks and replace all the placeholder settings again. If you're having trouble getting these files to work for you, please don't hesitate to ask for help. If you want to report any errors in the list of Forced Stereo Tones (or just inform me that a specific tone is not usable with Chorus or Flanger effects), I'd very much appreciate your help there as well. Thanks for reading, and enjoy! -Chandler

-

Version 1.0.0
17 downloads
This is a set of specially modified Registration bank files for the CDP-S350, created using my RBK Mixer program. Loading these bank files into your CDP-S350 will unlock functionality that would otherwise be impossible through the onboard controls alone, such as more flexible MIDI control and the ability to route specific tones to individual mono outputs for external effects processing. MIDI Control Banks (MIDICtr1.RBK and MIDICtr2.RBK) These Registration Banks set the volume levels for specific tones (Upper1, Upper2, Lower) to zero, muting them within the S350's internal sound engine. For reference, when you use your S350 as a USB-MIDI controller to trigger external sound sources (like software instruments in a DAW, or hardware synthesizers), you can disable all of the internal sounds by turning Local Control off in the MIDI Menu. This disconnects the keyboard from the internal sound source, essentially muting all three tone layers, the Rhythms and Accompaniment, and Auto-Harmonizer and Arpeggiator playback. Although you can't hear any of the internal sounds, the keyboard is still sending out MIDI note messages, and MIDI note messages received from external sources will still trigger the internal sounds. However, Local control is an "all-or-nothing" solution for MIDI control, as it turns off everything you can normally control from the onboard controls. On more advanced models like the CT-X3000 and X5000, an easy way to get around this is to use the built-in Mixer menu to disable any internal sounds you don't want to hear by muting them (setting the volume to zero). So, for example, if I wanted to use the CT-X3000's Stage Piano sound layered with a Synth Strings tone produced by an external software instrument in my DAW, I would enable Layer mode, but set the volume of the Layered tone to zero in the mixer menu. I wouldn't hear the CT-X3000's string sound, but because the Layer tone is still technically enabled, the CT-X will still send out MIDI notes on the Layer tone's MIDI channel (MIDI channel 2 by default). Unfortunately, the CDP-S350 does not have a Mixer menu, so it's normally impossible to mute a specific layer within the internal sound engine. These custom made RBK files circumvent this limitation by muting the appropriate layers whenever a specific Registration Slot is selected. This is accomplished by modifying "hidden" mixer parameters that are not accessible through the onboard controls, something that I only learned was possible thanks to @mrmr9494's initial investigations into the subject. Conveniently, you can connect the audio output of your external sound source to the 1/8" Audio Input on the S350's back panel, allowing you to layer these external sounds on top of the S350's tones without the need for an external mixer. The above image shows which slots correspond to a specific layer being muted. Some things to note: A specific layer must still be enabled in order to send out MIDI note data. By default, the Upper 1 (Main) tone send MIDI data on Channel 1, the Upper 2 (Layer) tone sends MIDI data on channel 2, and the Lower (Split) tone sends MIDI data on channel 3. You can define a specific MIDI channel for the Upper 1 tone by going to Function -> Scroll to MIDI, Press Enter -> The display shows "Keyboard Channel", Press Enter -> Use selection wheel to set the Keyboard Channel from 1-16. Whatever channel the Upper 1 tone is set to, the Upper 2 tone will transmit on the next highest channel, and the Lower tone transmits on the next highest channel after that. For example, if I set the Keyboard Channel to 5, Upper 1 transmits on channel 5, Upper 2 transmits on 6, and Lower transmits on 7. If I set the Keyboard channel to 16, Upper 1 transmits on channel 16, Upper 2 transmits on channel 1, and Lower transmits on channel 2. Arpeggiator data is sent out over MIDI, a very helpful feature for controlling external synthesizers that don't have their own built-in arpeggios to play with (or only have a few to choose from, whereas the CDP-S350 has 100 different Arp patterns). However, keep in mind that the Arpeggiator will only work for U1, so you'll want to use a slot that has Upper1 muted for this particular application. Slot 3 in the second MIDI Control Bank, which mutes all three layers (U1, U2, L). This may seem useless, but it is very handy if you only want to use the CDP-S350 for its Rhythms and Accompaniment sounds. Turning Local Control off will mute the keyboard tones as well as the Rhythm sounds, so if you want to use the S350 as a dedicated drum machine or backing track generator (but still control external sounds via USB-MIDI), this is the way to do it. Even though the keyboard tones are muted within the internal sound engine, the S350 is still processing them as if they were being played normally, meaning each note you hold down will still count towards the maximum polyphony limit of 64 simultaneous voices. Likewise, even if a specific layer is muted, it will still send out Program Change and bank select messages depending on which tone is assigned to that layer. If your external sound source responds to Program change messages for external tone selection, you can use this to recall a specific tone on the external instrument simply by recalling this Registration on the CDP-S350. However, this may result in unintentional tone changes on the external instrument, so if you don't want the S350's layers to trigger tone changes, you may need to filter out (or disable the receipt of) Program Changes in the settings for whatever external instrument you're using. To see which tones on the CDP-S send out which Program Change messages, refer to the Tone List in the S350's appendix. Panning Banks for Individual Outputs (PanBank1, 2 and 3.RBK) These Registration banks, similar to the MIDI control banks, work by setting values in the CDP-S350's hidden mixer menu whenever a specific Registration is loaded. This time, the mixer parameters being set are the pan position of each layer in the stereo field. Normally, the S350 outputs a stereo signal with all three of the keyboard tones (U1, U2, and L) centered, meaning they are heard equally in both the left and right channels. Using the mixer menu (or in this case, a specially modified RBK file), you can change the default pan setting of 64 such that a particular tone will be skewed towards either the left or right ends of the stereo field. Values lower than 64 will skew the balance towards the left output, and balances higher than 64 will skew the balance right. By panning certain tones hard left (pan position = 0) or hard right (pan position = 127), it's possible to give your S350 a pair of individual mono outputs rather than one combined stereo output. For example, let's say I have a Stage Piano tone assigned to Upper 1 and an Acoustic Bass tone selected as the lower split voice. If I hard pan Upper 1 to the left and hard pan Lower to the right, the left channel will only carry the signal of the piano tone, and the right channel will only have the bass tone. Using a splitter cable, I can send these isolated mono signals through separate outboard effects, allowing me to process the sounds with much more flexibility and precision. If you don't already have a splitter cable, the attached PDF guide should help you decide what to buy depending on what you already have and your specific recording/performance needs. CDP-S350 Individual Outputs Adapter Guide.pdf Alternatively, for a lower cost option, you could skip the splitter cable, record into your DAW as a stereo track, and then split the stereo recording into two separate mono tracks after the fact. You'd still end up with two isolated recordings of each tone that can be processed, trimmed and EQ'd independently of one another, which is a very convenient time-saver during the mixing process. Without isolated outputs, you'd have to record the piano track and the bass track in two separate takes to gain access to the same kind of post processing flexibility, as recording with both of them outputting in stereo at the same time would prevent you from making individual changes to either track afterwards. To cover a wide range of use cases, this utility pack includes three separate panning banks with multiple different combinations of tones assigned to the left or right output. Refer to the same image at the top of this page to find out which specific bank and slot contains the right combination of pan values to suit your recording or performance needs. Panning Bank 3 takes this a step further and combines these hard panned tones with muted layers for MIDI control purposes. With one layer panned hard left, another layer panned hard right, and the third layer muted so it can be used to control an external software instrument, it's now possible to record three entirely separate audio tracks at once, each of which can be run through its own specific effects, EQ, and post-processing for an unprecedented amount of mastering versatility on a keyboard of this price. There are some limitations to keep in mind, however: The internal reverb and delay effects on the S350 are stereo effects, so you cannot achieve fully independent outputs when the internal Reverb is enabled. Even with hard panned layers, the decay of the reverb and delay effects will always "bleed" into the other output, so Reverb has to be set to Off in order to have completely isolated mono outputs. The three panning banks will automatically set Reverb to "off" when you recall a Registration, so as long as you don't turn reverb back on, you'll be fine. By default, this will mean your signals will always be "dry" in terms of Reverb and Delay, but you can always add in Reverb and Delay effects with outboard effects units/pedals, or during post-processing in your DAW. Some tones are not "mono-compatible", and as such, cannot be used for this individual outputs workaround even when their pan position is set to 0 or 127. These tones include "Wide" variants of standard tones (Grand Piano Wide, Vibraphone Wide), as well as some ensemble tones (Chamber Strings, Brass Section). A list of these "Forced Stereo" tones has been included in the .ZIP archive, so if you find that you a certain tone doesn't seem to be working with these panning banks, double check that it isn't on the list before you continue troubleshooting. Chorus (and Flanger effects) are not always stereo, and as such, they are compatible with certain tones when using this mono outputs trick. However, it seems that chorus behaves differently for some tones than others, so if you have chorus turned on and you find that an otherwise mono compatible tone isn't working right, try turning chorus off and see if that solves the problem. If it does, please leave a comment on this download page so I can update the list of forced stereo tones to warn other users in the future. The Panning Arpeggiator will un-do the effects of these Registration banks to create the auto-panning effect, so you cannot use this type of arpeggio under any circumstances. If you do accidentally end up using it, you'll need to recall that same Registration slot again to re-apply the pan values. Importing and Using these RBK Files You'll need to connect a USB flash drive to the CDP-S350 transfer the files. For more information on how to set up your flash drive and navigate the Media menu, refer to this tutorial video. Use the image at the top of this download page to figure out which utility bank contains the slot that you want to use. Using a flash drive, import that RBK file into one of the 8 Registration banks in the onboard memory. I prefer to keep the Registrations I use the most in Bank 8, as it's hard to accidentally overwrite slots in Bank 8 since it's at the very end of the bank list. Once the bank is imported, navigate to whatever bank you chose and recall one of the slots by pressing the appropriate button. Play a few notes to verify that it applied the settings you wanted it to. If it's not what you expected, double check that you chose the right file and recalled the right slot. These banks contain placeholder tones (Piano on U1, Strings on U2, and Acoustic Bass on L), but you can change tones without undoing the muting or panning effects that were applied by recalling the slot. Once you're sure you've recalled the right slot for your particular application, you can change these tones around to adapt the registration to suit the needs of your performance or recording. (Optional) If you're using the Panning Banks for individual outputs, be sure to check the list of Forced Stereo Tones included in the zip file so you can avoid using any tones that are incompatible with hard panning. At this point, you can hook up whatever you're using to split the signal and test the signal coming out of both outputs to see if the sounds are properly isolated. You can also try applying a Chorus or Flanger effect if desired, although again, this might mess up the mono outputs trick depending on what tone you use. The Rhythm, tempo, arpeggiator, touch response, pedal assignment etc are also placeholder values in these Registration banks, so once you've got your tones, layers, and splits squared away, you can start configuring all the other settings you want to store in this Registration. Store these settings as a new Registration in whatever bank and slot you'd like. Note that switching to another (unmodified) Registration will undo the muting and panning effects applied by these files, so you'll have to recall this specific slot again to re-apply these special effects. Turning off the keyboard and turning it on again will also remove the muting and panning effects, so again, you'll need to recall this slot to revert back to these special settings at the start of each session. (Optional) Once you've created all the personalized Registrations you want for the time being, export the Registration bank containing your newly created Registration slot (or slots) and store the RBK file externally on your computer or a flash drive. That way, if you accidentally overwrite this slot at some point down the road, you can just re-import the archived version instead of having to start from scratch with the utility banks and replace all the placeholder settings again. If you're having trouble getting these files to work for you, please don't hesitate to ask for help in this thread over in the CDP-S section of the forums. If you want to report any errors in the list of Forced Stereo Tones (or just inform me that a specific tone is not usable with Chorus or Flanger effects), I'd very much appreciate your help there as well. Thanks for reading, and enjoy! -Chandler -
Version 1.0.0
39 downloads
This is a set of specially modified Registration bank files for the CT-X700 and X800, created using my RBK Mixer program. Loading these bank files into your CT-X700 or X800 will unlock functionality that would otherwise be impossible through the onboard controls alone, such as more flexible MIDI control and the ability to route specific tones to individual mono outputs for external effects processing. MIDI Control Banks (MIDICtr1.RBK and MIDICtr2.RBK) These Registration Banks set the volume levels for specific tones (Upper1, Upper2, Lower) to zero, muting them within the CT-X's internal sound engine. For reference, when you use your CT-X as a USB-MIDI controller to trigger external sound sources (like software instruments in a DAW, or hardware synthesizers), you can disable all of the internal sounds by turning Local Control off in the MIDI Menu. This disconnects the keyboard from the internal sound source, essentially muting all three tone layers, the Rhythms and Accompaniment, and Auto-Harmonizer and Arpeggiator playback. Although you can't hear any of the internal sounds, the keyboard is still sending out MIDI note messages, and MIDI note messages received from external sources will still trigger the internal sounds. However, Local control is an "all-or-nothing" solution for MIDI control, as it turns off everything you can normally control from the onboard controls. On more advanced models like the CT-X3000 and X5000, an easy way to get around this is to use the built-in Mixer menu to disable any internal sounds you don't want to hear by muting them (setting the volume to zero). So, for example, if I wanted to use the CT-X3000's Stage Piano sound layered with a Synth Strings tone produced by an external software instrument in my DAW, I would enable Layer mode, but set the volume of the Layered tone to zero in the mixer menu. I wouldn't hear the CT-X3000's string sound, but because the Layer tone is still technically enabled, the CT-X will still send out MIDI notes on the Layer tone's MIDI channel (MIDI channel 2 by default). Unfortunately, the CT-X700 and X800 do not have a Mixer menu, so it's normally impossible to mute a specific layer within the internal sound engine. These custom made RBK files circumvent this limitation by muting the appropriate layers whenever a specific Registration Slot is selected. This is accomplished by modifying "hidden" mixer parameters that are not accessible through the onboard controls, something that I only learned was possible thanks to @mrmr9494's initial investigations into the subject. Conveniently, you can connect the audio output of your external sound source to the 1/8" Audio Input on the CT-X's back panel, allowing you to layer these external sounds on top of the CT-X tones without the need for an external mixer. The above image shows which slots correspond to a specific layer being muted. Some things to note: A specific layer must still be enabled in order to send out MIDI note data. By default, the Upper 1 (Main) tone send MIDI data on Channel 1, the Upper 2 (Layer) tone sends MIDI data on channel 2, and the Lower (Split) tone sends MIDI data on channel 3. You can define a specific MIDI channel for the Upper 1 tone by going to Function -> Scroll to MIDI, Press Enter -> Use +/- buttons to set the Keyboard Channel from 1-16. Whatever channel the Upper 1 tone is set to, the Upper 2 tone will transmit on the next highest channel, and the Lower tone transmits on the next highest channel after that. For example, if I set the Keyboard Channel to 5, Upper 1 transmits on channel 5, Upper 2 transmits on 6, and Lower transmits on 7. If I set the Keyboard channel to 16, Upper 1 transmits on channel 16, Upper 2 transmits on channel 1, and Lower transmits on channel 2. Arpeggiator data is sent out over MIDI, a very helpful feature for controlling external synthesizers that don't have their own built-in arpeggios to play with (or only have a few to choose from, whereas the CT-X has 100 different Arp patterns). However, keep in mind that the Arpeggiator will only work for U1, so you'll want to use a slot that has Upper1 muted for this particular application. Slot 3 in the second MIDI Control Bank, which mutes all three layers (U1, U2, L). This may seem useless, but it is very handy if you only want to use the CT-X for its Rhythms and Accompaniment sounds. Turning Local Control off will mute the keyboard tones as well as the Rhythm sounds, so if you want to use the CT-X as a dedicated drum machine or backing track generator (but still control external sounds via USB-MIDI), this is the way to do it. Even though the keyboard tones are muted within the internal sound engine, the CT-X is still processing them as if they were being played normally, meaning each note you hold down will still count towards the maximum polyphony limit of 64 simultaneous voices. Likewise, even if a specific layer is muted, it will still send out Program Change and bank select messages depending on which tone is assigned to that layer. If your external sound source responds to Program change messages for external tone selection, you can use this to recall a specific tone on the external instrument simply by recalling this Registration on the CT-X. However, this may result in unintentional tone changes on the external instrument, so if you don't want the CT-X's layers to trigger tone changes, you may need to filter out (or disable the receipt of) Program Changes in the settings for whatever external instrument you're using. To see which tones on the CT-X send out which Program Change messages, refer to the Tone List in the CT-X's appendix. Panning Banks for Individual Outputs (PanBank1, 2 and 3.RBK) These Registration banks, similar to the MIDI control banks, work by setting values in the CT-X700 and X800's hidden mixer menu whenever a specific Registration is loaded. This time, the mixer parameters being set are the pan position of each layer in the stereo field. Normally, the CT-X outputs a stereo signal with all three of the keyboard tones (U1, U2, and L) centered, meaning they are heard equally in both the left and right channels. Using the mixer menu (or in this case, a specially modified RBK file), you can change the default pan setting of 64 such that a particular tone will be skewed towards either the left or right ends of the stereo field. Values lower than 64 will skew the balance towards the left output, and balances higher than 64 will skew the balance right. By panning certain tones hard left (pan position = 0) or hard right (pan position = 127), it's possible to give your CT-X a pair of individual mono outputs rather than one combined stereo output. For example, let's say I have a Stage Piano tone assigned to Upper 1 and an Acoustic Bass tone selected as the lower split voice. If I hard pan Upper 1 to the left and hard pan Lower to the right, the left channel will only carry the signal of the piano tone, and the right channel will only have the bass tone. Using a splitter cable, I can send these isolated mono signals through separate outboard effects, allowing me to process the sounds with much more flexibility and precision. If you don't already have a splitter cable, the attached PDF guide should help you decide what to buy depending on what you already have and your specific recording/performance needs. CT-X700 X800 Individual Outputs Adapter Guide.pdf Alternatively, for a lower cost option, you could skip the splitter cable, record into your DAW as a stereo track, and then split the stereo recording into two separate mono tracks after the fact. You'd still end up with two isolated recordings of each tone that can be processed, trimmed and EQ'd independently of one another, which is a very convenient time-saver during the mixing process. Without isolated outputs, you'd have to record the piano track and the bass track in two separate takes to gain access to the same kind of post processing flexibility, as recording with both of them outputting in stereo at the same time would prevent you from making individual changes to either track afterwards. To cover a wide range of use cases, this utility pack includes three separate panning banks with multiple different combinations of tones assigned to the left or right output. Refer to the same image at the top of this page to find out which specific bank and slot contains the right combination of pan values to suit your recording or performance needs. Panning Bank 3 takes this a step further and combines these hard panned tones with muted layers for MIDI control purposes. With one layer panned hard left, another layer panned hard right, and the third layer muted so it can be used to control an external software instrument, it's now possible to record three entirely separate audio tracks at once, each of which can be run through its own specific effects, EQ, and post-processing for an unprecedented amount of mastering versatility on a keyboard of this price. There are some limitations to keep in mind, however: The internal reverb and delay effects on the CT-X models are stereo effects, so you cannot achieve fully independent outputs when the internal Reverb is enabled. Even with hard panned layers, the decay of the reverb and delay effects will always "bleed" into the other output, so Reverb has to be set to Off in order to have completely isolated mono outputs. The three panning banks will automatically set Reverb to "off" when you recall a Registration, so as long as you don't turn reverb back on, you'll be fine. By default, this will mean your signals will always be "dry" in terms of Reverb and Delay, but you can always add in Reverb and Delay effects with outboard effects units/pedals, or during post-processing in your DAW. Some tones are not "mono-compatible", and as such, cannot be used for this individual outputs workaround even when their pan position is set to 0 or 127. These tones include "Wide" variants of standard tones (Grand Piano Wide, Vibraphone Wide), as well as some ensemble tones (Chamber Strings, Brass Section). There are also some synth tones that have stereo delay effects hard coded into them (Synth Sequence, X Synth 4), meaning they will always be stereo. A list of these "Forced Stereo" tones has been included in the .ZIP archive, so if you find that you a certain tone doesn't seem to be working with these panning banks, double check that it isn't on the list before you continue troubleshooting. Chorus (and Flanger effects) are not always stereo, and as such, they are compatible with certain tones when using this mono outputs trick. However, it seems that chorus behaves differently for some tones than others, so if you have chorus turned on and you find that an otherwise mono compatible tone isn't working right, try turning chorus off and see if that solves the problem. If it does, please leave a comment on this download page so I can update the list of forced stereo tones to warn other users in the future. The Panning Arpeggiator will un-do the effects of these Registration banks to create the auto-panning effect, so you cannot use this type of arpeggio under any circumstances. If you do accidentally end up using it, you'll need to recall that same Registration slot again to re-apply the pan values. Importing and Using these RBK Files If you have a CT-X700, you will need to use Data Manager for CT-X and a USB-B to USB-A data cable to transfer the files (here's a video tutorial if you need it). If you have a CT-X800, you have the option of connecting a flash drive to transfer the files (tutorial video), or you can use Data Manager if you'd prefer. Data Manager does have the advantage of letting you import one slot from a specific bank rather than loading in all four slots at once, but either way works. Use the image at the top of this download page to figure out which utility bank contains the slot that you want to use. Using either Data Manager or a flash drive, import that RBK file into one of the 8 Registration banks in the onboard memory. I prefer to keep the Registrations I use the most in Bank 8, as it's hard to accidentally overwrite slots in Bank 8 since it's at the very end of the bank list. Once the bank is imported, navigate to whatever bank you chose and recall one of the slots by pressing the appropriate button. Play a few notes to verify that it applied the settings you wanted it to. If it's not what you expected, double check that you chose the right file and recalled the right slot. These banks contain placeholder tones (Piano on U1, Strings on U2, and Acoustic Bass on L), but you can change tones without undoing the muting or panning effects that were applied by recalling the slot. Once you're sure you've recalled the right slot for your particular application, you can change these tones around to adapt the registration to suit the needs of your performance or recording. (Optional) If you're using the Panning Banks for individual outputs, be sure to check the list of Forced Stereo Tones included in the zip file so you can avoid using any tones that are incompatible with hard panning. At this point, you can hook up whatever you're using to split the signal and test the signal coming out of both outputs to see if the sounds are properly isolated. You can also try applying a Chorus or Flanger effect if desired, although again, this might mess up the mono outputs trick depending on what tone you use. The Rhythm, tempo, arpeggiator, touch response, pedal assignment etc are also placeholder values in these Registration banks, so once you've got your tones, layers, and splits squared away, you can start configuring all the other settings you want to store in this Registration. Store these settings as a new Registration in whatever bank and slot you'd like. Note that switching to another (unmodified) Registration will undo the muting and panning effects applied by these files, so you'll have to recall this specific slot again to re-apply these special effects. Turning off the keyboard and turning it on again will also remove the muting and panning effects, so again, you'll need to recall this slot to revert back to these special settings at the start of each session. (Optional) Once you've created all the personalized Registrations you want for the time being, export the Registration bank containing your newly created Registration slot (or slots) and store the RBK file externally on your computer or a flash drive. That way, if you accidentally overwrite this slot at some point down the road, you can just re-import the archived version instead of having to start from scratch with the utility banks and replace all the placeholder settings again. If you're having trouble getting these files to work for you, please don't hesitate to ask for help in this thread over in the CT-X700/X800 section of the forums. If you want to report any errors in the list of Forced Stereo Tones (or just inform me that a specific tone is not usable with Chorus or Flanger effects), I'd very much appreciate your help there as well. Thanks for reading, and enjoy! -Chandler -

Something for all arpeggiators in casio keyboards.
AlenK replied to XW-Addict's topic in General Casio Discussion
Hope you get your G1 working again. Re jumping across two octaves, that is what the "Random 2Oct" pattern does. Patterns are also available for jumping across three and four octaves. Re control tracks with the argeggiatr, on the XW synths you get up to four if you trigger the sequencer to run in parallel with the arpeggiator. For more about that, see section 5.2 in The XW Companion. Re random velocity with a hex layer tone, there is likely a way to do something that is perceptually indistinguishable by using the sequencer in the way described in section 5.2. But I will have to give it more thought to figure out exactly how. -
When in slave mode, the XW needs to receive a MIDI clock signal from the master device before any sequences or arpeggios will play. Having said that, you still have to play the XW keys to trigger the arpeggiator. It can not be driven via MIDI.
-
As some of you know, some Casios (and other midi equipment) do not have a midi clock in or out generated internally-for example, the XW-P1 does, the PX560 does not. This matters as i have a huge variety of equipment that can be synchronized through midi, and in creating more "live" or realtime recordings with my sequencers-I would like to sync the PX560 in particular with the Xw-P1/Yamaha QY modules and my software sequencers. Reason for this post-years ago, in the analog age (yeah now you know how old i am) I could sync analog synths with an analog-audio trigger-I did this with a Pro-One which sent a control voltage signal out with its built-in step sequencer. I was able to assemble my own control voltage device that would be sensed by another analog device-and keep their respective sequencers synced together. This was a long time ago-I don't remember exactly how I did it, but I recall before midi, my Korg Poly-61 had a simple arpeggiator-and i was able to sync the Pro-One and Poly 61 together-crude system but back then-there was no other means of creating a sync signal. There are ways to work around this-setting identical tempos on 2 or more devices and hoping for the best-have had some luck with a QY100 and PX560, but most devices aren't precise enough to do this without a clock signal. I am researching if there is currently some device that could connect to a keyboard without midi clock-that could create some kind of midi clock out-possibly based on an audio tone output-say a simple drum sound as a metronome that could create a synced midi clock. Even something that could use MTC somehow from my digital recorders to sync to keyboards that have no midi clock. Asking for alot here, but if anybody has any ideas-post back. I am seeing some devices that look like this can happen, but most so far are costing as much as the PX560 or more!
-
Version 1.0.0
22 downloads
Performance notes: 1. To start, begin percussion (pedal 2) and bass quarter notes. 2. When synth comes in, hold down pedal 1 and play bass chords in 2nd inversion (root in middle). Pedal 1 will trigger the arpeggiator to play the bass quarter notes so your right hand is free for the... 3. "Bell" synth is in the highest octave. 4. Guitar for verse is in the 2nd highest octave. OutOfTouch.mp3 -
Version 1.0.0
67 downloads
This one is maybe a bit too ambitious, but here it is. There are two stage settings and two phrases. The second stage setting is specifically for the bridge. One of the two phrases is set to the main phrase player for percussion. The other is mapped to the arpeggiator in zone 1. The latter is used for the percussion intro for the song. Instead of a quick sample MP3, I've included the whole song as I would play it live (hopefully, without the cringey mistakes) so you can see how it all fits together. Verse/Chorus Stage setting (Rio_____.ZPF): 1. The random arpeggiator uses the top E, F#, and B 2. Intro percussion is started by pressing the lowest C# (or lower) key. Start the main percussion (pedal 2) on the first downbeat of measure 5. Make sure when installing the files that the zone 1 arpeggiator points to the RIOINTRO.ZPH phrase. 3. Distortion guitar is in octave 5 4. Chorus "strings" synth is octave 3&4 5. At the beginning of the chorus, "reset" the percussion by pressing the stage setting button again. This compensates for the extra two measures in the song (the percussion phrase is four measures long). If you don't do this, the percussion won't feel right because it will be two measures off. Bridge stage setting (RioBridg.ZPF): 1. Originally, this was set to switch from the main stage setting with the pedal using a CC, but it turns out there is a problem with this. A non-hex-tone will sustain over a stage-setting change, but only if it's changed with a Program Change. The CC method of changing stage settings apparently doesn't work like this, so I had to time the switch just right so that the bass didn't cut out. instead, I gave up on that and just change it with the normal stage setting buttons. 2. This was a lucky bonus: the arpeggiator continues playing across a stage setting switch! So the "swirling" synth in the background makes use of the arpeggiator from the previous stage setting and you don't have to do anything to trigger this. 3. The voice for the solo I didn't want to sound too much like a saxophone, because... well... I'm playing a keyboard, not a sax, so I don't feel like it would have come across that well. There's a sax in one of the hex layers to at least suggest a sax lead. The synth also swells slowly for the last note held from the solo. I put Pedal 1 on sustain so you can either play a snare (which I decided I didn't like, but it's in the MP3 anyway), or get ready to switch stage settings. 4. When you switch back to the first stage setting, the arpeggiator switches back to the random pattern. I love my PX-5S! Rio_full.mp3 -
I currently have a PX-5S and I'm considering buying a MZ-X500. I was hoping folks on this forum could clarify a few questions I have, though. There are some features that would be showstoppers if they don't work they way I need: 1. I'm mostly envious of the rhythm section of the MZ-X500. I don't currently care much about the factory rhythms or chord accompaniment. I am mostly interested in just the percussion capability (for now) and would use that as a built-in drum machine. The way I envision using it is this: I program in the intro I want, as well as a verse loop (a 4 bar loop for example), a chorus loop that is a variation of the verse, and an outro. It seems like the MZ-X500 is probably well-suited to exactly that task, but I hadn't seen anyone using just the percussion without the chord accompaniment. Can it do what I'm describing? Would I be able to assign a pedal to switch between the verse and chorus? In contrast, the PX-5S only has one phrase loop available for percussion (technically, there is one more if you assign it to the keys in a zone), but it isn't practical for the intro/verse/chorus/outro structure that I'd like. Can I trigger it (preferably with the pedal) to do an abrupt stop (cesura) and then trigger it to start up again at the beginning of the phrase? On the PX-5S, I currently do this by assigning "Phrase Start/Stop" to the pedal. (Nevermind. I just found "Rhythm S/S" pedal assignment in the manual.) Can I mute certain parts of a drum track, for example, just the hi-hat? This probably also isn't a big deal because I'm imagining I could just copy a drum phrase into another variation with the hi-hats missing. 2. Is the tonewheel organ a simulator (built from independent audio-frequency oscillators), or sample-based? The documentation implies to me that it's sample-based. This doesn't really impact my decision to buy one, but I am curious. 3. Do the drums/percussion take up a zone? For instance, using percussion on the PX-5S realistically leaves me with only one hex-layer rather than the two it is capable of. I understand why this is the case, because the drum engine is quite powerful and needs that extra computing resource. Of course, the MZX is advertised as having four hex-layers, so this isn't really that big of a deal, either. 4. One of the limitations I have with the PX-5S is that the arpeggiator lock function locks all arpeggiators/phrases. So I can't have a phrase loop play continuously on one zone and simultaneously have another phrase play only when triggered on another. It looks like the pads on the MZ-X500 can be used to trigger the behavior I'm after, one phrase locked while the arpeggiator stays unlocked, for instance, but I wasn't clear on that. 5. What's the deal with the "upper" and "lower" parts? Do I not have the freedom to assign tones to any old range of the keyboard that I want? 6. Is the bass synth monophonic mode just for specific bass sounds? In other words, would I be able to apply monophonic mode to, say, a saxophone lead? It looks like "Legato mode" in the hex layers might be what I'm looking for, but I'm not sure on that. Thanks in advance for any input you may have!
-
OK how about this. Of course this idea will only work if Zex has the 3 pedal unit. Trigger the desired notes for the arpeggiator and the press and hold the Sustenuto pedal. As an alternative, he could get a MIDI Solutions Footswitch Controller with a seperate footswitch and program it to transmit sustenuto.
-
Playing a chord while pressing only one key
Brad Saucier replied to lume's topic in Privia Pro PX-5S
You could record a phrase that you can trigger from a key. The arpeggiator can be switched to a phrase player and the phrase can transpose depending on which key you press. -
XW-P1 vs. Behringer model D or Pro-1
Chas replied to Jokeyman123's topic in General XW Series Discussion
Yup, the XW's arpeggiator can trigger other synths quite impressively. The best thing is the accuracy of the XW's arpeggiator when manually retriggering an arpeggiated sequence via the keyboard. The XW quantizes far better than the arpeggiators in my Korg DW8000 and my Kiwi3P Roland JX-3P (the Kiwi3P upgrade adds an arpeggiator, the standard 3P does not have one). Only my Novation Bass Station 2 has an arpeggiator that matches the XW in usability, though the XW's have many more arpeggio presets as well as user programmable slots. Are you sure it was a MemoryMoog that you played around 1971-2? That model didn't come out until 10 years later (1981/ 2), and they were the last Moog made before the company was sold and eventually went bankrupt in the mid 80's. They were an impressive beast, but somewhat underdeveloped causing all sorts of niggles and instabilities. When working, they did sound absolutely glorious! http://www.vintagesynth.com/moog/memory.php When you talk about the "sound quality" of the Pro-One and Model D, are you literally asking about the quality of the output sound signal, or the character of the sound? In terms of "quality", with both the Pro-One and Model D being fully analogue VCO synths, there is likely to be more noise and variation in the signal by the very nature of them being VCO based. Obviously, the Casio XW being fully digital (VA Solo Synth), and more modern, is far more likely to have a "cleaner" signal with less noise or "dirt" in its outputs. If you're talking about sound "character", that's another factor entirely. The Pro-One and the Model D are famous for their unique sounds that instantly identify them, especially the Model D. A good analogy is to look at guitars, say, a Fender Telecaster, a Fender Stratocaster and a Gibson Les Paul. All three are electric guitars, all three are fundamentally similar with six strings, tuners, a fret board, electronic magnetic pickups and volume/ tone controls. However, each is sonically distinctive when played, each has it's own unique sound character and feel. Thus when you compare the Pro-One, the Model D and the XW Solo Synth, the same applies (though there are more differences in how each operates as a "mono synth"). The Model D is renowned for being fat, warm and pleasantly fuzzy, the Pro-One, despite only having two oscillators to the Model D's three, has more modulation options, a wilder filter and can do more varied sounds. The XW being all digital can sound much harsher, especially the filter on high resonance, but has more 'oscillators' to play with and can generate sounds that the Pro-One and Model D can't. Even though the XW's filter can be harsh at times, it CAN still sound fat and warm when programmed well. It really depends if you specifically want "THAT" Model D Moog sound, or "That" Pro-One sound, much the same if you were a guitar player and sought to have a distinctive Tele sound or Les Paul sound. Are you looking for a particular character of sound, or do you wish to have an audio paintbox with more colours? The Model D will sound like a Model D, the Pro-One will have characteristics of the Pro-One plus can do more, and both will have a unique character in a recording. The XW can get close to both, but doesn't quite have the same timbre in its sounds to pass off as either (then again, it also has its own sound characteristics too). Meanwhile, the Novation Bass Station 2 I mentioned in my previous post, that can get closer to both the Model D and the Pro-One and can do more still, plus still has that unique analogue feel about it. Best thing I suggest you do is get on YouTube and watch and listen to demos of all of these synths discussed. Even though YouTube uses compression, you'll still get a good idea of the sound characteristics of each synth. Oh and just to throw a curve ball, also check out the Behringer Crave and Neutron models. Both can sound incredible, and both are semi-modular. The Crave has a very unique sound despite being a single oscillator, and the Neutron is more flexible having two. However, like the Model D and Pro-One, neither has patch storage. That's where the Bass Station 2 scores a big win by being analogue and having full Sysex/ CC as well as decent patch storage. I'm curious to see what conclusion you will make! Maybe you specifically wanted a Pro-One or Model D sound, or maybe like me, you wanted some of the flavour of those vintage synths but despite their legacies, the extra features and control of synth such as the Bass Station 2 wins you over. Time will tell! -
XW-P1 vs. Behringer model D or Pro-1
Chas replied to Jokeyman123's topic in General XW Series Discussion
Jokeyman123, I found myself in a similar position to you by wanting to complement my XW's (and other synths) with an oldschool analogue synth. Of course, the thing to bear in mind is that the XW-P1 is a multi-engined digital synth that can do a good VA mono synth emulation with its Solo Synth section. However, it's digital and sometimes it shows (filter stepping/ zipping plus harshness of high filter resonance, and occasionally a digital sounding overall tone for instance). Furthermore, one of the things that really makes the character of a real analogue synth is its filter, and also its amp stage. So much so, that with many legendary analogue synths its the filter design most of all that really makes it stand out, i.e. Moog Ladder Filter (MiniMoog), Korg MS10/ 20 filter, Roland Diode filter (TB303), Roland IR3109 filter (Jupiters, Junos, JX-3P, SH101 etc.), SSM/ CEM filters (SC Prophet 5/ Pro One) and so on. Additionally, the signal path being VCF or DCF can make a big difference too, with VCF's being more fluid though often at the expense of being more unstable compared with DCF. Both the Pro One and the Model D are vintage based mono synths using pure analogue circuitry, everything from the oscillators to the amp and filter (VCO, VCA and VCF). Both are legendary mono synths famous for their unique sounds. The Model D is FAT (it has THREE oscillators!), and has been used on so many recordings as a bass synth, as well as for leads (much of the bass on Michael Jackson's "Thriller" album is MiniMoog). The Pro One isn't as fat sounding, BUT, it has more modulation options, is much more flexible and is capable of a wider variety of sounds. Vince Clarke (Depeche Mode, Yazoo, Erasure) used one extensively in his early career. IIRC, many of the Yazoo songs are almost entirely recorded with the Pro One. Also bear in mind that both the Model D and the Pro One have no patch storage. Every sound you want, you have to program it manually, every time. And you have to remember the settings for each specific sound/ patch you make and reprogram them back in whenever you change one of the controls. This sometimes leads to finding a wonderful patch, experimenting with the controls to design another patch, and then never quite being able to reprogram that wonderful patch you once had exactly the same again. The frustration! Oh, and also remember that when you have a Model D, it is instantly identifiable sonically as a Model D, with the Pro One slighter less so because it's more flexible. This can be an issue when you want to find a "new" sound that doesn't automatically tie it famous recordings from the past. With the above in mind, when I decided to add an analogue mono synth to my rig I completely changed my original choice that I'd had for years. I'd always dreamed of having a MiniMoog or an ARP Odyssey having grown up listening to and being inspired by both Gary Numan, and Billy Currie (Ultravox). Numan used a MiniMoog and a PolyMoog extensively on his early albums, and Billy Currie famously used his Odyssey for those screaming leads and soaring solos. As wonderful as those synths are, the lack of patch memory and their uniquely identifiable sound lacking some sonic flexibility could be a negative. I read loads of reviews and did a bunch of research to look at all the potential mono synth options sub $400, and time and time again, one model kept coming up - the Novation Bass Station 2. Yes, it's a dual oscillator DCO rather than a VCO synth (DCO is still analogue, just under digital control), but it has patch storage and full MIDI CC/ SYSEX control. It also had loads of modulation options, two switchable filters (Classic and Acid), with switchable slopes (12db/ 24db), plus HP/ LP and BP modes. If also has a variable filter overdrive circuit for pushing and saturating the filter hard. It also has PWM and a load of other features, such as an arpeggiator, step sequencer, velocity and aftertouch keyboard, dual LFOs/ Envelopes, duophonic mode (similar to the Odyssey) and more. It has lots of modulation options making it incredibly flexible and able to create a very wide range of sounds. It can get Moog'ish if you want, and also do Odyssey style screaming, as well as TB303 acid. It really is an incredible little synth, and Novation still support and add features via firmware updates quite a few years since it was released. Anyhow, if you want THAT Model D or Pro One sound, then get one of the Behringers. If you want a much more flexible mono synth that can easily integrate into a modern DAW set up, as well as have a huge potential range of sounds and capabilities plus patch storage, I can heartily recommend the Bass Station 2. Oh yes, if you do go with one of the Behringers, as Mike said above, you can trigger them via the XW. You can also use the XW arpeggiators with them, and I did just this with my Roland JX-3P. The XW arpeggiators absolutely wiped the floor with my (Kiwi3P upgraded) 3P arpeggiator and made it sound fantastic! -
I've been contemplating buying a vintage Casiotone 1000p - while the synth engine isn't the most awesome, I really like the innovative arpeggiator it has. The one thing that keeps me from pulling the trigger is the lack of a MIDI interface. Not knowing if anyone from Casio ever drops by these forums, I thought I'd put out my wish for a revamped 1000p. Things to keep: - arpeggiator, particular the way it is programmed - basics of the synth engine (it may not be the best, but for what it does, I think it is pretty cool - see things to add to where I think it would make what is there better) Things to expand: - memory slots (so more patches/arpeggiator patterns can stored) - # of simultaneous voices (16-32 would be my wish) Things to consider adding in order of my personal pref: - MIDI in/out/thru - arpeggiator can receive and send MIDI clock - velocity sensitivity on the keyboard to affect volume (amplitude) and filter - aftertouch to affect filter, volume, pitch, and lfo rate - pitch bend wheel or joy stick - additional effects: reverb, flanger, phaser, and gated reverb - filter wheel or joy stick - lfo wheel or joy stick - weighted keys Things to consider dropping: - speaker
-
XW synths have a step sequencer and phrase sequencer that can be used trigger a note in zone 1. Have you tried those? I think the arpeggiator could even be used.
-
MZX500 HONEST REVIEW AFTER A YEAR OF USE
Brad Saucier replied to brownysweet's topic in MZ-X500 / MZ-X300
There is one arpeggiator. It can trigger up to two zones at once. -
recently purchased this board, and getting a feel for the arpeggiator. The hold feature on it makes sense, but I have a question. I know I can have each zone trigger a different arpeggio, but can I have one zone on arpeggio hold with another merely having it on (but not on hold). It seems right now as if the hold feature affects all zones, or none at all. Thanks!
-
Both the XW-P1 and XW-G1 synthesizers provide three independent and quite different types of sequencer: the step sequencer, the phrase sequencer and the arpeggiator. You might not recognize the arpeggiator as a sequencer but that is what it is, the only difference being that the notes it sequences are based on the keys that you hold down (or latch). All three of these sequencers are typically used more-or-less independently. For example, play a backing rhythm using the step sequencer while using the argeggiator in a zone to play a note sequence with one tone while periodically triggering a phrase in another zone with another tone. However, the XW synths contain a number of features that can tie two or even all three of the sequencers together into a seamless, synchronized whole that is more than the sum of its parts (the definition of "synergy"). It may seem serendipitous (by chance) to us but I have a hard time believing that the XW’s designers who added these features didn't know exactly what they were doing. The first feature is called Sync. You’ll find it described, somewhat confusingly, on page E-40 in the XW-P1’s User Guide and page E-41 in the XW-G1’s User Guide. When it is turned on it starts the step sequencer when an arpeggio starts playing, which of course happens as soon as you press one or more keys in an area (note range) of the keyboard in which the arpeggiator is enabled. If you are playing in Performance mode that range is determined by the Performance parameters ArpKeyRgLo (Arpeggio Key Range Low) and ArpKeyRgHi (Arpeggio Key Range High). The Sync feature can also stop the sequence automatically when you release the keys (or release the "hold" condition if you used that to keep the arpeggio going without needing to keep pressing keys); the "S/S" setting enables that. The other feature doesn’t have a name. It is the ability to start and stop a specified phrase from the fourth control track (Ctl4) of the step sequencer. You’ll find the parameters for that feature described on page E-56 in the XW-P1’s User Guide and page E-57 in the XW-G1’s User Guide. I have previously described here in this forum one way to use that feature, allowing phrases to be selected using the step sequencer’s pattern buttons. But it can also be used merely to synchronize a phrase to the step sequencer. Note that a phrase initiated from the step sequencer is actually independent of a phrase initiated from the phrase sequencer, the latter done using the PLAY/STOP button in the PHRASE SEQ area of the front panel. Hence the XW-P1 can be playing two independent phrases at any given moment. The XW-G1 can actually play up to four phrases independently, since two additional phrases can be initiated from the multi-function area of the keyboard. If you count the G1's independent sample looper as another phrase (because it can easily record phrases played by the G1 itself) then five phrases can be happening at the same time. With all that going on plus the step sequencer who needs to actually play the keyboard?? There is yet another interaction between sequencers, this one between the primary phrase sequencer and the arpeggiator. If a phrase is started by hitting PLAY/STOP in the PHRASE SEQ area of the panel while the arpeggiator is also active, the arpeggiator behaves as if the notes played by the phrase sequencer are actually being pressed on the keyboard. Those that are in the range over which the arpeggio is enabled then supply the arpeggiator with its source notes. Furthermore, if KEY PLAY is enabled then pressing a single key in an area enabled for both the phrase sequencer and the arpeggio will immediately transpose the phrase and hence transpose the source notes for the arpeggio. This is powerful stuff. (Note that if you DON'T want such behavior you need to enable the phrase sequencer and the arpeggiator in different zones or in different key ranges within the same zone.) So, to recap: The step sequencer can be started automatically, and optionally also stopped, when we play an arpeggio. A phrase can be started when the step sequencer starts playing or indeed at any time during a pattern, depending on which step(s) in the pattern the phrase start command appears. If the step sequencer is started by the arpeggiator and a phrase is started by the step sequencer then all three can start at the same time. Finally, if a phrase is started from the PLAY/STOP button on the panel then that phrase can be used to automatically change the notes played by the arpeggiator. What can we do with such synchronization? Here are a couple of ideas: (1) The control tracks of a step-sequencer pattern can rhythmically modify parameters like volume, filter cutoff, pan position or even tempo while an arpeggio is playing using the four control (Ctl) tracks. For example, if we arrange an arpeggio to play an upward sequence of four eighth notes from a fingered four-note chord we could also program a step-sequencer pattern to increase volume and raise the filter cutoff with each cycle of the arpeggiator by programming those tracks with a half-note step size. This could go on for eight cycles, then the cutoff and volume could be progressively lowered back down to their original settings on the next eight cycles, after which the pattern repeats. The resulting “composite” sequence is sixty-four notes long and it is chord-interactive (because of course the arpeggio is chord-interactive). The only other way to accomplish such a long sequence on the XW-P1 would be to chain four 16-note patterns together but the result would not be chord interactive (but could still be transposed). (2) A user arpeggio is set up that does nothing (!) The arpeggio's Sync option is set to "S/S." This “null” arpeggio is enabled in a zone, which consequently becomes silent (because the null arpeggio has no notes). However, the zone's noble sacrifice allows the step sequencer to be started and stopped by pressing a single "trigger" key without an accompanying arpeggio. For our trigger key we choose C3 immediately above the un-transposed first octave of the keyboard. We use the step sequencer to call a phrase using part 8 set to an acoustic-guitar tone (we could choose part 1 or any one of parts 8 to 16). The phrase implements an acoustic-guitar strum or perhaps a complete rhythmic strumming pattern that we sourced from the internet or created ourselves in a PC-based MIDI sequencer. We enable KEY SHIFT on the panel. We now use our left hand to press the trigger key, producing our strum or strumming pattern in the original key. Simultaneously pressing the trigger key and another key in the octave below it with our left hand produces a transposed strum or strumming pattern. We thus produce a rhythm-guitar accompaniment with our left hand while our right hand is playing a melody in another zone using another tone. Need different kinds of strummed chords? Then create phrases for them, call each up using a separate pattern and then select them during live play using the pattern buttons, as described here. Think of this as "Motif Lite." PS. I have added a gratuitous shot of Amy Poehler and Bradley Cooper comping on a keyboard from the film "Wet Hot American Summer." It has nothing to do with the post but it's funny and some people just won't read long articles without a picture or two attached.

-
Assigning different arpeggios and phrases to different channels
AlenK replied to sslyutov's topic in XW Sequencing
If by assigned buttons you mean the eight sequencer pattern buttons, each pattern button can be programmed to select its own phrase. The button actually selects a pattern which in turn selects a phrase. Only one pattern/phrase can play at any given time. Depending on how you program the patterns you can arrange for two different modes of operation. In one, the pattern buttons merely select phrases that you must then start (and optionally stop) using the START/STOP button (or the foot pedal assigned to do that). That mode of operation is described here. In the second, alternate mode of operation pressing a pattern button will immediately play the phrase; that mode is described here. Samples can't be selected or started from the pattern buttons on the XW-P1 simply because it doesn't have user samples. (All the internal sounds are based on samples, of course, but those are for notes of each tone; one wouldn't normally want to trigger those by anything other than keys on the keyboard, even the drum tones.) On the XW-G1 I suppose it would be possible for a multi-function key or a pattern button to play a user sample by assigning it to a particular otherwise-unused part and playing the part with a single-note phrase triggered by that key or pattern button. The XW synths only have the one arpeggiator in the strict meaning of the term where the notes it plays depend on which keys you hold down. What Yamaha calls an arpeggiator can also play phrases, which don't typically depend on what notes you hold down (except possibly for transposition). Playing phrases is a separate function on the XW. -
Please recommend me an audio interface for recording the PX5S
Brad Saucier replied to dc2k's topic in Privia Pro PX-5S
I wanna say the arpeggiators will only respond to keys being played. You could play the keys to trigger the arpeggiator and record those arpeggio patterns into the DAW. It would then play back what the arpeggiator did. Just a thought.