Brad Saucier
-
Posts
8,742 -
Joined
-
Last visited
Content Type
Profiles
Forums
Downloads
Everything posted by Brad Saucier
-
It's possible several flash drives could be faulty in a row. I've seen it happen. I would try the new flash drive, one from a well known brand. Keep us updated.
-
What happens if you try to record something with the audio recorder?
-
MIDI Driver needed (WK-3000) - Windows 10
Brad Saucier replied to TBBCD's topic in General Casio Discussion
At the keyboard, connect the MIDI IN plug on your cable to the MIDI OUT port on the keyboard. OUT goes to IN. IN goes to OUT. Do not connect OUT to OUT or IN to IN. -
MIDI Driver needed (WK-3000) - Windows 10
Brad Saucier replied to TBBCD's topic in General Casio Discussion
Double check your connections. MIDI OUT goes to IN, and IN goes to OUT. -
MIDI Driver needed (WK-3000) - Windows 10
Brad Saucier replied to TBBCD's topic in General Casio Discussion
WK-3000 does not have a USB port. It has MIDI ports. A computer requires a MIDI adapter. What are you using to adapt the MIDI ports to your computer? That is the only thing which would need a driver. -
Sustain Pedal Polarity
Brad Saucier replied to Mario79's topic in General CT-S1000V and CT-S500 Discussion
The PX-560 is designed to work with the SP-33 three pedal board. It connects to a port located below the piano. It should not need "polarity" adjustment. -
Sustain Pedal Polarity
Brad Saucier replied to Mario79's topic in General CT-S1000V and CT-S500 Discussion
Connect a standard TS plug switch type pedal and turn on the PX-560. Do not touch the pedal until the main screen has appeared. The 560 will automatically detect "polarity" and adapt. -
Casio 6000 sometimes plays wrong notes.
Brad Saucier replied to Afeskens's topic in Privia PX-S7000 / PX-S6000 / PX-S5000
Contacting Casio service is the official channel for problems like this. They'll offer either repair or replacement. You are the first I have seen with this issue. I would be surprised if they have seen something like this before. -
Unfortunately that is what it is designed to do. I don't know of a way to synchro stop the drum pattern without accompaniment.
-
Oh I'm sorry, I misread your post. For synchro stop, you should be listening to accompaniment playback first. Press the synchro stop button and confirm the display is flashing as shown in the manual. Play a chord in the accompaniment section and then release it. The rhythm should stop.
-
1. Turn the keyboard off and back on. Hold the store button and press a registration button to store the default setup for recall later. 2. Turn on accompaniment. Turn on synchro. Playing a chord in the chord section will start playback of the rhythm.
-
Casio 6000 sometimes plays wrong notes.
Brad Saucier replied to Afeskens's topic in Privia PX-S7000 / PX-S6000 / PX-S5000
That doesn't sound like any normal behavior unfortunately. As with anything under warranty, I would contact the manufacturer, in this case Casio service in your region of the world should be able to help. -
Disable the pedal for the parts you don't want it affecting. To do this, press Function>Controllers(Cntrllr)>Pedals(Pedal)>Pedal 1 Enable(PD1Enbl)>Upper 1 Pedal 1 Enable (Up1Pd1Enb)>OFF. Upper 2, Lower 1 and Lower 2 enable settings are also located here.
-
set split points for each layer?
Brad Saucier replied to methodman3000's topic in CT-X3000 / CT-X5000
There is only a single split point for layered tones. You can move the split point by holding the split button and pressing the key you want. -
CDP-135 is a class compliant USB MIDI controller. Microsoft supplies the driver for Windows 11 and automatically installs it when the keyboard is first connected by USB. "Casio USB MIDI" will be the name of the device you can select as MIDI input and output in any MIDI capable software.
-
How to control MIDI velocity on the PX - 350m?
Brad Saucier replied to Bruno Barcks's topic in Privia x50 x60 Series
Are you saying that with touch response turned off, it still has touch response when used as a MIDI controller? That should not be happening. -
Closest equivalent new model would be a 61 key CT-X5000. 76 key models are currently not available. I'll summarize some, not all differences. CT-X5000 adds expression pedal input jack while removing the instrument input jack found on the WK-7600. SD card slot is replaced with a USB flash drive port. Other input output jacks are the same. CT-X5000 does not run on batteries. Speaker power increased to 15 watt x 2. Sliders are removed. Drawbar organ modelling is removed. DSP effects increase substantially with the CTX series. A wide variety of new tones and rhythms have been added. Phrase pads are added. CT-X3000 is mostly similar to the CTX5000 but removes tone and rhythm category buttons, line out jacks, mic input. Speaker power is 8 watt x 2. CT-X3000 retains the WK-7600 battery powered option.
-
How bright you can get depends on the sampled waveform you choose. 4 different velocities were sampled from the real piano. Of the raw waveforms available, level 4 is the brightest and loudest. Filter cutoff can be adjusted to reduce the brightness of the raw wave. Wave levels 1 to 3, the raw samples are not as bright.
-
How to control MIDI velocity on the PX - 350m?
Brad Saucier replied to Bruno Barcks's topic in Privia x50 x60 Series
What happens whenever you go into the function menu and adjust touch response to various settings from off to light (1), normal (2), heavy (3)? -
What do the numbers on the hammer mean?
Brad Saucier replied to Casipx160's topic in General Casio Discussion
They are grading numbers, since the weights are different for different keys. You'll need to match the same number for replacement. -
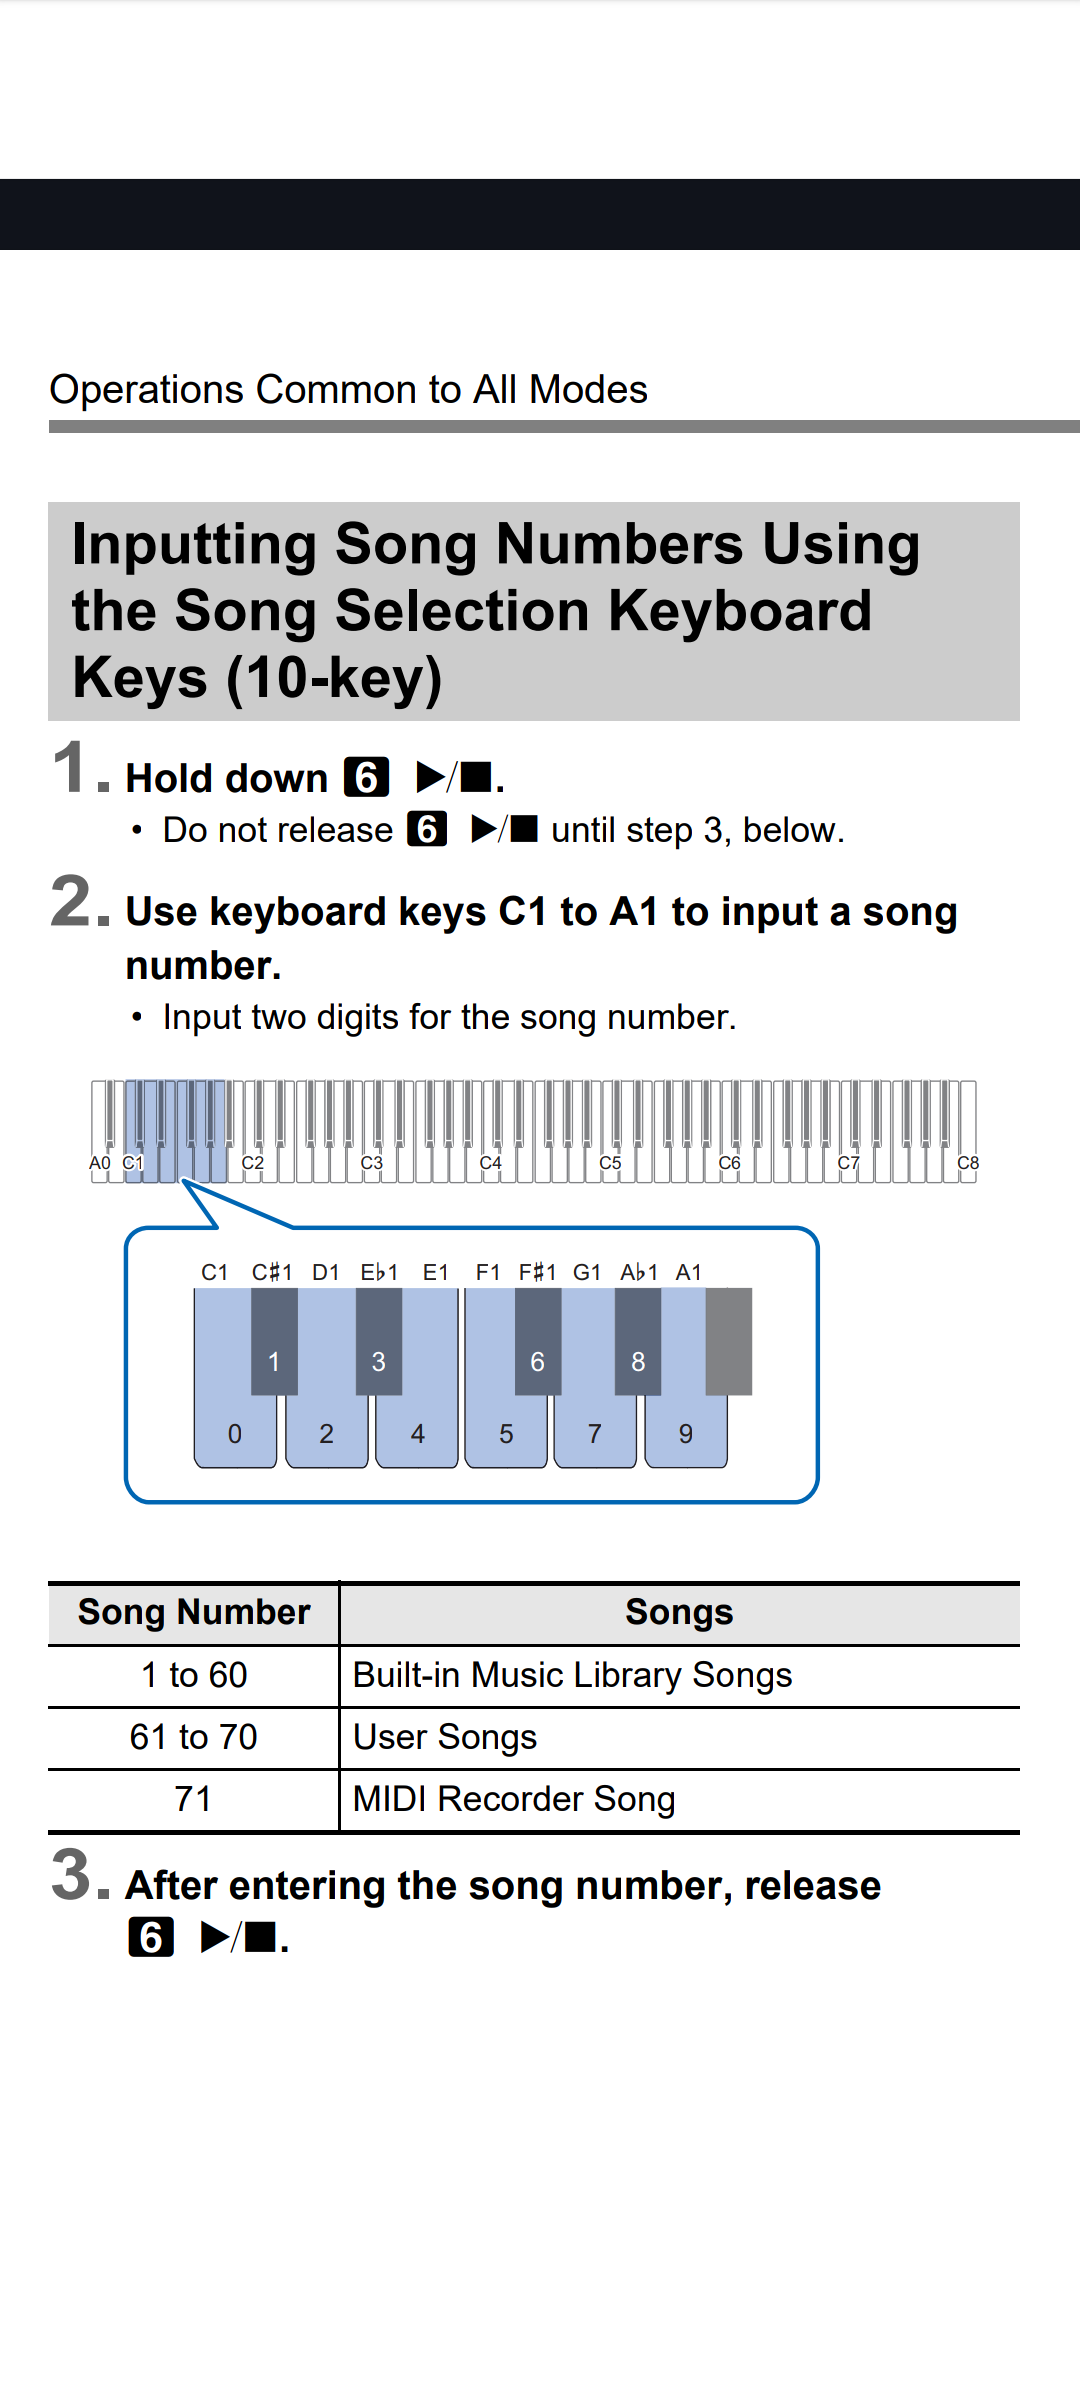
You are combining steps from two different processes (recording a MIDI song + exporting to USB) into one. That is not correct. To clarify how the system works, the built in Audio and MIDI recorders behave differently. Audio records directly to USB flash drive. MIDI is recorded directly to internal keyboard memory. You will never need to specify a USB folder during the MIDI recording process. You do not need to mount a USB flash drive to record MIDI. I would not mount a USB flash drive until you are familiar with the MIDI recording process. Step 1. Create a MIDI recording. Play it back to make sure it is what you wanted to record. This will confirm it is stored in keyboard memory. Stop playback. Step 2. Insert a USB flash drive. Step 3. Enable MIDI mode by holding FUNCTION and pressing F6. Step 4. Input the user song number you wish to export by holding the start/stop button and pressing the number keys. Hint: 61 through 70, see the attached screenshot of the user manual for details. Step 5. Specify song export format as SMF and execute by holding the function button and pressing the sequence G1 followed by C. The sound mode lamp will flash and then illuminate sequentially during this process. Lamps will go dark when complete.

-
Exit the edit menu to return to the main screen before pressing write>stage setting.
-
Only difference is the number of keys. 76 vs 61
-
Fix or replace Casio CGP 700
Brad Saucier replied to replace casio cgp 700's topic in PX-360 and CGP-700
Blow air between the problem keys to clean and reset the sensors. -
octave function not working on a WK7600
Brad Saucier replied to smiggell's topic in WK-7500/7600 - CTK-7000/7200
Long pressing the octave button opens the octave menu. With the octave menu open, short pressing the button should cycle through any active upper and lower parts and then exit the menu. Have you confirmed split mode is still active while in the octave menu, to make sure something funny didn't happen to the layer button?